TM - Tasks
The Task Manager module is designed to help users efficiently plan, organize, and track tasks within a selected Organization, Business Unit, and Project. It provides a centralized grid-based interface where all task-related information -such as planned dates, actual progress, hierarchy, and completion status-can be viewed and managed in one place.
The module is built to support real-time updates, allowing users to directly edit and manage tasks without navigating across multiple screens. It also supports hierarchical task structures, enabling users to group related tasks under parent tasks for better organization and tracking.
Accessing the Task Manager
To access the Task Manager, navigate through the application menu:
Home > Task Management > Task Manager
Once selected, the Task Manager page opens with a structured layout that allows users to begin workingimmediately.
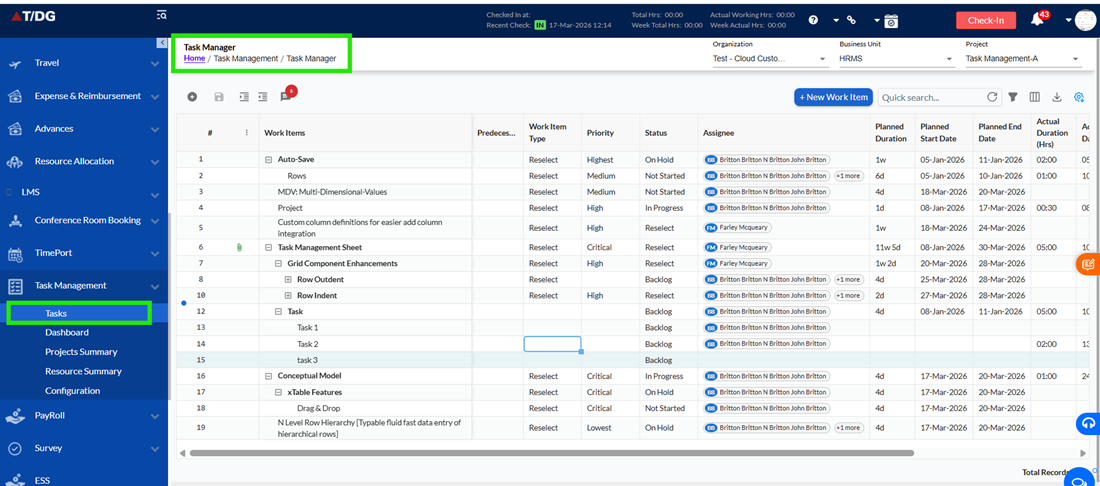
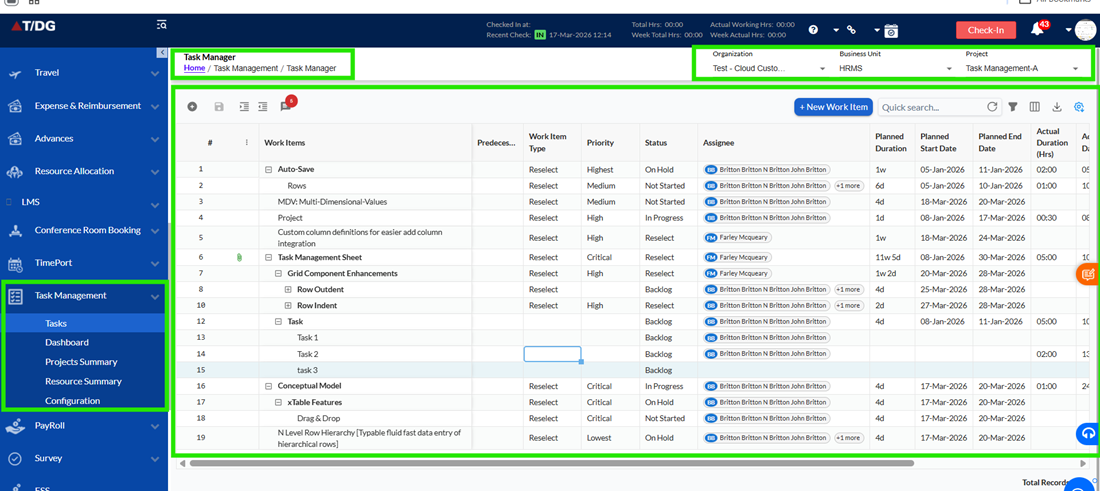
Task Editor - Understanding the Page Layout
When the Task Manager page opens, the screen is divided into three main sections.
On the left side, there is a navigation panel that allows users to switch between different modules such as Dashboard, Project Summary, Resource Summary, and Configuration.
At the top of the page, users must select theOrganization, Business Unit, and Project. These selections are mandatory and act as filters. Only the tasks relevant to the selected values will be displayed in the grid.
The main area of the screen displays theTask Grid, which is where all task-related operations are performed.
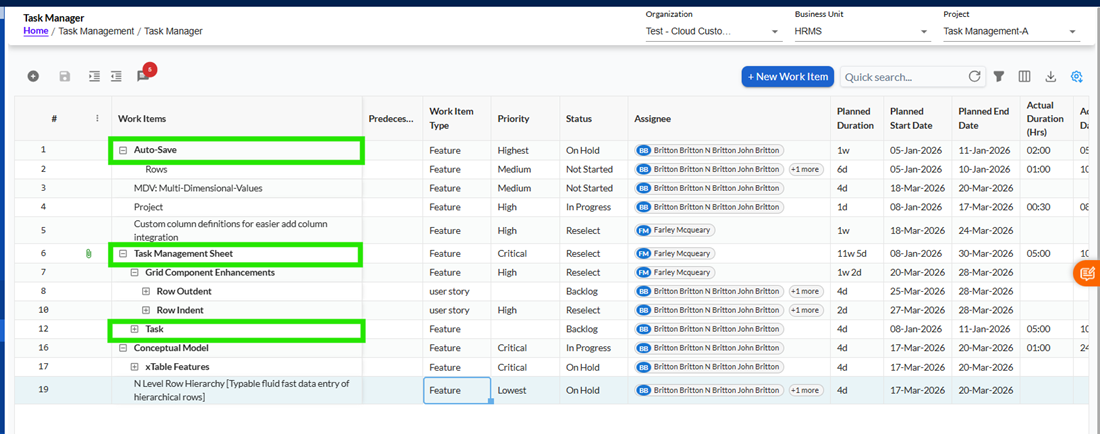
Working with the Task Grid
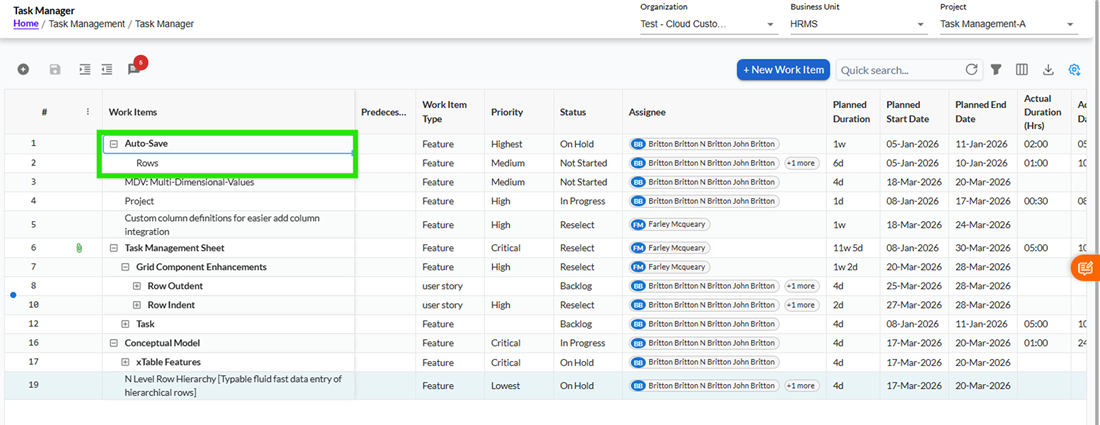
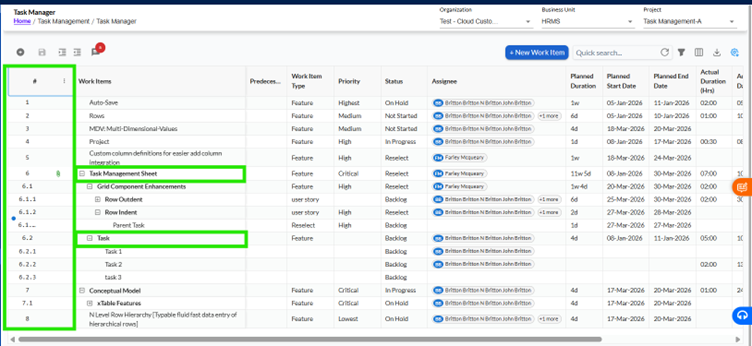
The Task Grid is the central working area of the module. Each row in the gridrepresentsa task. Tasks can either exist independently or be structured under a parent task to form a hierarchy.
Parent tasks are visually distinguishable by appearing inbold, and users can expand or collapse them to view or hide their child tasks. This makes it easier to manage large sets of tasks without cluttering the screen.
The grid supports inline editing, which means users can directly click on any editable cell and update its value without opening a separate screen. All updates reflectimmediately, making task management fast and efficient.
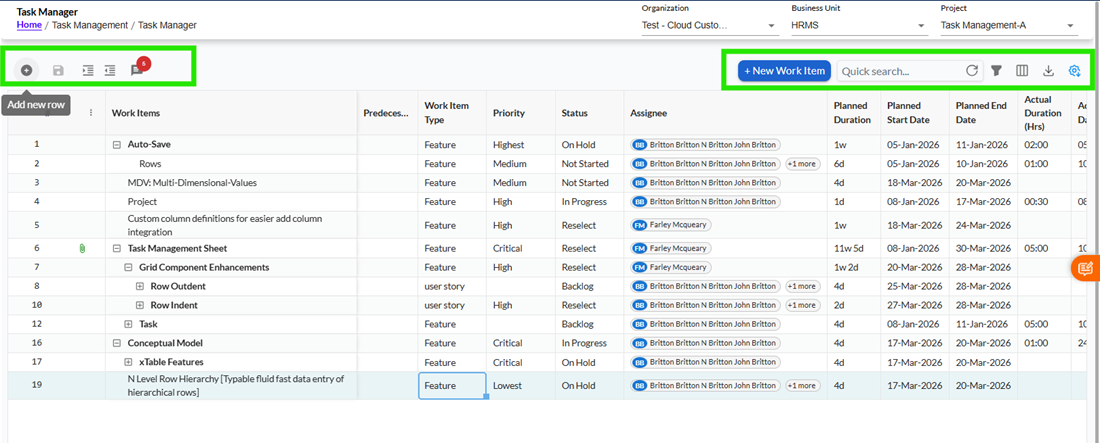
Using Grid Controls
At the top of the grid, users will find a set of controls that allow them to perform different actions.
On the left side, options such asAdd New Row, Save All Rows, Indent, and Outdentare available. These controls help users create new tasks, save changes, and manage task hierarchy.
The Add New Row option allows users to insert a new task directly into the grid. Additionally, users can also insert tasks between existing rows using aplus (+) icon, providing a seamless experiencelikeLoop-style editing.
Indent and Outdent options are used to structure tasks. Indenting a task makes it a child of the task above, while outdenting removes that relationship.
On the right side, users will find options such asCreate New Task, Search, Filter, Column Visibility, Export, and Settings. These controls help users quicklylocatetasks, customize their view, and manage data efficiently.
Creating a New Task
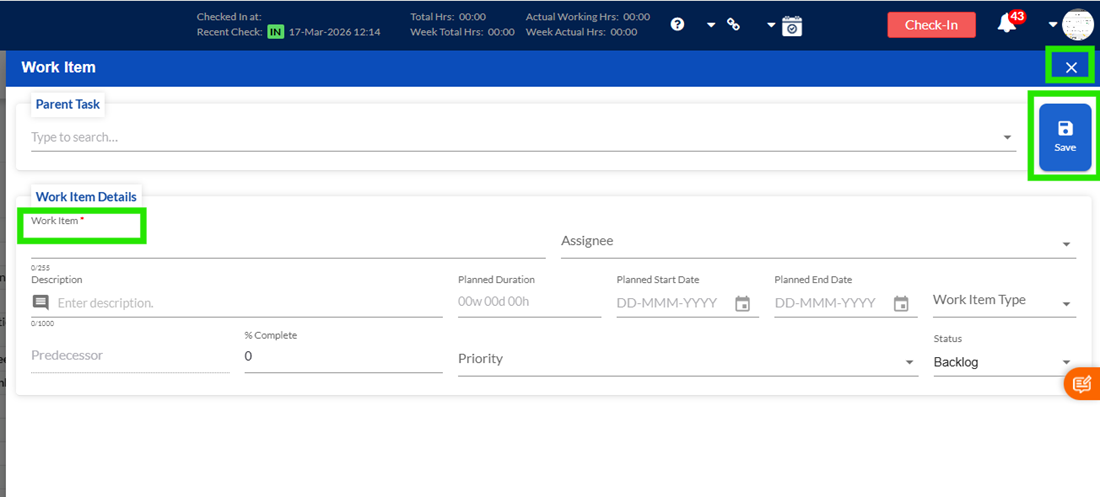
To create a new task, users can click on theCreate New Taskoption available at the top of the grid. This opens a popup window where task details can be entered.
TheWork Itemfield is mandatory and must be filled before saving the task. Once all required details are entered, clicking on the Save button creates the task and adds it to the grid.
If the user decides not to create the task, they can close the popup using the close (X) icon, and no data will be saved.
Managing Task Hierarchy
Tasks in the grid can be structured in a parent–child format torepresentdependencies or grouped work.
When a task is indented, it becomes a child of the task above it. This allows users to organize tasks logically under broader categories. Outdenting a task removes it from the hierarchy and makes it an independent task.
This structure helps in better visualization and tracking of related work items.
Tracking Task Progress
The systemprovidesa flexible way to track task completion using the% Complete field.
The value can be automatically calculated based on work logs entered by the assignee. This system-calculated value is displayed ingray,indicatingthat it is derived from actual work.
Managers alsohave the ability tooverride this value by entering a manual percentage. This overridden value is displayed inblack, and the original calculated value is shown in brackets for reference.
This approach ensures transparency while allowing flexibility in progress tracking.
Understanding Dates and Duration
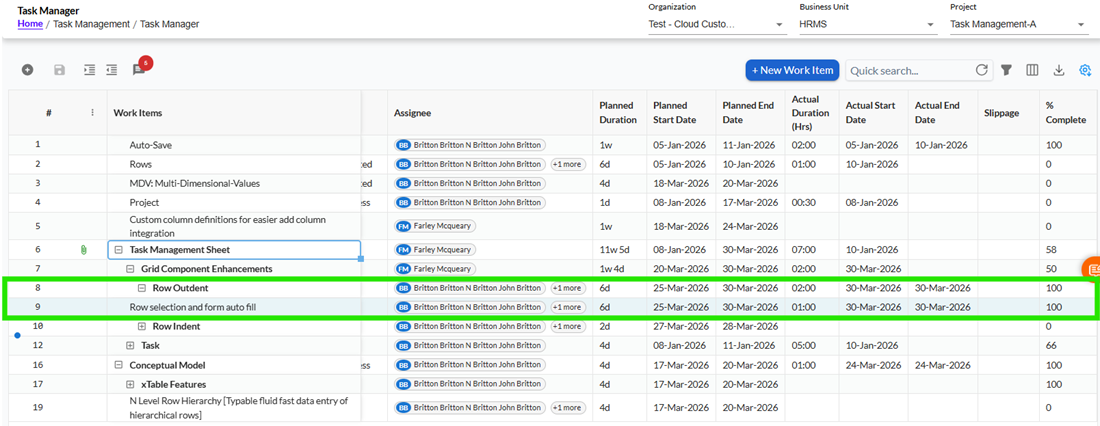
The system automatically manages Actual Start Date, Actual End Date, and Actual Duration based on work logs.
The Actual Start Date is populated when work begins on a task, and the Actual End Date is populated when the task is100%completed. The Actual Duration reflects the total effort spent.
The system also calculatesslippage, which is the difference between the planned end date and the actual end date. This helps usersidentifydelays in task completion.
Default Taskbehaviour
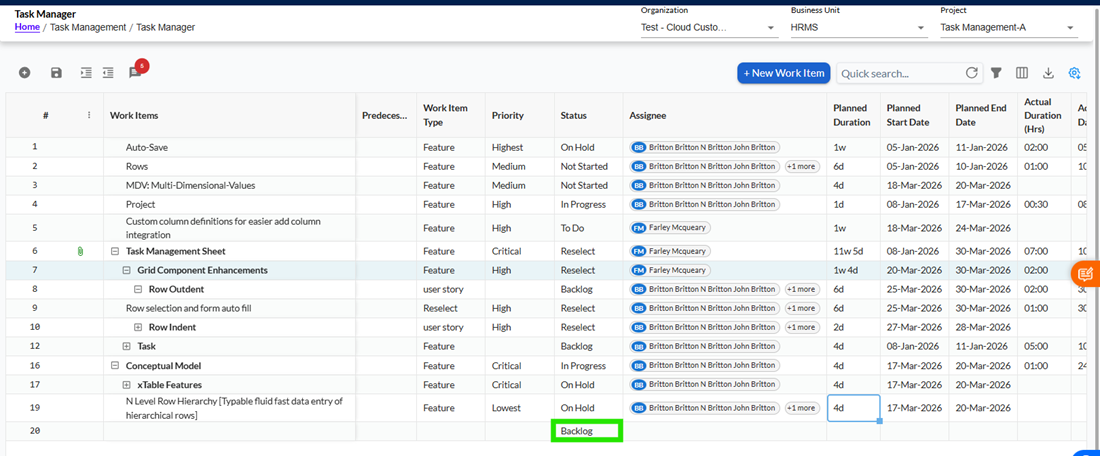
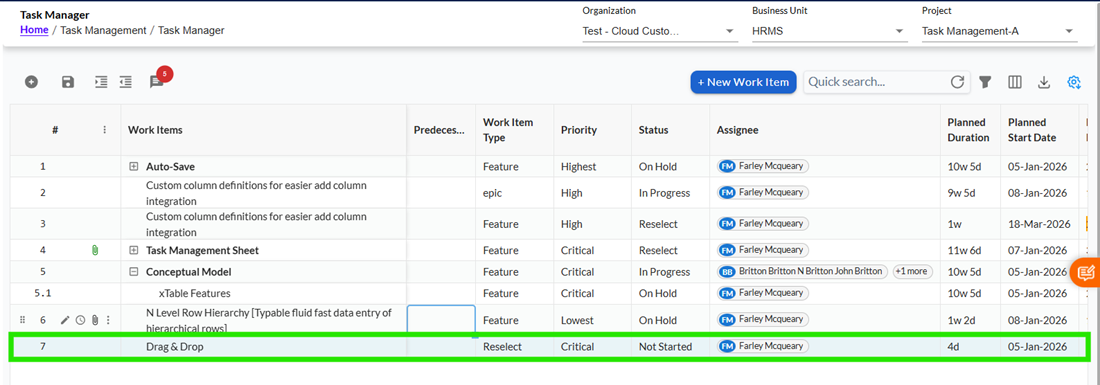
Whenever a new task is created or inserted into the grid, its status is automatically set toBacklog. This ensures that all new tasks are tracked from a consistent starting point.
Users can later update the status based on progress.
Working with Attachments
Within the Task Editor popup, users have the option to attach files related to the task.
Users can upload, view, ordeleteattachments. Each attachment includes details such as file name, size, date, and the user who uploaded it.
This helps inmaintainingall relevant task-related documents in one place.
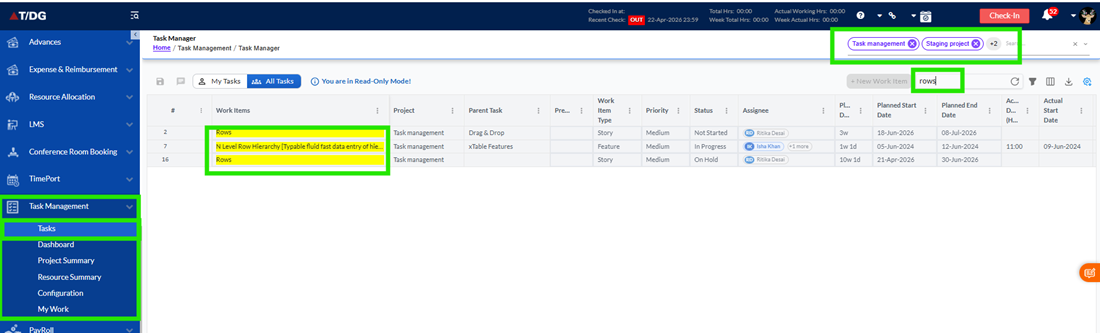
Using Filters and Search
To quicklylocatetasks, users can use the search bar available at the top of the grid.
Additionally, the filter option allows users to define specific conditions and apply them to the grid. Filters can also be saved for future use, making it easier to repeatedly access filtered data.

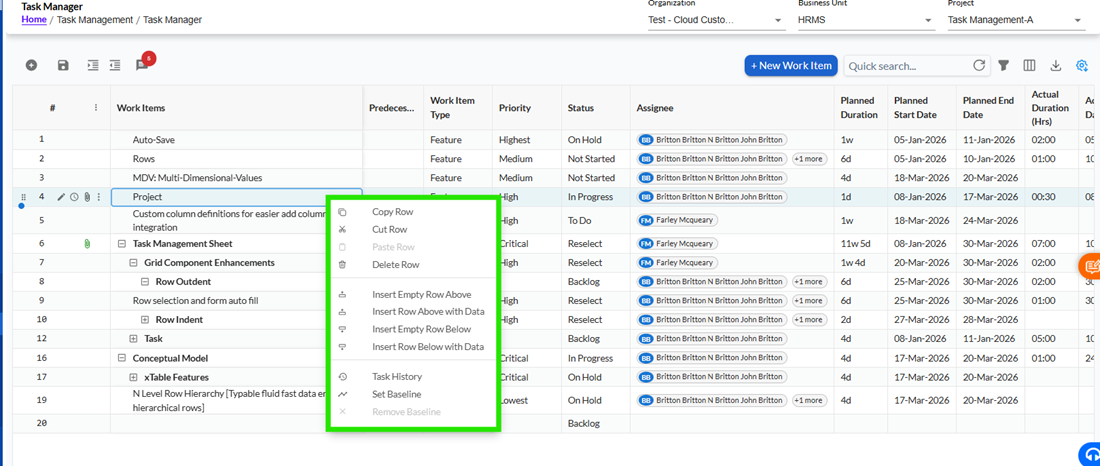
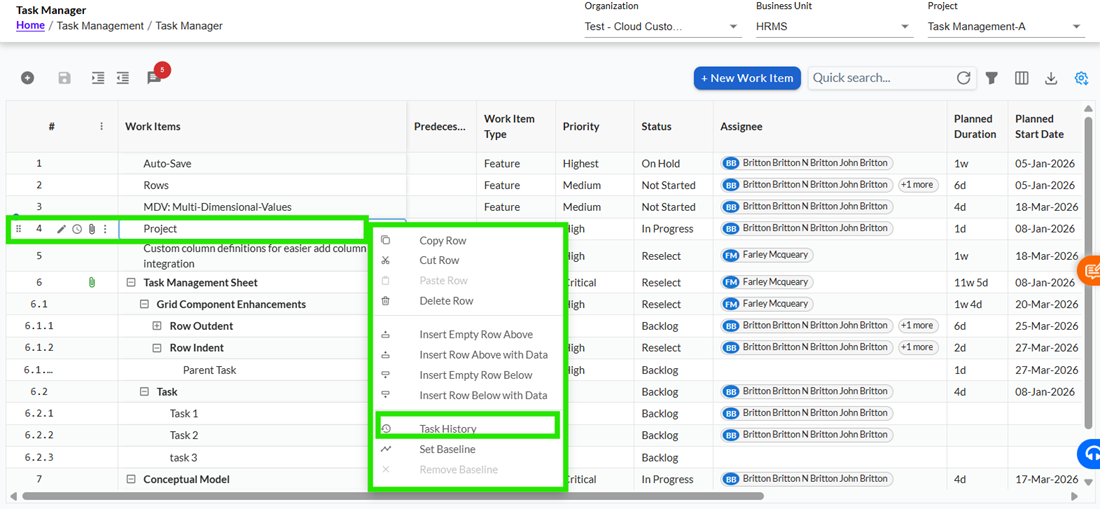
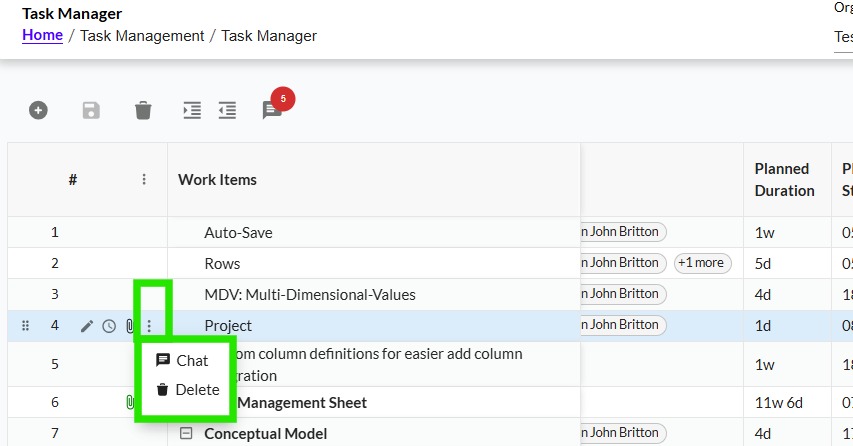
Row-Level Actions
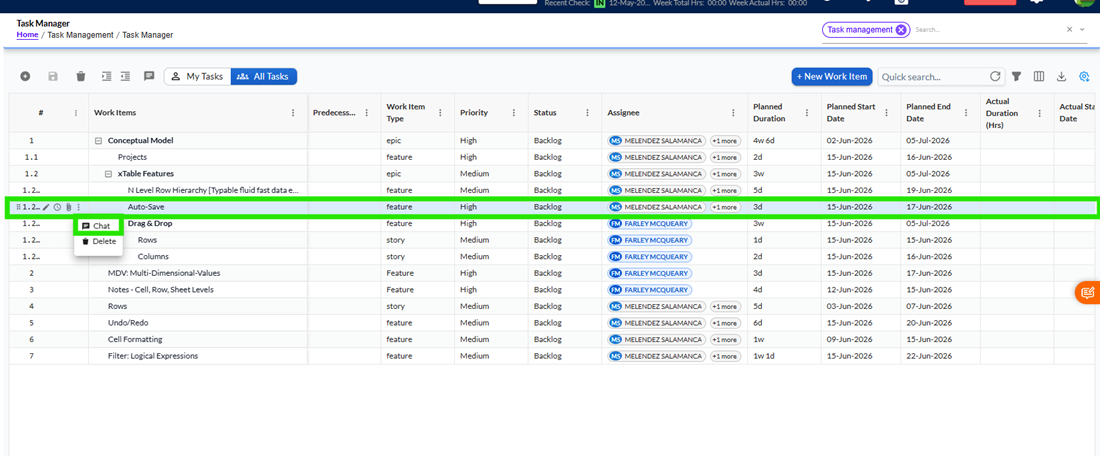
Each task row providesadditionalactions through a right-click menu or action icon.
Users can copy, paste,delete, or insert rows above or below. If a task has child tasks, the system prompts the user for confirmation before deletion to prevent accidental data loss.
Users can also access task history to view past changes.
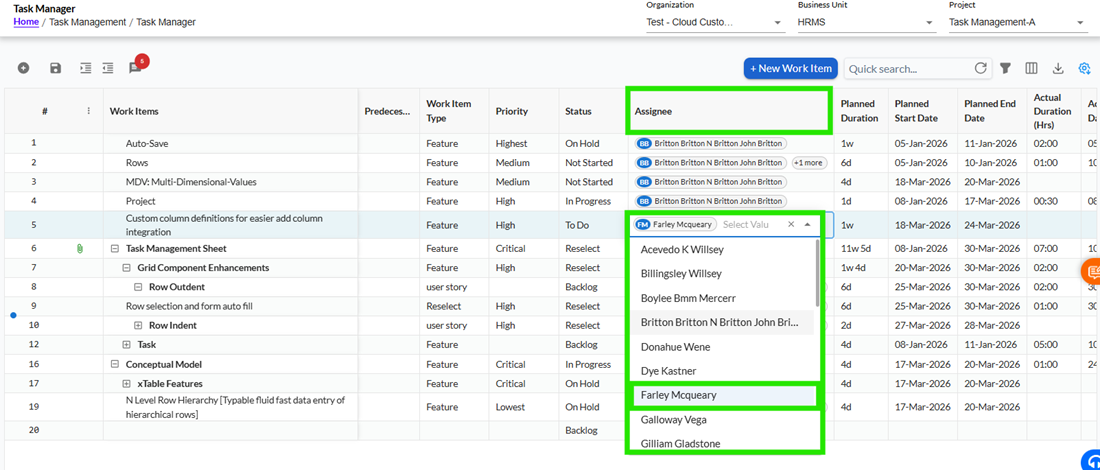
Assigning Tasks
Tasks can be assigned to team members using the Assignee field. The available users are populated based on the selected project, business unit, and organization cluster.
This ensures that only relevant users are available for assignment.
1Task Grid & Filter Functionality
The Task Grid has been enhanced to provide a more interactive, efficient, and user-friendly experience. These improvements help users manage tasks more effectively through better navigation, editing capabilities, and advanced filtering options.
Along with grid improvements, a powerful filtering system is introduced that allows users to quickly find relevant data, save filter configurations, and reuse them wheneverrequired.
Working with the Enhanced Task Grid
The Task Grid is designed to behave more like a smart spreadsheet, making it easier for users to manage large sets of task data.
Users can now work with tasks in a hierarchical structure where parent and child relationships are clearlymaintained. Tasks are automatically numbered in both hierarchical and sequential formats, making it easier to track their position within the structure.
Editing tasks has become more intuitive. Users can directly update values within the grid, and navigation across cells is smoother using keyboard actions such asTabto move forward andDeleteto clear values,likeExcel.
Users can also use:
Ctrl + Dto quickly fill values down a column
Ctrl + C / Ctrl + V(restricted whererequiredtomaintaindata integrity)
A) Ctrl + Dto quickly fill values down acolumn:
B) Ctrl + C OR Ctrl + V(restricted whererequiredtomaintaindata integrity):
The grid also allows users to rearrange tasks easily usingdrag-and-drop functionality. This makes it simple to reorder tasks or move them withindifferent levelsof the hierarchy.

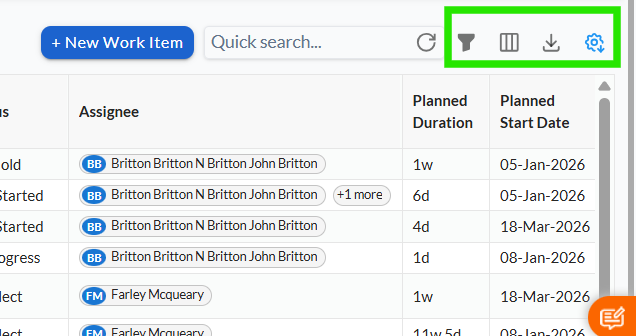
An enhanced action area is available near the search bar, whereadditionalcontrols such as buttons, toggles, or custom actions can be accessed. This provides quick access tofrequentlyused operations without cluttering the grid.
Users can perform advanced searches using logical conditions such asANDandOR, allowing more precise results when working with large datasets.
When exporting data, the system ensures that the exported Excel fileretainsproper data types based on the input fields, making it more usable for reporting and analysis.
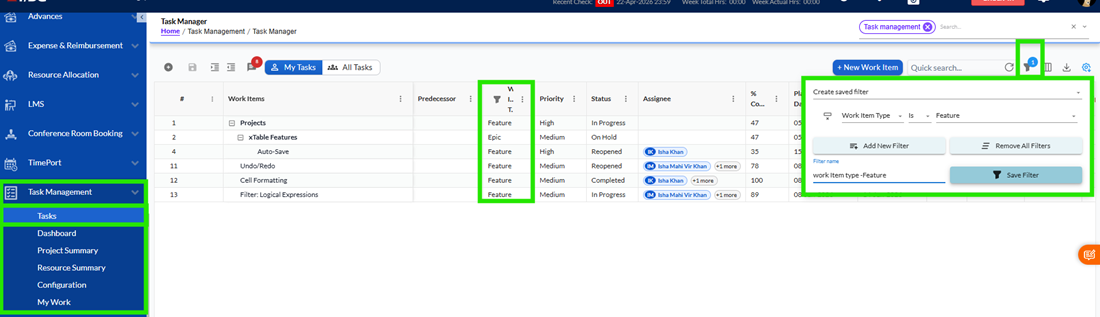
Using Filters in the Task Grid
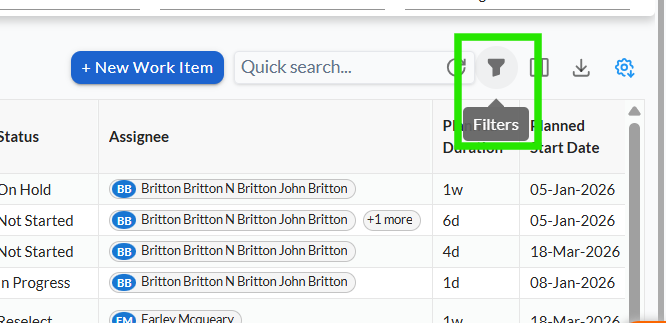
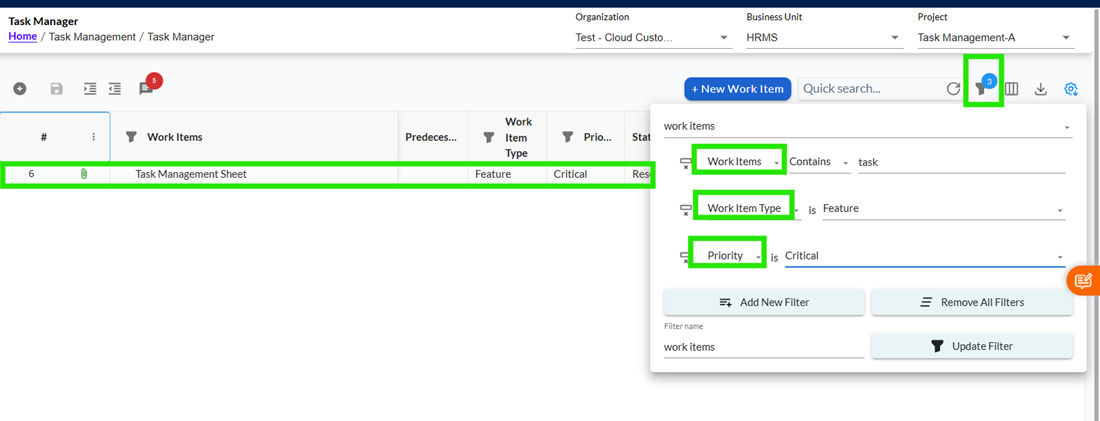
To help users quickly find relevant information, the gridprovidesa powerful filtering option.TheFilter iconis available at the top-right corner of the grid, next to the search bar. Clicking on this icon opens the Filter Panel.

Applying Filters
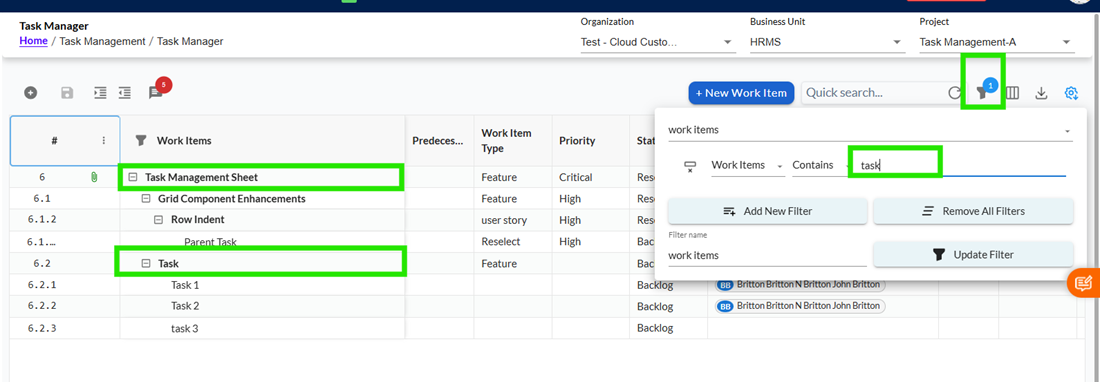
Users can create filters by selecting a field and defining conditions based on that field.
For example, a user may want to:
- View only tasks assigned to a specific person
- Check tasks with a particular status
- Find tasks within a certain date range
Once the filter conditions are applied, the grid automatically refreshes to show only matching records.
Working with Different Types of Filters
The filtering experience adapts based on the type of data in the selected field.
For text-based fields such as Work Item or Predecessor, users can enter values manually and apply conditions like "contains" or "starts with". For dropdown-based fields such as Status, Priority, or Assignee, users can select values from a predefined list. Multiple selections are supported, allowing users to filter more flexibly.
For date fields, users can either select dates from a calendar or enter them manually in the required format. If a range is selected, both start and end dates must be provided.
For percentage-based fields like % Complete, users can enter values or define ranges to filter tasks accordingly.
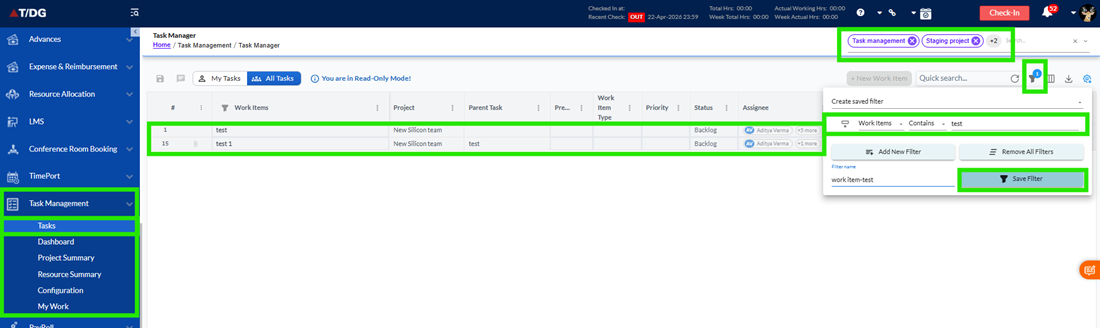
Saving Filters for Reuse
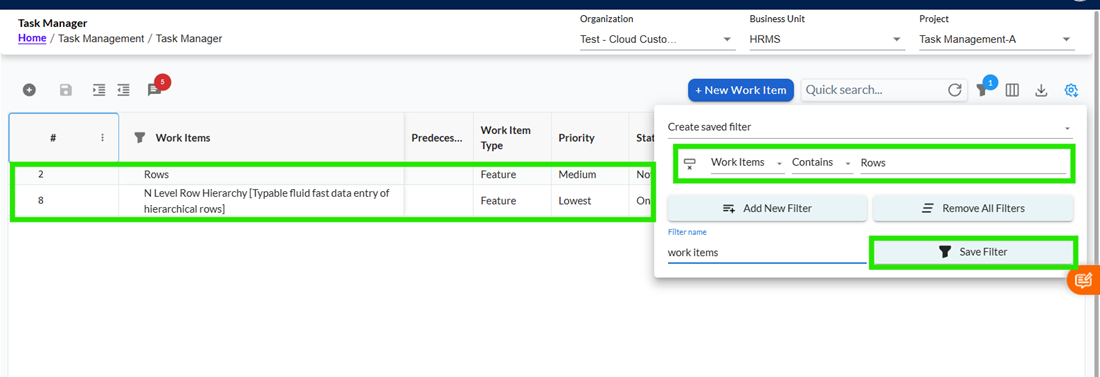
One of the key features of the filtering system is the ability to save filters.
After defining filter conditions, users can assign a name to the filter and save it. This allows them to reuse the same filter later without redefining conditions.Once saved, the filter becomes available in the filter dropdown and can be applied anytime.
Using Saved Filters
Users can select any previously saved filter from the dropdown. Once selected, the system automatically applies the stored conditions and refreshes the grid.
This is especially useful forfrequentlyused views, such as:
- "My Tasks"
- "High Priority Tasks"
- "Pending Tasks This Week"
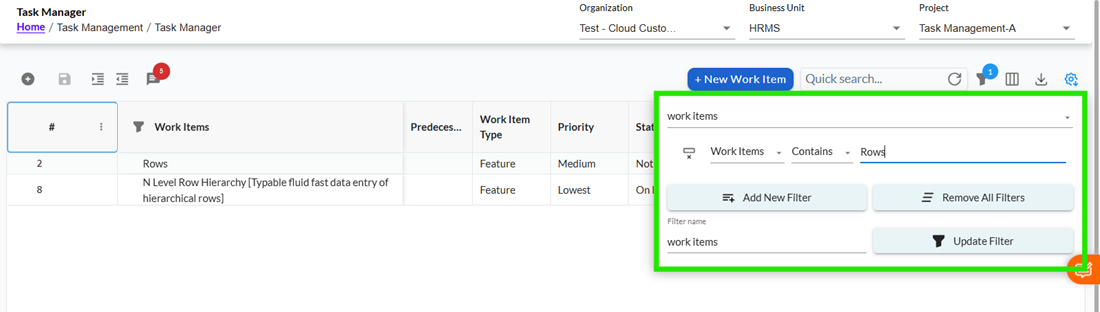
Updating Existing Filters
If users want tomodifya saved filter, they can update the conditions and clickUpdate Filter.If the update is not saved, the changes will only apply temporarily and will not overwrite the original filter.
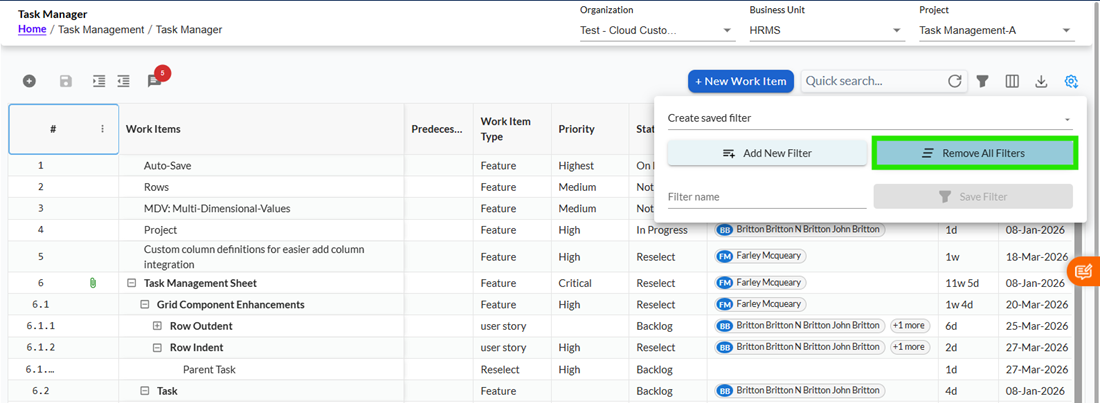
Clearing Filters
Users can remove all applied filters using theRemove All Filtersoption.
This resets the grid to its default view, showing all records. However, saved filtersremainavailable and are notdeleted.
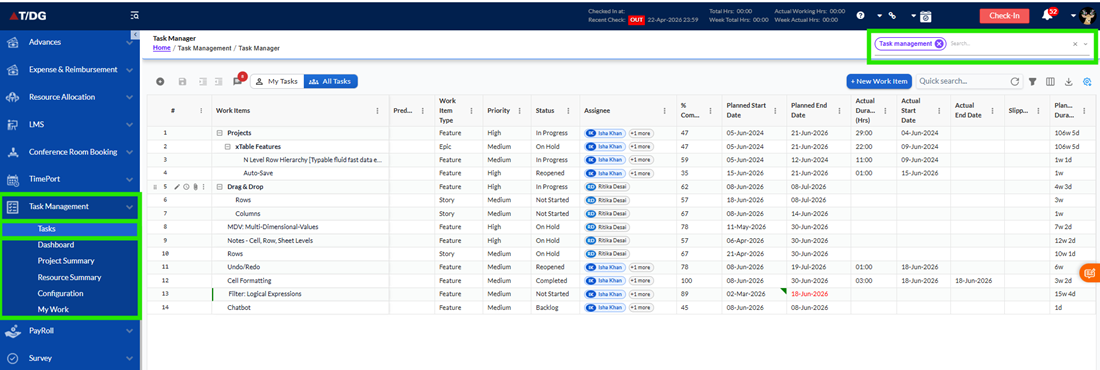
Baseline Functionality Overview
The baseline functionality is designed to record the original planning of tasks once it has been finalized. In any project, planned start dates, end dates, task relationships, and hierarchy form the foundation of execution. If these elements are changed without control, it can lead to timeline confusion, broken dependencies, and uneven progress tracking. This feature ensures that the approved plan remains stable while still allowing teams to continue working on execution-related updates.
When a task is baselined, the system captures a snapshot of its planned start and end dates. This snapshot becomes a reference point against which all future changes are compared. At the same time, users can still update planned dates if needed, but the original baseline remains recorded for tracking deviations. The baseline is applied at an individual task level, meaning only the selected task is affected.
Scope of Baseline Functionality
Baseline functionality is available across multiple areas of the system to ensure consistent behavior. Users can apply and view baseline actions directly in the Task Grid View. The same rules and restrictions are enforced in the Task Edit Form when modifying individual tasks. In addition, all baseline-related activities are recorded in Task History and included in exported reports. This ensures complete traceability regardless of where the task is accessed.
How Baseline Works
The purpose of baselining is to balance stability and flexibility. The system stores the original planned dates while still allowing controlled updates during execution. This helps teams stay aligned with the approved plan while adapting to real-world changes when necessary.
Setting and Removing Baseline
Users can set a baseline by selecting a task and using the "Set Baseline" option from the right-click menu. This action locks key planning fields and captures the baseline snapshot. If required, users can remove the baseline using the "Remove Baseline" option, which unlocks the planning fields again.
These actions can be applied to a single task or multiple selected tasks at the same time, making it easier to manage large projects.
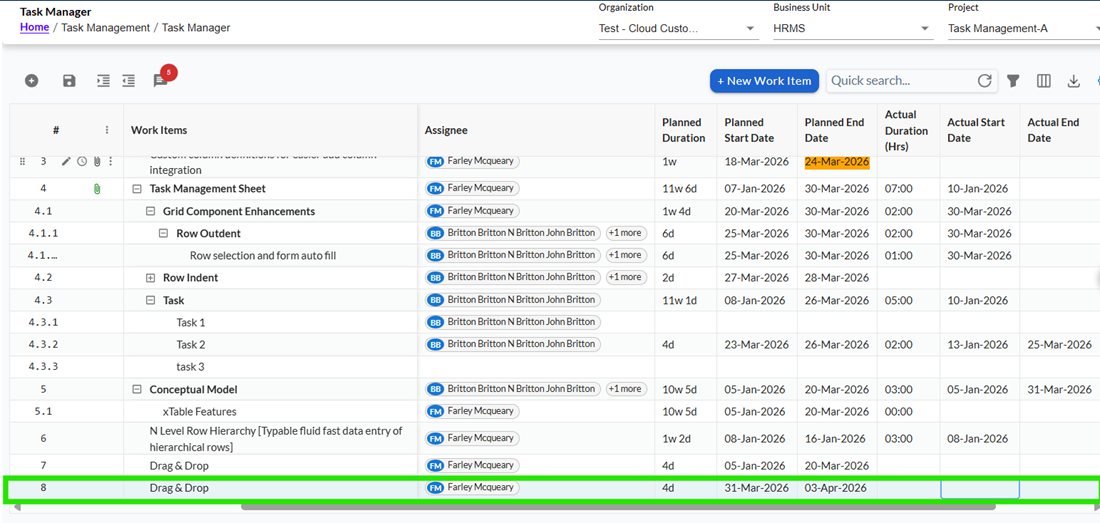
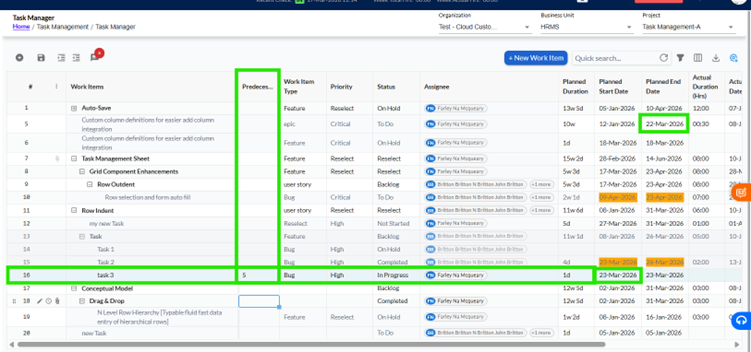
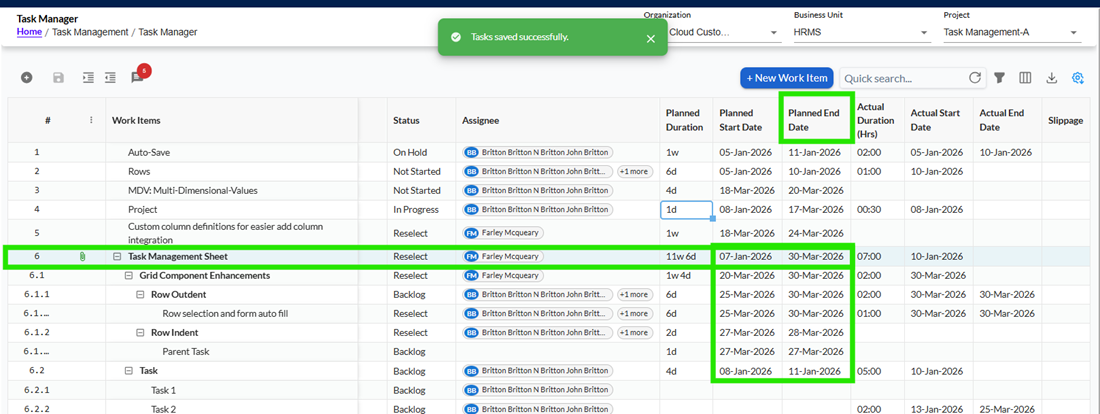
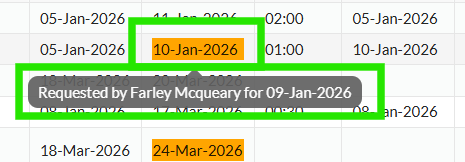
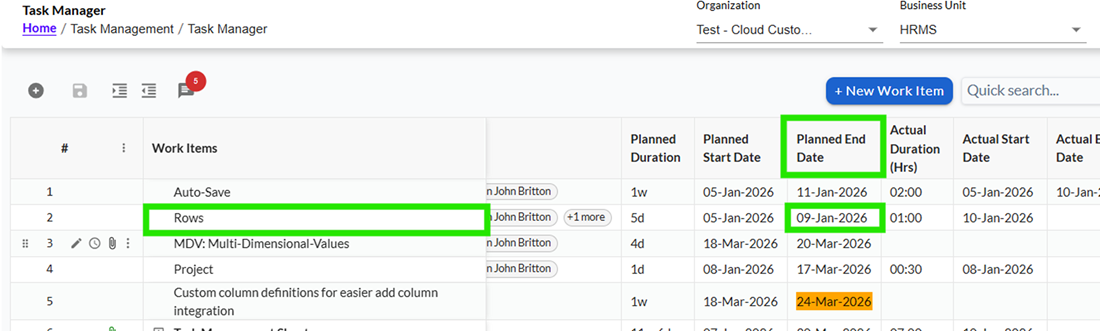
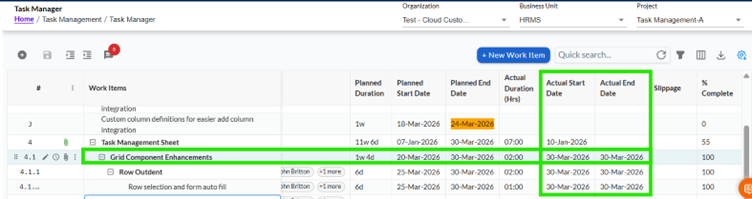
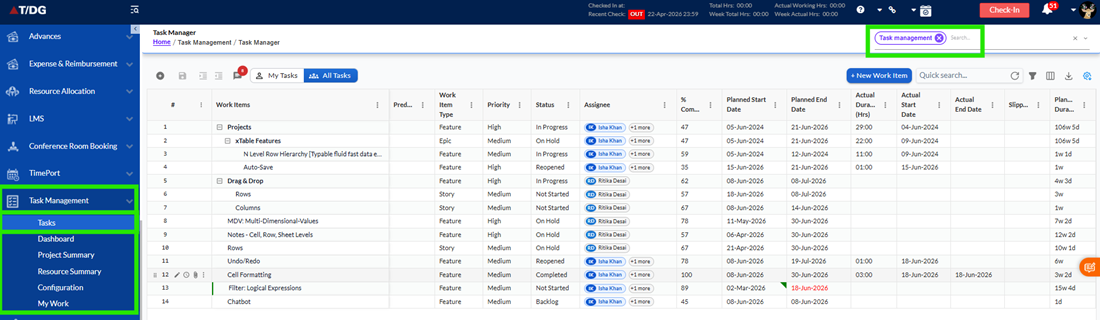
Visual Indicators
Baselined tasks are clearly marked to help users identify them quickly. A green border appears around the task in the grid, and a small green triangle is shown in the planned date column. When the triangle is clicked, it displays details such as the baseline start date, baseline end date, and duration.
Overdue Tracking
The system helps track delays by comparing current planned dates with baseline dates. If the planned start or end date exceeds the baseline values, the task is highlighted as overdue. This applies to tasks in Backlog, Not Started, and In Progress statuses. This feature allows users to quickly identify delays and take corrective action.
Validation Before Baselining
Before a task can be baselined, it must have both a planned start date and a planned end date. If either is missing, the system prevents the action and displays a message to inform the user. This ensures that only complete and valid planning data is captured.
Bulk Baseline Handling
When multiple tasks are selected, the system checks each task before applying the baseline. If all selected tasks are valid, the baseline is applied immediately. If some tasks are not eligible, a confirmation message is displayed. After confirmation, only valid tasks are processed while invalid ones are skipped.
Saving Changes
Baseline changes are reflected immediately in the interface, but they are not permanently saved until the user performs a save action. The Save button becomes active once changes are made. Users can either click Save manually or rely on the auto-save feature to store the changes.
Task History and Audit Trail
All baseline actions are recorded in the system to maintain accountability. When a task is baselined, a message is added to the task history indicating the action. Similarly, removing a baseline is also recorded. These records are included when exporting task history, ensuring full visibility for audits and reporting.
Permissions and Access Control
Baseline actions are controlled by user permissions. Only users with the appropriate access rights can set or remove baselines. Users without permission will not be able to perform these actions, ensuring that planning data remains secure.
System Behavior and Restrictions
Once a task is baselined, certain restrictions are applied to maintain data records. Planned dates cannot be cleared, and they cannot be transferred using copy or paste actions. Copy and cut operations do not carry planning data, and baselined tasks are protected from modifications through these actions.
However, in specific scenarios such as approval workflows, planned date changes may still be allowed even if a baseline exists.
Delete and Confirmation Handling
When performing delete on a baselined task, the system requires user confirmation before proceeding. Only users with delete permissions can complete this action. This prevents deletion of important tasks.
Handling Task Hierarchy and New Tasks
Baseline functionality works correctly for both parent and child tasks, whether the task hierarchy is expanded or collapsed. Users can also apply a baseline to newly created tasks before saving them. These changes remain visible and are finalized once the task is saved.
Consistency and Persistence
Once a task is baselined and saved, its state and visual indicators remain consistent even after refreshing the page or updating the grid. This ensures that users always see accurate and reliable information.
Export and Reporting
All baseline-related actions are included in exported reports, especially in task history. This helps teams maintain proper documentation and review changes over time.
Overall, the baseline functionality maintain records of planning data while still allowing flexibility during execution. It ensures that teams work with a consistent plan, track progress effectively, and maintain accountability throughout the project lifecycle.
Cut-Paste
The Cut-Paste Rows functionality allows users to reorganize tasks within the Task Grid by modifying their hierarchical structure. It enables easy movement of tasks across different levels and parents, helping users efficiently manage and restructure task data without manual rework.
Cutting Tasks
Users can cut tasks from the grid to move them to a different location. When a task is cut, it is removed from its current position.
If a parent task is cut, its child tasks are automatically promoted to the immediate upper level while maintaining their order and structure. In cases where tasks have multiple levels (such as children and grandchildren), the hierarchy within those tasks is preserved during the operation.
Users can also cut individual tasks or multiple tasks at once. When multiple tasks are selected, their relative order is maintained after the operation.
Pasting Tasks
After cutting, users can paste tasks into a new location within the grid. Tasks can be pasted under a different parent or repositioned within the same level as sibling tasks.
When pasted, the task is removed from its original location and inserted into the selected position. The system ensures that the task structure and order are maintained during this process.
Reordering and Movement
The Cut/Paste feature allows users to easily reorder tasks within the same level or move them across different parent nodes. This helps in adjusting task sequences and restructuring the hierarchy as needed without recreating tasks.
The system ensures that the order of tasks remains consistent and that all moved tasks retain their associated data and relationships.
Validation and Restrictions
The system enforces rules to maintain hierarchy integrity. Users cannot paste a task into its own child or create any cyclic structure. Invalid operations are blocked, and appropriate validation messages are displayed to guide the user.
Additionally, when selecting both a parent and its child for cutting, the system processes only the parent to avoid duplication or inconsistencies.
System Behaviour
The Cut-Paste operations are temporarily maintained until the user saves the changes. If the save operation fails, the changes are retained, ensuring that users do not lose their work.
The system also ensures that all structural updates are reflected immediately in the grid while maintaining consistency across the hierarchy.
Floating Add (+) ButtonThe Floating Add (+) Button is designed to simplify and speed up task creation within the Task Grid. It allows users to add new tasks directly between existing rows without relying only on fixed options like "Add New Row". This improves usability and helps users maintain their workflow without interruption.
How to Use the Floating Add Button
While working in the Task Grid, users can move their cursor between any two rows in the Action column. When the cursor is positioned in this area, a floating "+" button appears dynamically.
This button is visible only when needed and disappears when not in use, ensuring that the interface remains clean and uncluttered. By clicking the "+" button, a new task row is inserted at the selected position.
Adding Tasks Within the Grid
The Floating Add Button allows users to insert tasks exactly where required within the grid. Once the button is clicked, a new row is created instantly, and users can start entering task details without navigating away from their current position.
This reduces manual effort and improves efficiency, especially when working with multiple tasks or large datasets.
Behaviour Based on Mode
The availability of the Floating Add Button depends on the grid mode. In Edit Mode, the button is visible and fully functional, allowing users to add and modify tasks. In Read-Only Mode, the button is either hidden or disabled to prevent unintended changes.
This ensures that task creation aligns with user permissions and system access control.
Interaction and UIBehaviour
The Floating Add Button is designed to enhance usability without interfering with other UI elements. It does not overlap with action icons such as edit or delete, column menus, or footer elements like pagination. The button maintains proper positioning during scrolling and adapts well across different screen sizes and zoom levels.
This ensures a smooth and consistent user experience across various scenarios.
2 Predecessor Functionality
The Predecessor functionality allows users to define dependency relationships between tasks within the Task Grid. It ensures that tasks follow a logical sequence and enables accurate scheduling by linking tasks based on their dependencies. This helps in maintaining consistency in planning and prevents incorrect task execution order.
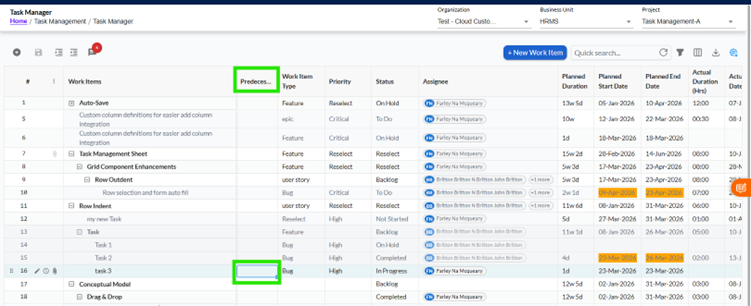
Assigning Predecessors
Users can assign predecessors directly within the Predecessor column by entering valid Work Item IDs or by selecting values from the Predecessor Picker. The system also supports assigning predecessors through copy/paste and drag operations, making it easier to manage dependencies across multiple tasks.
The Predecessor field can be updated even if a task is marked as 100% complete, and the assigned value will be retained without being removed.
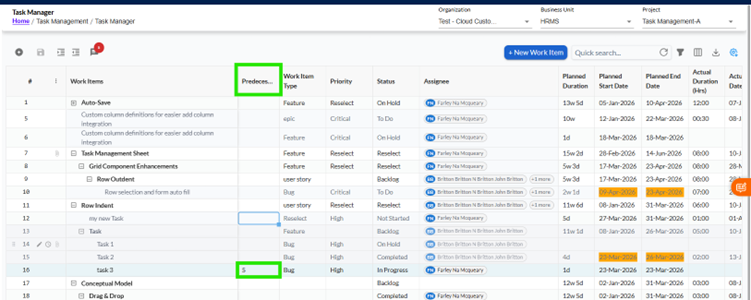
Dependency Impact on Scheduling
Once a valid predecessor is assigned, the system automatically updates the task schedule. The Start Date is adjusted based on the predecessor’s End Date, and the End Date and Duration are recalculated accordingly. Any tasks dependent on this task are also updated to ensure the entire sequence remains aligned.
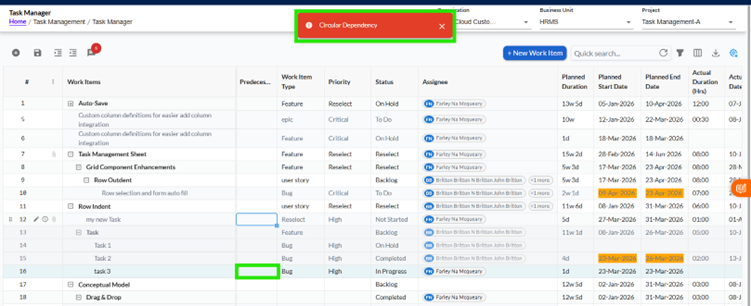
Validation and Dependency Rules
The system ensures that only valid dependencies are created. It prevents users from assigning a task as its own predecessor, selecting a successor as a predecessor, or creating dependencies that violate hierarchy rules. Circular dependencies are strictly restricted, and any such attempts are blocked with a validation message to maintain data integrity.
User Actions and SystemBehaviour
The Predecessor functionality supports common user actions such as copy, paste, drag, and delete. When a predecessor is removed, the dependency is cleared and related task dates are recalculated automatically. The system also supports undo and redo operations, allowing users to revert changes step-by-step without losing previously saved data.
Hierarchy Interaction
When tasks are reorganized using indent or outdent actions, the system revalidates all predecessor relationships. Any invalid dependencies are automatically removed, and scheduling is recalculated to ensure consistency within the updated hierarchy.
3 File Attachment Management
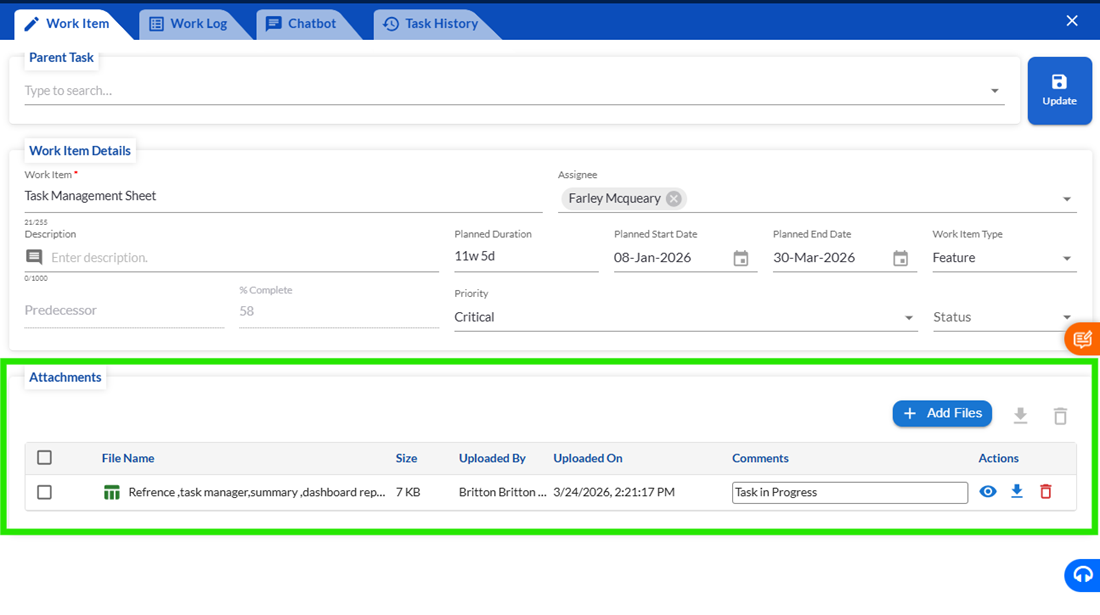
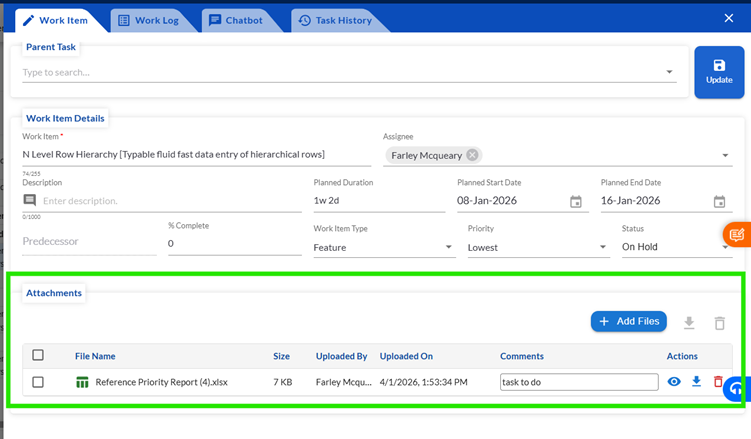
TheAttachments featurehelps you easily add and manage files related to your work items. Whether you are creating a new task or editing an existing one, this feature ensures that all your important documents stay linked and accessible in one place.
You can use this feature to:
- Attach supporting documents while creating a task
- Add or update files while editing a work item
- Quickly view or preview files anytime
This consistent experience makes it easier to manage attachments throughout the entire lifecycle of a work item.
TheAttachments sectionis available in both:
- View work log (while viewing a work item)
- Work Item Editor (while editing a work item)
In both cases, the section is placedjust below the work item details panel, so it is easy to locate and use.
Attachments Feature
The Attachments feature allows you to:
- Add new files
- View already attached files
- Remove unwanted files
- Save your attachment changes
All these actions are available both during task creation and while editing, ensuring a smooth and consistent experience.
Add Attachments
To attach files to your work item:
- Click on theAttachment iconorAdd Attachmentoption
- A popup window will open where you can select and manage files
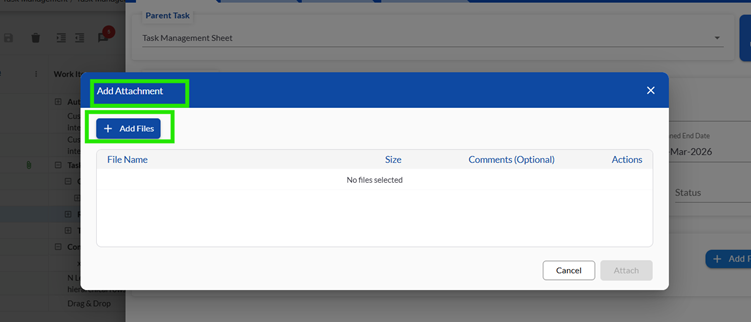
Inside the Popup
You will see:
- ABrowseoption to select files from your system
- AComments fieldto add notes about the file
- OK buttonto confirm upload
- Cancel buttonto discard changes
- Close (X) iconto exit the popup
If you clickCancelor close the popup, no files will be saved or uploaded.
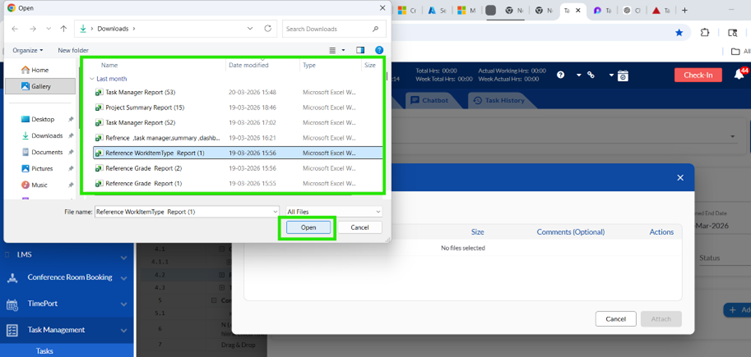
Selecting Files
You can easily select files from your local system using theBrowseoption.
Important Points to Remember:
- You must selectat least one fileto proceed
- You can selectmultiple files at once (up to 50 files)
- If you select more than 50 files, you will see an error message
If you add many files and they don’t fit in the popup, ascrollbar will automatically appearfor easy navigation.
File Validation Rules
To ensure smooth operation, the system checks your files before adding them:
- Duplicate files arenot allowed
- Unsupported file types will berejected
Unsupported formats include:
- Images
- ZIP files
- APK files
- Audio/Video files
- Folders
If any invalid file is selected, atemporary error messagewill be shown and the file will not be added.
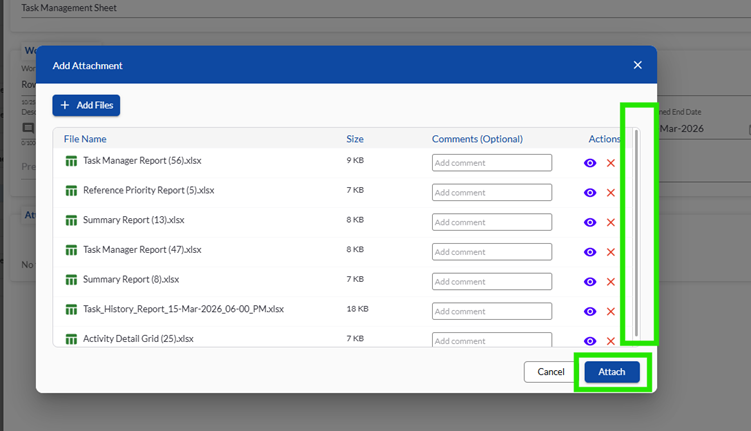
Draft Mode Before Upload
When you select files:
- They will appear immediately in the popup
- They are added as adraft list
- Files arenot uploaded yet
Files will only be uploaded after you click theOKbutton.
This helps you review and make changes before final submission.
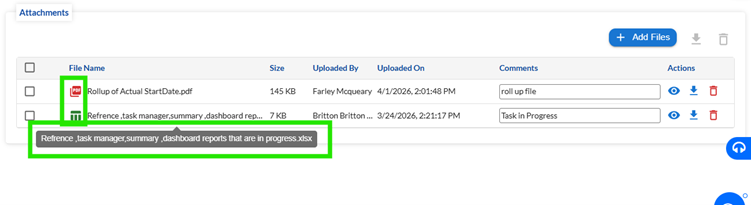
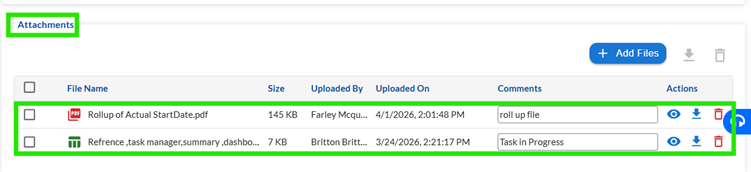
Viewing Attachment Details
Once files are added, you can see important details such as:
- File Name
- File Size
- Date Attached
- Added By (Username)
- Comments
Additional UI Features:
- Each file shows afile-type icon
- Long file names are shortened with
- Hovering over the name shows the full file name
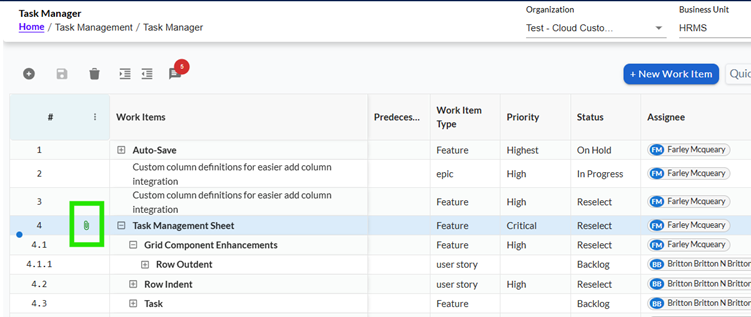
Quick Access from Work Item
You don’t always need to scroll to the Attachments section.
AFile Attachment iconis available in the work item area, allowing you to:
- Quickly open the attachment popup
- Add or view files instantly
This works the same way in both View work log and Edit screens.
Working with Attached Files
You can interact with your files using simple actions:
Remove File
- Click theRemove iconto delete a file from the list
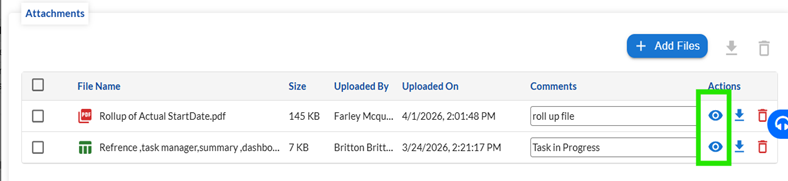
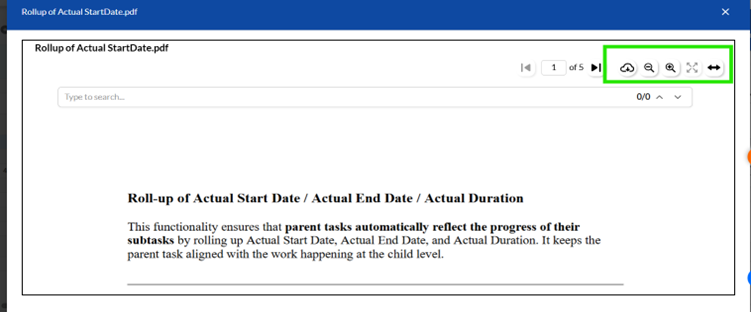
Preview File
- Click thePreview (eyeicon)to open the file
Preview Features:
- Zoom in and zoom out
- Full-screen mode
- Exit preview using theESC key
Uploading Files
Once you are ready:
- ClickOK or Attach
- All selected draft files will be uploaded
- Files will be linked to the work item
After successful upload:
- The corresponding row will behighlighted visually
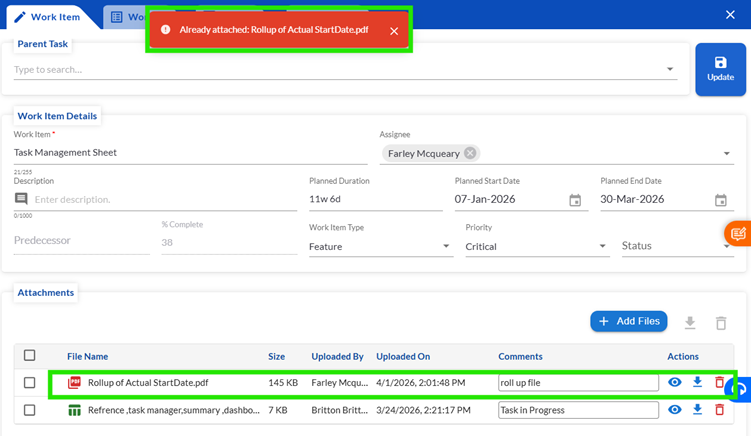
Editing Existing Attachments
When you open an existing work item:
- All previously attached files will be visible
- You can add new files or remove existing ones
If you try to upload a file that already exists, the system will show an error and prevent duplication.
Saving and Persistence
All your attachments are reliable:
- Files remain attached after saving the work item
- Attachments are available when you reopen the task
- No data is lost between sessions
This ensures that all your important documents stay securely linked to your work item.
4 Task History
The Task History feature allows users to view the complete history of a task from creation to the latest update. It helps users understand what changes were made, who made them, and when they occurred.
This ensures full transparency and makes it easy to track task updates, review past changes, and support audit or troubleshooting activities.
Accessing Task History
Users can open Task History from multiple places:
- Right-click on a task row >Task History
- Task Editor >Task History tab
- Work Log view >Task History tab
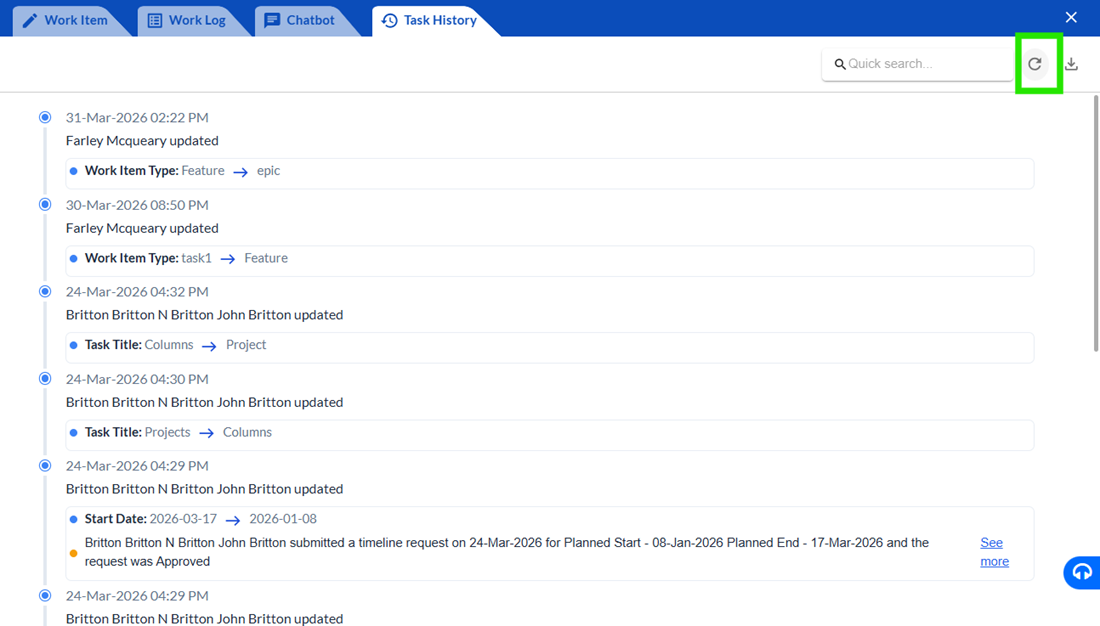
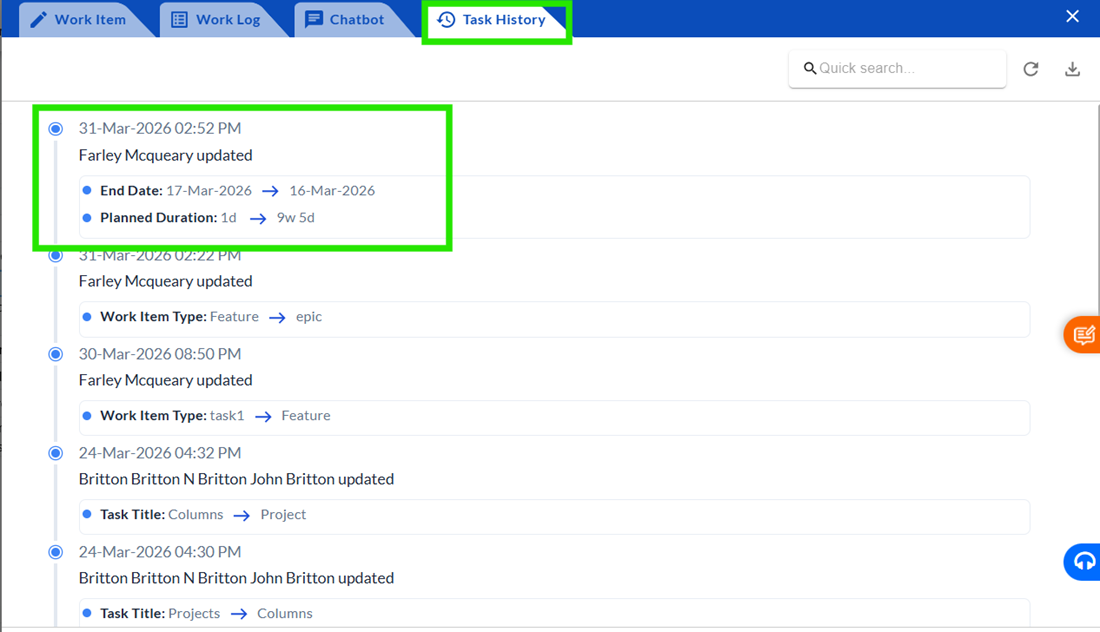
Understanding the Task History View
The Task History opens in a grid format where each row represents a change or activity related to the task.
- The latest changes appear at the top
- Older changes appear below
- Each entry shows the timeline of updates clearly
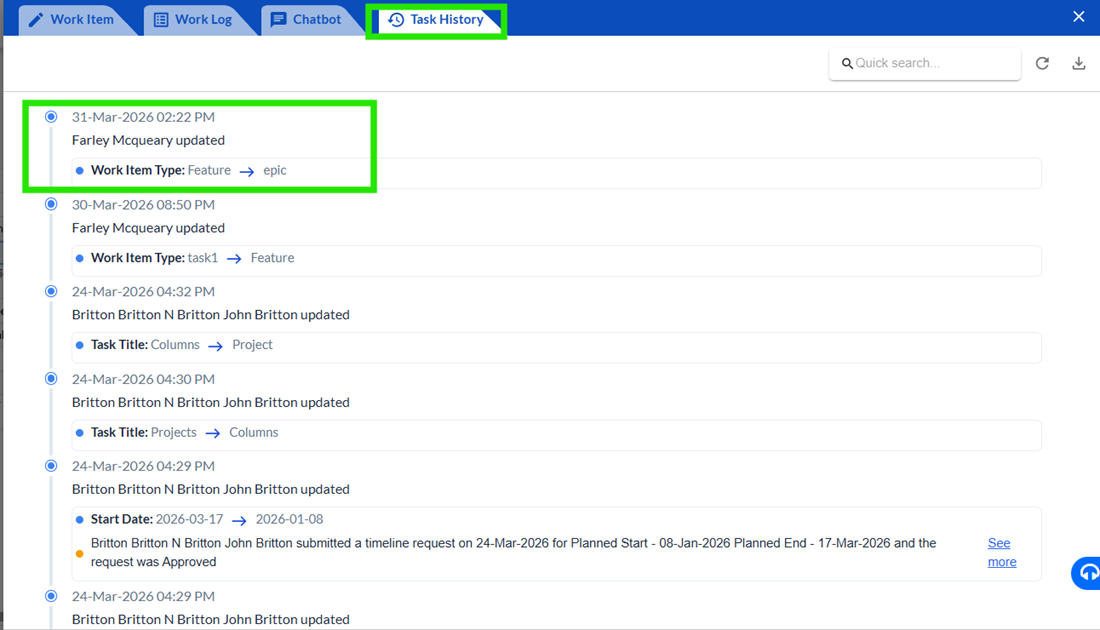
What Information is Shown
Each history record includes:
- Task name and change description
- User who made the change
- Date and time of the change
- Updated values such as status, dates, priority, assignee, etc.
- Type of event (e.g., status update, date change, reassignment)
Changed values are clearly highlighted for better visibility.
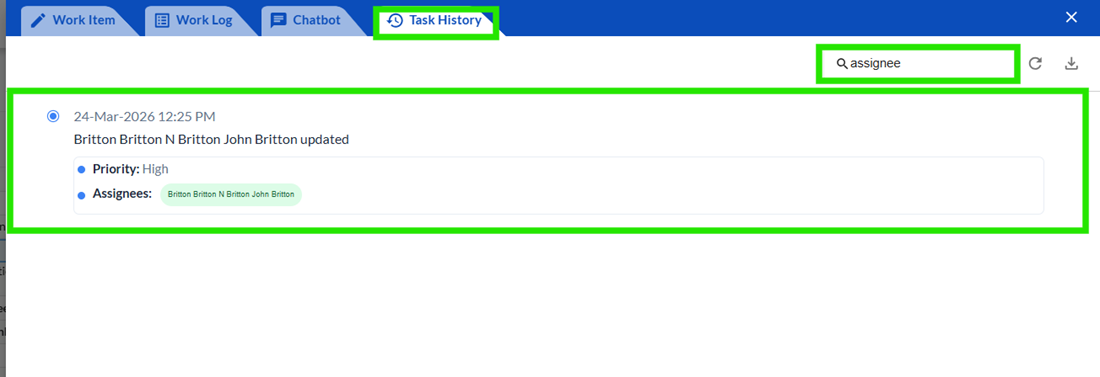
Using Search and Navigation
Users can quickly find specific history records using theQuick Searchoption.
- Search byuser name, change type, or keywords
- Results update instantly
TheResetoption clears the search and returns to the first page.
Pagination and Record Count
If there are many records:
- Data is divided into pages
- Users can navigate using page numbers or next/previous buttons
A record count is displayed (e.g.,Showing 1-10 of 50 records) to help users understand how many changes are available.
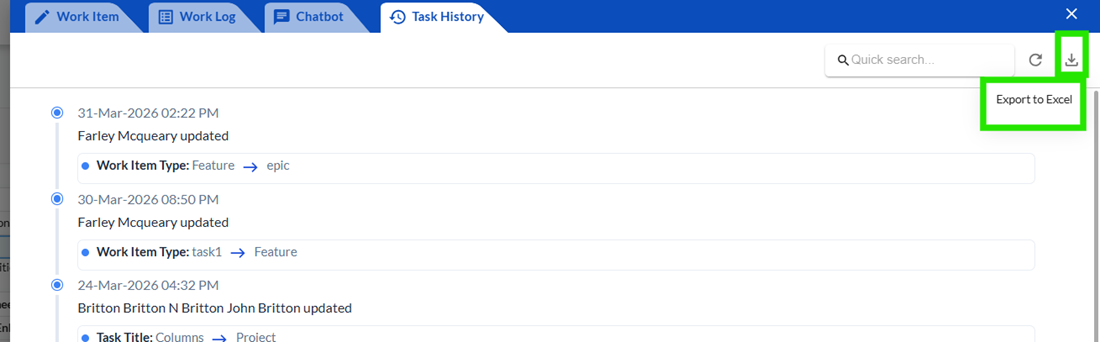
Exporting Task History
Users can download the history data using theExport option.
- Data is exported in Excel format
- Useful for reporting, audits, or offline review
ImportantBehaviour
- Task History isread-only
- Records are automatically created by the system
- No record can be edited or deleted
- Every change (manual or system-generated) is captured
- Data is always shown in chronological order (latest first)
5 Planned Dates Roll-up & EditingBehaviour
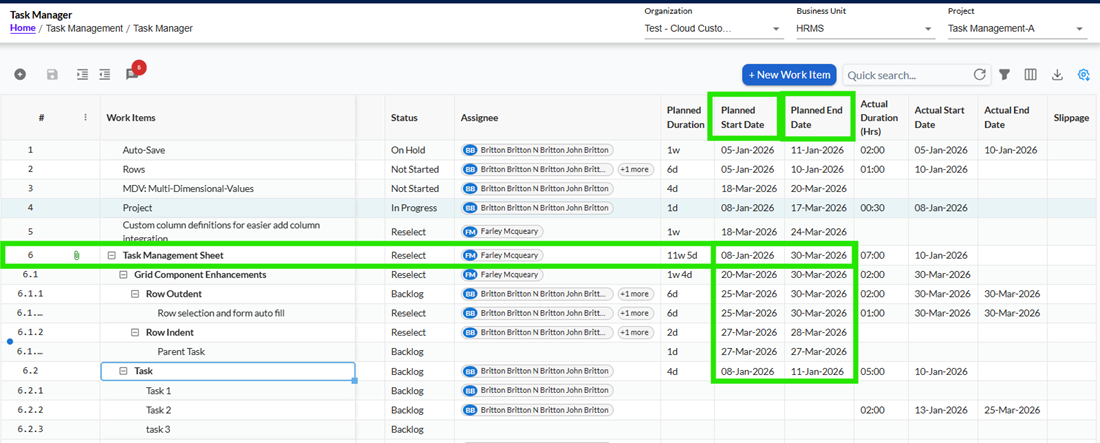
The Planned Start Date and Planned End Date of parent tasks are automatically managed by the system based on their child and sub-child tasks.
This ensures that parent tasks always accurately reflect the timeline of all underlying work. At the same time, users are allowed toadjustparent task dates within certain limits to support planning flexibility.
How Parent Task Dates Work
For any parent task, the system automatically calculates dates based on its child tasks.
- ThePlanned Start Dateis set to the earliest start date among all child and sub-child tasks
- ThePlanned End Dateis set to the latest end date among all child and sub-child tasks
This automatic calculation is known asroll-up, and it ensures that the parent task alwaysrepresentsthe full duration of all its children.
Automatic Updates Based on Changes
Whenever there is any change in the task hierarchy, the system updates parent task dates automatically.
This includes situations such as:
- Adding a new child or sub-child task
- Updating the planned dates of an existing child task
In such cases, the parent task dates are recalculated to reflect the latest timeline.
Editing Parent Task Dates
Users are allowed to edit the Planned Start Date and Planned End Date of parent tasks, but only within valid limits.
Users can:
- Set astart date earlierthan the earliest child task
- Set anend date laterthan the latest child task
This allows users to expand the timeline of a parent task ifrequiredfor planning purposes.
Restrictions While Editing
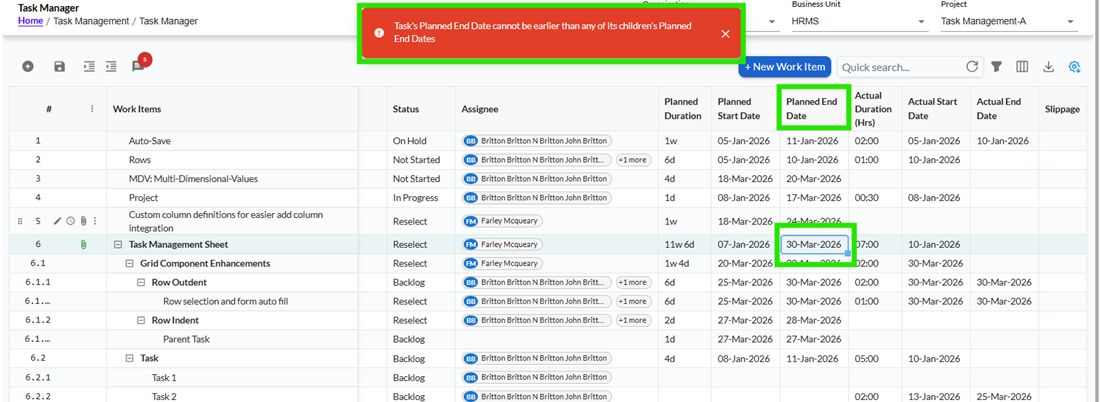
While editing is allowed, the system ensures that parent tasks always cover all child tasks.
Users cannot:
- Set a start date later than any child task
- Set an end date earlier than any child task
If such a change isattempted, the system will block the update and display a validation message.
SystemBehaviourand Priority
It is important to note that:
- Parent task dates are primarily controlled by the system
- Any manual changes made by users are considered temporary
- If child task data changes, the system will override manual values
This means the roll-up logic always ensures consistency and accuracy across the task hierarchy.
User Awareness
To avoid confusion, users should be aware that parent task dates are dynamic and depend on child tasks.
In scenarios where child tasks are updated or new tasks are added, parent dates may automatically change even if they were manually edited earlier.
A typical system message or tooltip mayindicate:
“Parent task dates are automatically adjusted based on child tasks.
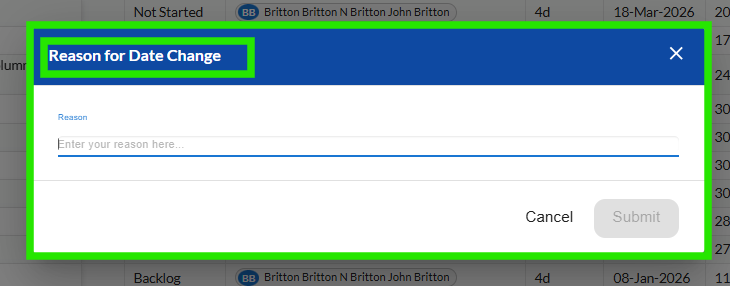
6 Planned Dates Change Approval & Communication
To ensure better control, transparency, and accountability in task planning, any change to thePlanned Start Date or Planned End Datefollows an approval process.
Instead of updating dates directly, the system captures the request, allows discussion through Chatbot, and updates the task only after approval. This ensures that all changes are tracked, reviewed, and properly documented.
How Planned Date Changes Work
When a user attempts to update Planned Dates, the system does not immediately apply the change.
Instead:
- Achange request is created
- The existing dates remain unchanged
- The task continues to be editable for other fields
This ensures that date changes are controlled and reviewed before being finalized.
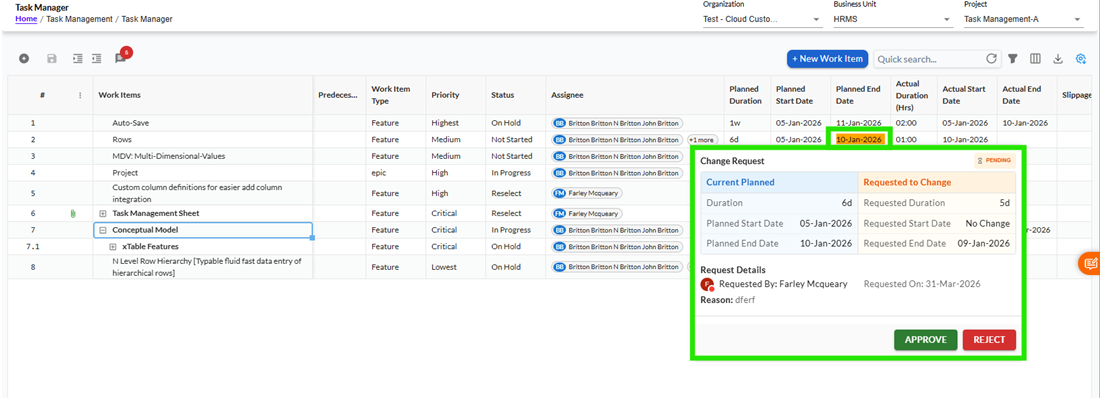
Viewing Pending Date Changes
When a date change is under approval, users can view details directly on the task without opening a separate screen.
By hovering over the Planned Date field, the following information is displayed:
- Existing Planned Dates
- Requested New Date
- Requested By
- Requested On
- Reason for Change
This allows quick visibility and helps users understand the context of the change.
Approval and Rejection Process
Authorized users (such as Project Managers or Admins) can take action on the request.
- Approve- Accept the requested change
- Reject- Decline the request
These options are available on hover for authorized users. Other users can only view the request.
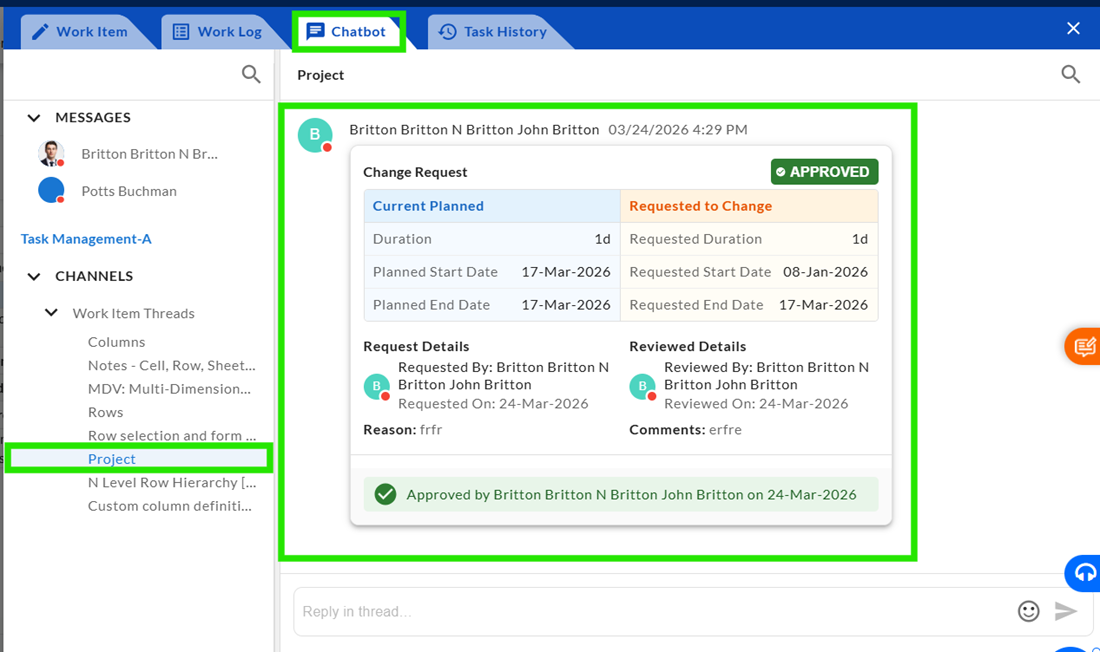
What Happens on Approval
When a request is approved:
- Planned Dates are updated to the new values
- Task timelines are recalculated (if applicable)
- The action is recorded in Task History
What Happens on Rejection
When a request is rejected:
- Planned Dates remain unchanged
- A rejection reason must be provided
- The action is recorded in Task History
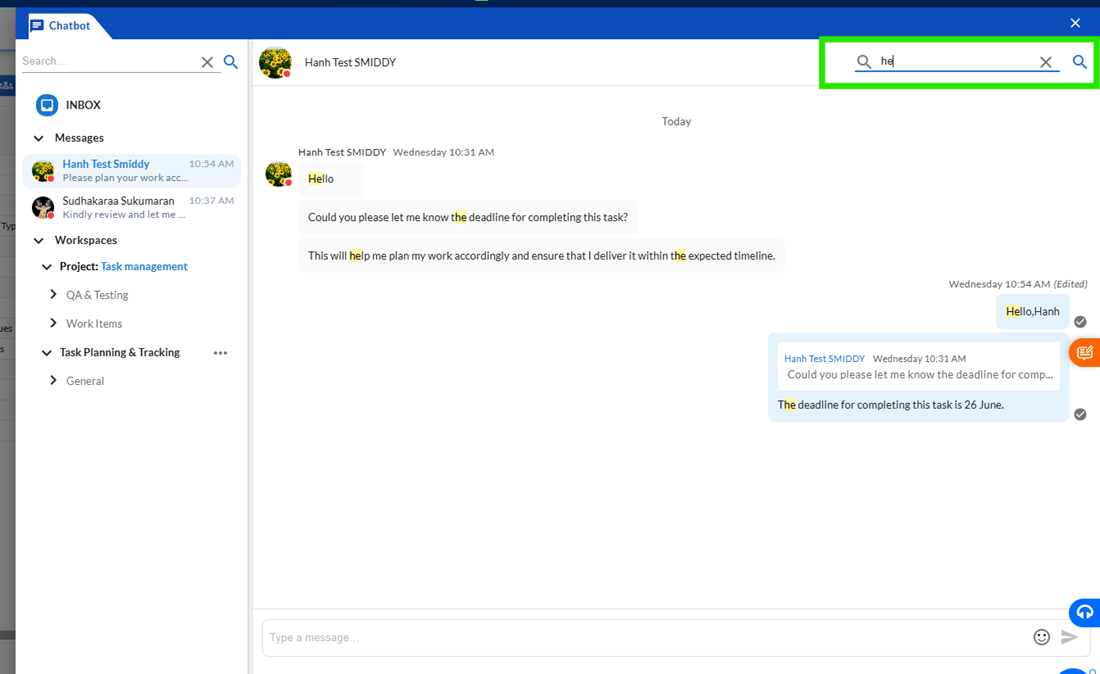
Using Chatbot for Discussion
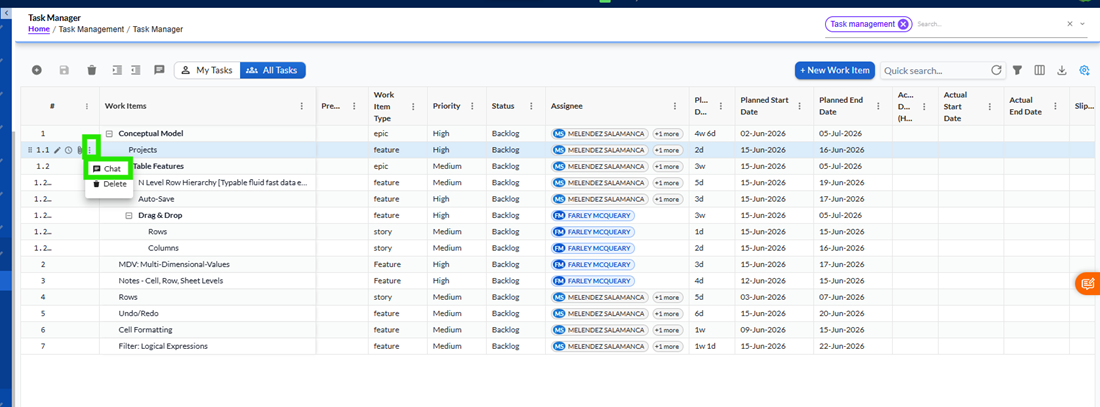
Before approving or rejecting a request, users can communicate directly through the Chatbot.
When a discussion is required:
- AChat icon appears on the task row
- Clicking it opens aside chat panel
- Users can discuss the change, clarify reasons, and make decisions
This avoids unnecessary emails and keeps all communication linked to the task.
How the Chat Flow Works
- Assignee requests a date change and provides a reason
- Manager reviews the request
- If needed, discussion happens through Chatbot
- Final decision is taken (Approve OR Reject)
- Decision is applied and recorded
All conversations and actions are stored for future reference.
Notifications
To keep users informed without overwhelming them:
- The system sendsone consolidated email
- Notifications are triggered when:
- A date change request is created
- A request is approved or rejected
Tracking Changes in Task History
All actions related to Planned Date changes are recorded in Task History.
This includes:
- Requested changes
- Approval or rejection decisions
- User details and timestamps
- Related remarks and events
This ensures complete traceability of all decisions.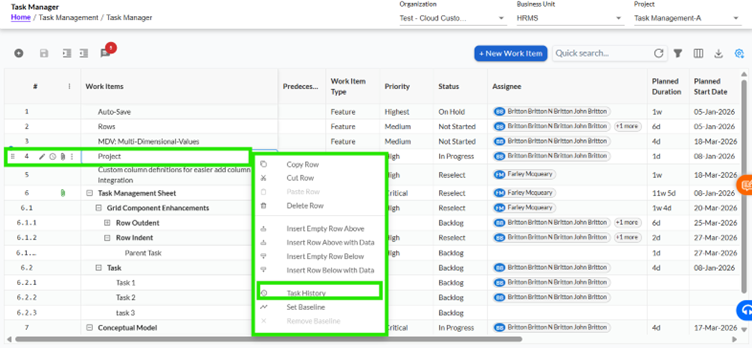
7 Actual Dates and Roll-up Functionality
The roll-up functionality helps users easily track overall task progress without manually updating parent tasks. Whenever work is done on child tasks, the system automatically updates the parent task’s Actual Start Date, Actual End Date, and Actual Duration.
This ensures that the parent task always reflects the latest progress happening within its hierarchy.
How Actual Dates Work
The Actual Start Date of a parent task is automatically set to the earliest start date among all its child tasks or the parent’s own work log, whichever is earlier. This means the parent task always shows when work began across the entire hierarchy.
Example:
If one child task starts on 05 Jan, another on 08 Jan, and the parent has work logged on 07 Jan, the parent task will show 05 Jan as the Actual Start Date.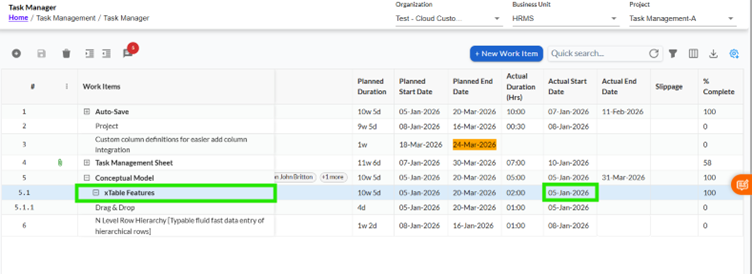
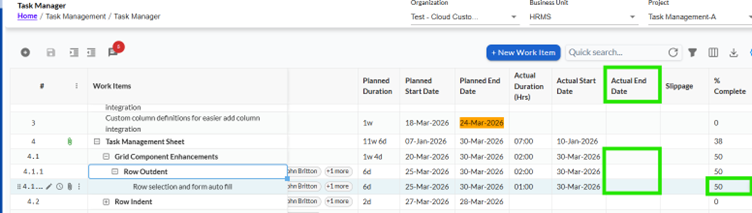
The Actual End Date is calculated based on the latest completion date among child tasks or the parent’s own work log. However, this date will only appear when all child tasks are completed, and the parent task is also marked as 100% complete.
If even one child task is incomplete, the parent task will not display an Actual End Date.
Example:
If child tasks are completed on 10 Feb and 11 Feb, the parent task will show 11 Feb as the Actual End Date once everything is completed.
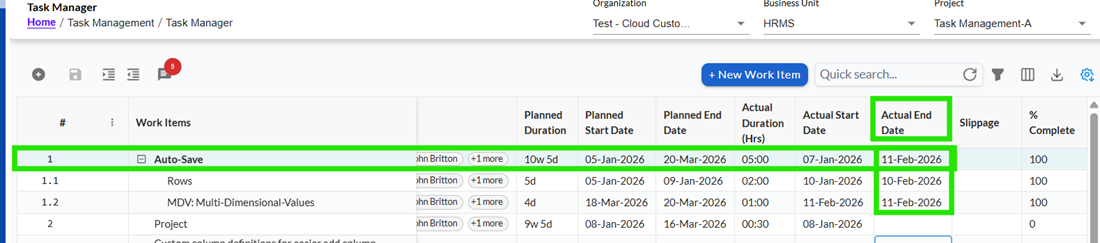
The Actual Duration of a parent task is the total of all time logged across its child tasks along with any work logged directly on the parent. This gives a complete view of the total effort spent.
How the System Updates Automatically
The roll-up values are updated automatically whenever changes happen in the task. This includes adding, editing, or deleting work logs, updating completion percentage, restructuring tasks (like indenting or dragging), or marking tasks as complete or incomplete.
Users do not need to refresh or manually update anything-the system keeps everything in sync.
What Happens in Different Scenarios
When some child tasks are completed but others are still pending, the parent task will still show the correct start date and total duration, but the Actual End Date will remain blank. This ensures that completion is only reflected when all work is finished.

If a completed child task is reopened, the parent task will automatically remove its Actual End Date and adjust its completion status accordingly.
When work logs are added to child tasks, the parent task's duration increases automatically. Similarly, if work logs are deleted, the parent duration decreases accordingly.

If tasks are moved, indented, or reorganized, the system recalculates the roll-up values based on the updated structure.
Important User Guidelines
When copying tasks or inserting new rows, the Actual Start Date and Actual End Date are not copied. These fields will remain blank in the new row to avoid incorrect data.
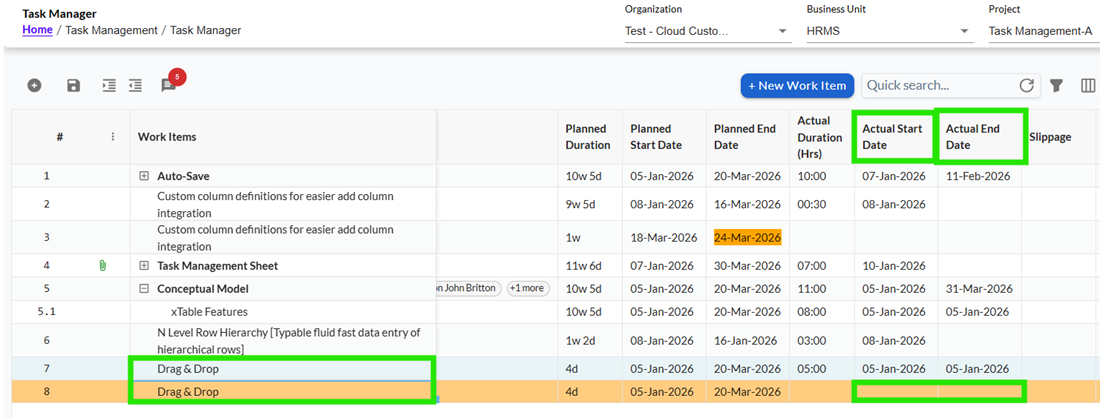
When tasks are moved using drag-and-drop, the system ensures that actual dates are duplicated, and existing task data remains unchanged.
8 Chatbot Module
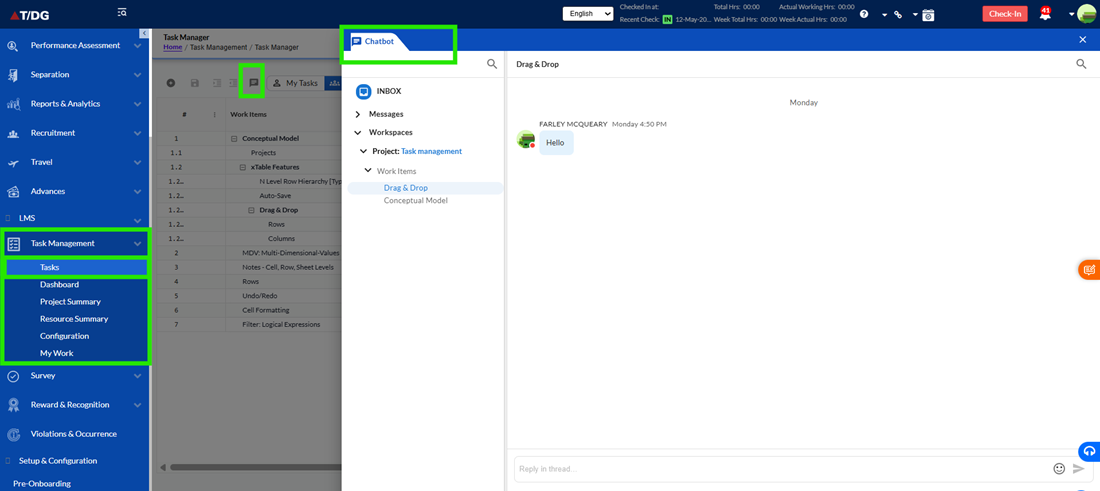
The Chatbot is an integrated communication tool within the Task Management module that allows users to collaborate and communicate without leaving the application. Users can send direct messages, participate in workspace discussions, communicate within channels and threads, and discuss specific tasks or work items. By centralizing communication within the system, the Chatbot helps teams collaborate more effectively while maintaining conversation history related to projects and tasks.
- Accessing the Chatbot
The Chatbot can be accessed from multiple locations within the application to provide quick and convenient communication.
Users can open the Chatbot directly from the Task Grid by clicking the Chat icon available on the page. When opened for the first time, the Chatbot displays the Inbox view, allowing users to access unread messages and recent conversations. If the user was previously working in a specific conversation, workspace, or thread, the Chatbot automatically reopens the last active conversation for continuity.
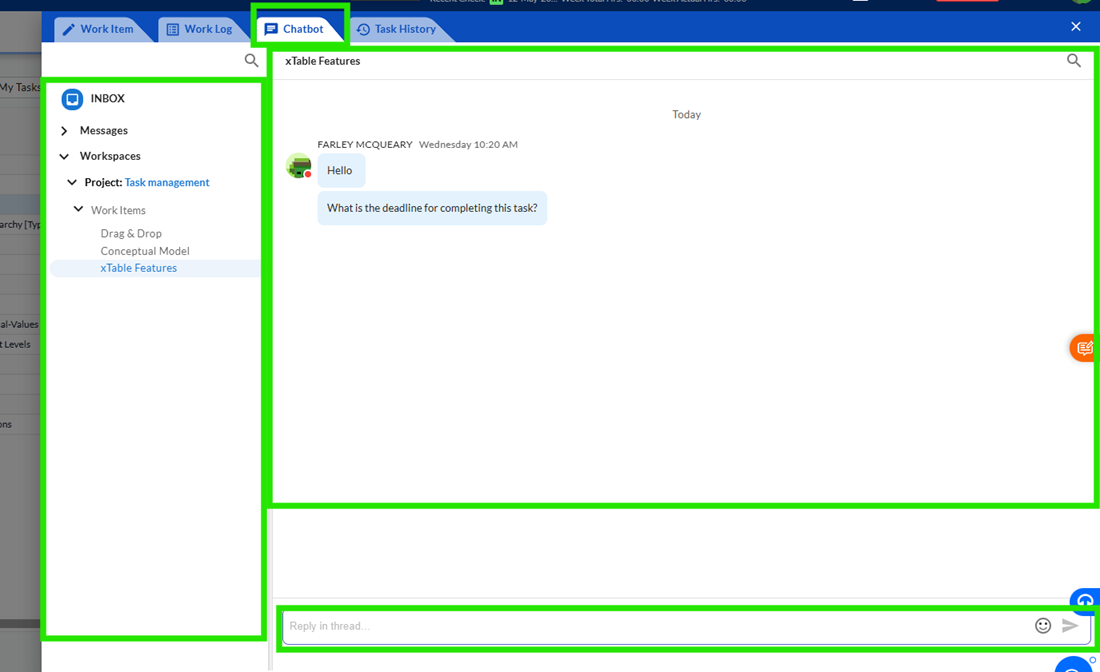
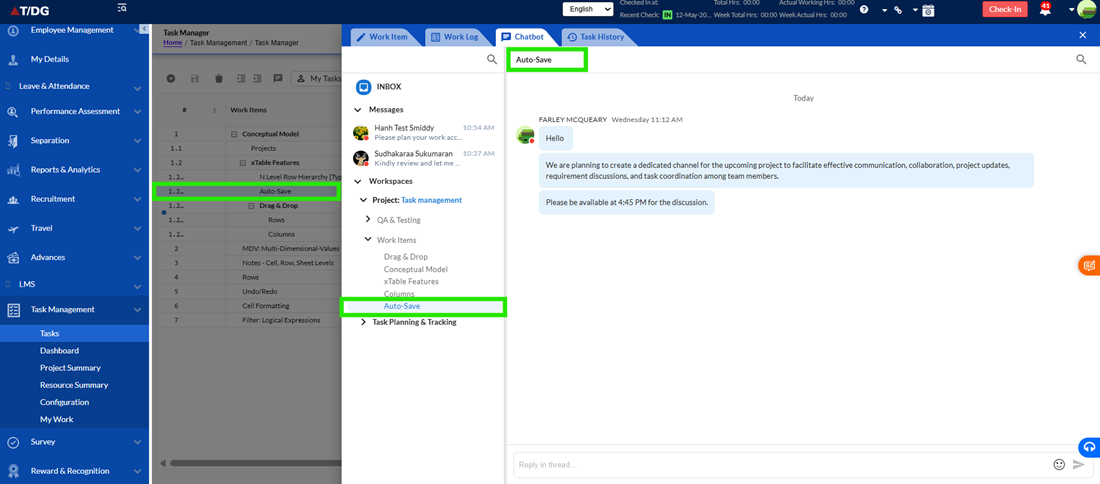
The Chatbot can also be accessed from within a Work Item. When users navigate to a task and open the Chatbot tab, the system automatically opens the conversation associated with that specific work item. This allows users to discuss task-related information without navigating away from the current task.
In certain modules, the Chat option is available within the Ellipsis menu. Selecting this option opens the Chatbot and automatically navigates the user to the conversation related to the selected item.
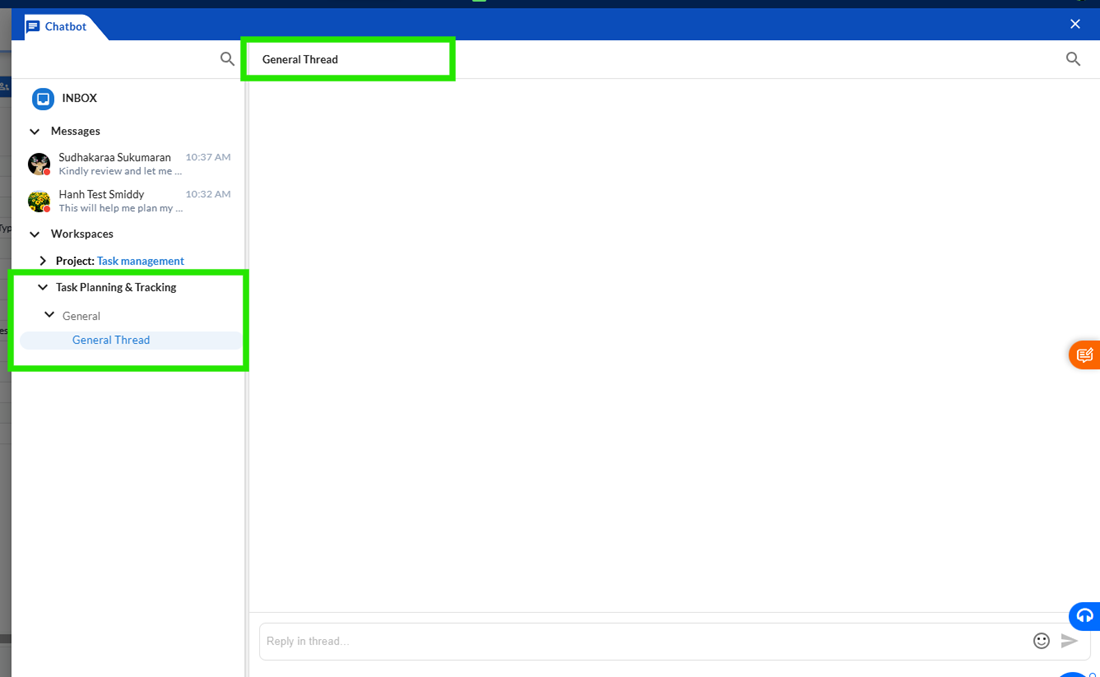
- Chatbot Interface
The Chatbot interface is divided into three primary sections. The left navigation panel provides access to Inbox, Messages, and Workspaces. The center section displays conversations, messages, channels, and threads. The bottom section contains the message composer, allowing users to type and send messages.
This layout enables users to easily switch between conversations while maintaining visibility of ongoing discussions.
- Inbox
The Inbox serves as a centralized location for all unread messages. It displays unread conversations from direct messages, work item discussions, workspace channels, and threads. Users can quickly identify pending communications without opening individual conversations.
Selecting an item from the Inbox automatically navigates the user to the corresponding conversation, allowing them to review and respond to messages efficiently.
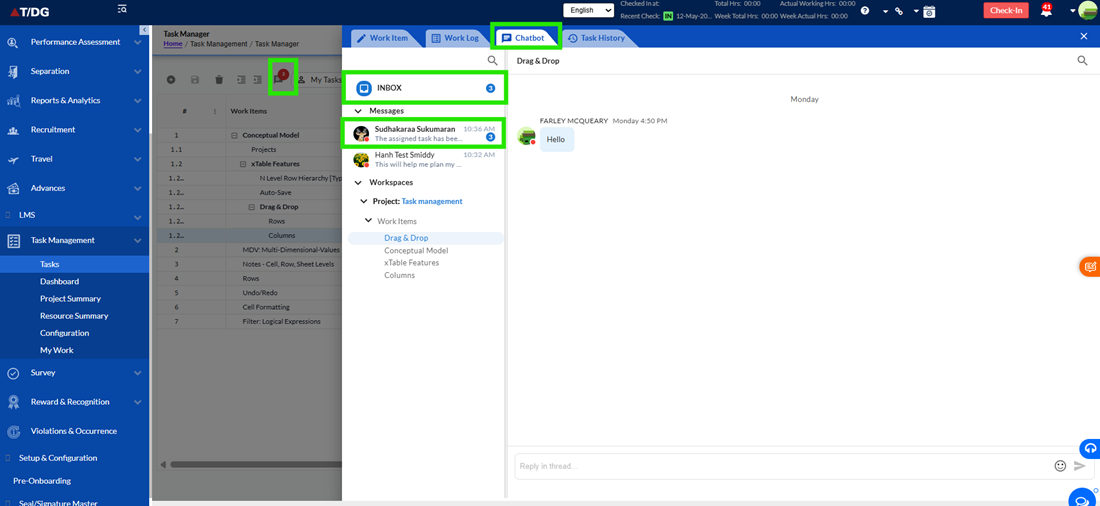
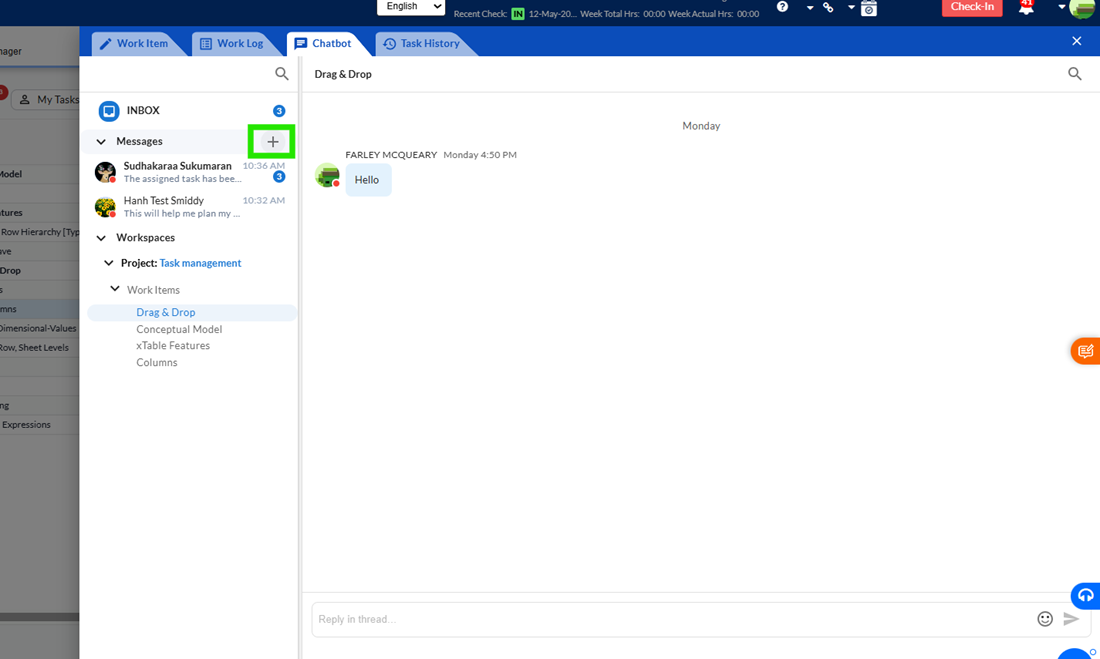
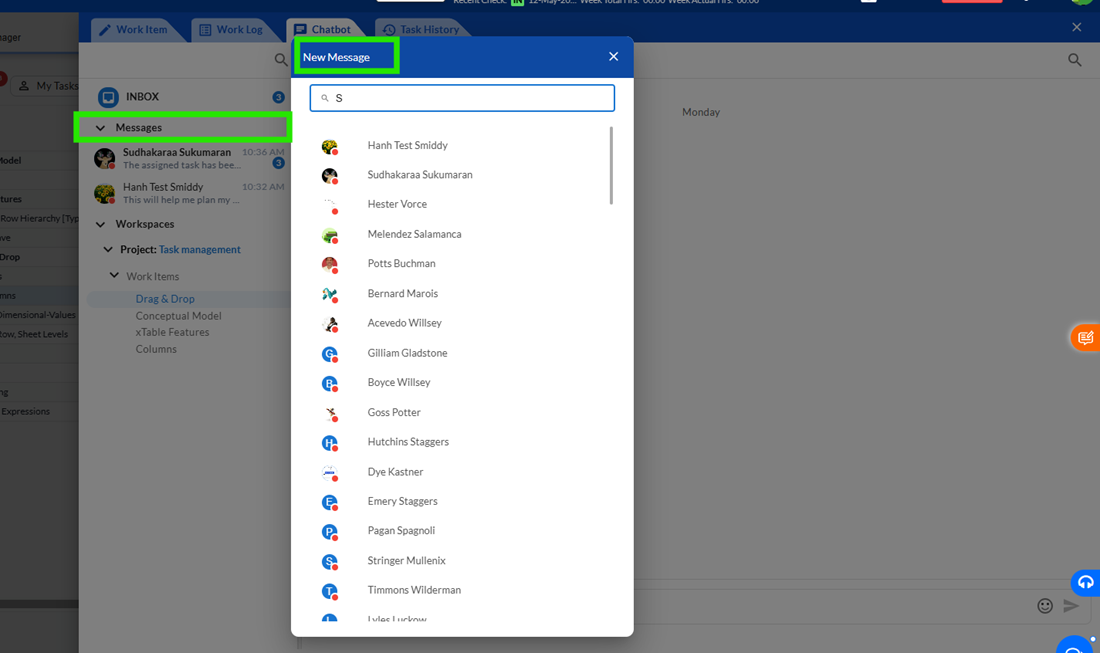
- Direct Messages
Direct Messages allow users to communicate privately with other users within the system. Users can start a new conversation by selecting the Plus (+) icon in the Messages section and searching for the desired user. Once selected, the conversation is added to the Messages panel for future access.
Each conversation displays the participant's name, profile image, and availability status. Users can exchange messages in real time and maintain a complete history of their communication.
Messages include timestamps that help users understand when conversations occurred. The system also provides indicators showing whether a message has been successfully delivered or viewed by the recipient.
- Managing Messages
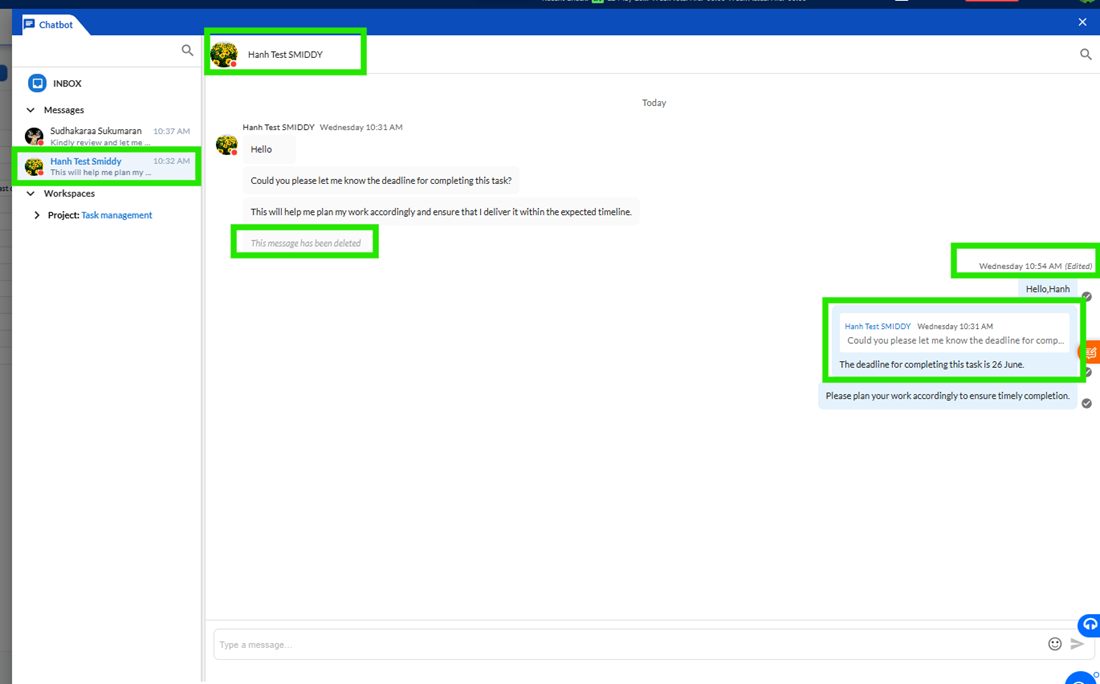
The Chatbot provides several options to help users manage conversations effectively. Users can edit messages that they have sent, delete messages that are no longer required, and reply directly to specific messages to maintain conversation context.
When a message is deleted, the original content is removed and replaced with a placeholder message indicating that the message has been deleted. This helps maintain the continuity of the conversation while making users aware that a message previously existed.
The reply feature allows users to respond directly to a particular message instead of the entire conversation, making discussions easier to follow, especially in active chats.
- Workspaces
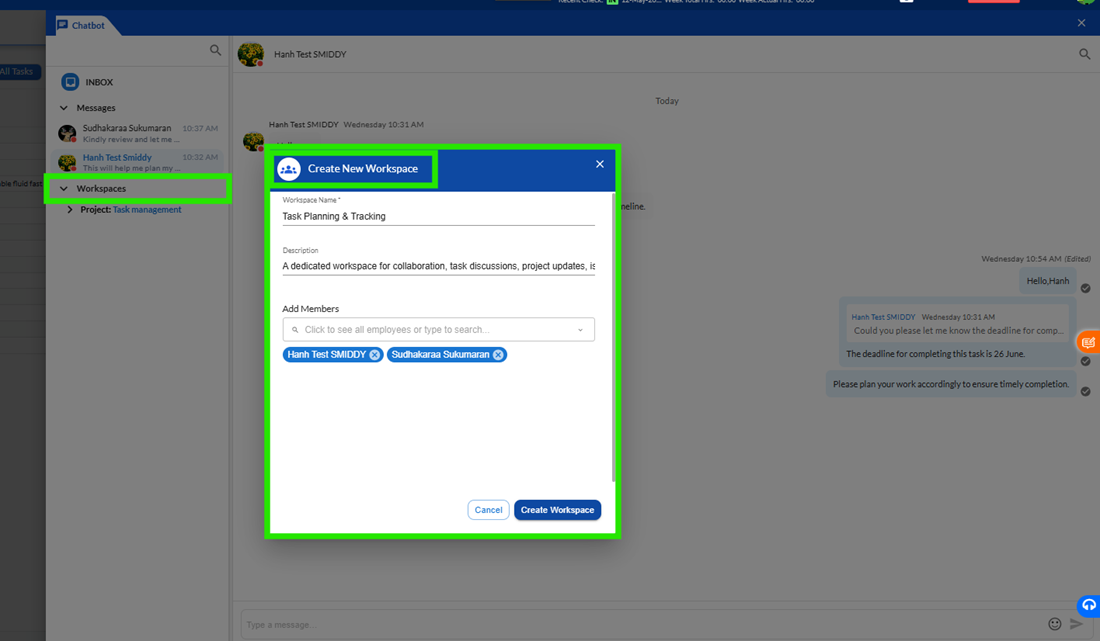
Workspaces provide a collaborative environment where teams can organize discussions related to projects, departments, or specific areas of work. A workspace acts as the primary container for communication and can contain multiple channels and discussion threads.
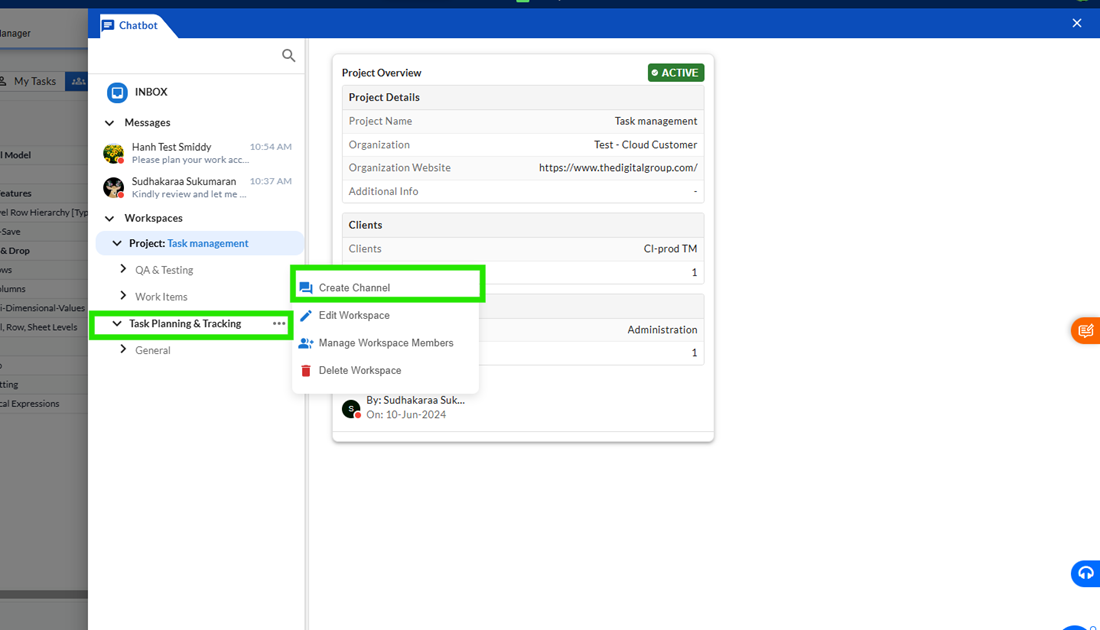
Users can create a new workspace by providing a workspace name and adding team members. Once created, the workspace becomes available to all added members, allowing them to participate in discussions and collaborate effectively.
Each workspace automatically includes a default channel and thread, enabling communication to begin immediately after creation.
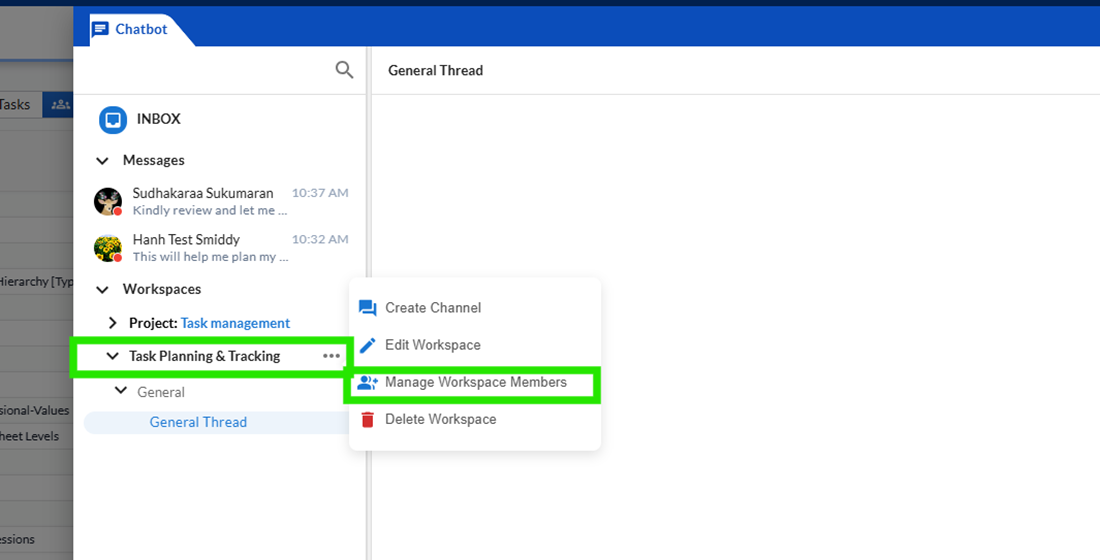
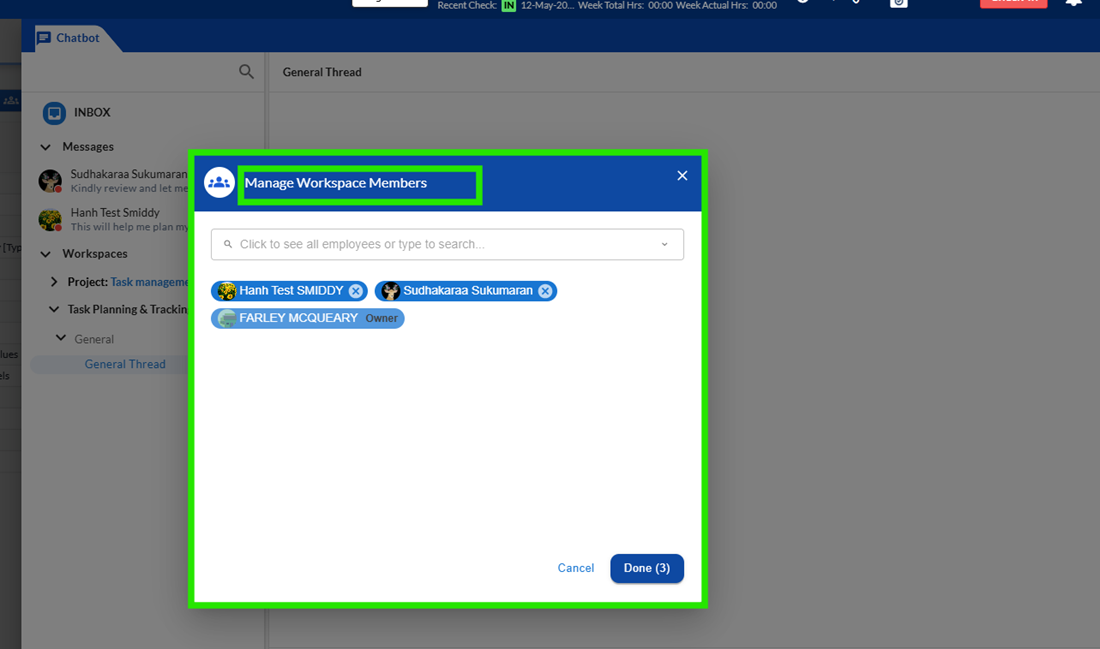
- Managing Workspace Members
Workspace owners and authorized users can update workspace details and manage workspace members. Users can add new members, remove existing members, and update workspace information whenever required.
Managing workspace membership helps ensure that the correct users have access to relevant discussions and project communications.
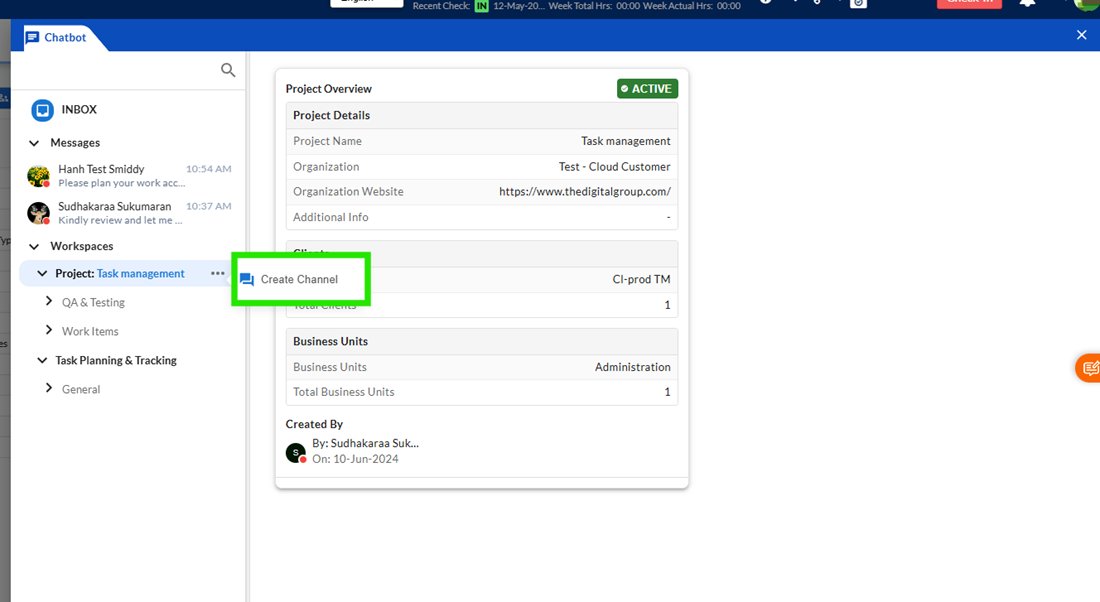
- Channels
Channels help organize conversations within a workspace by grouping discussions into separate topics. Users can create channels for different functional areas, teams, projects, or activities, making communication more structured and easier to navigate.
When a new channel is created, it becomes available within the selected workspace and can be accessed by workspace members.
Users can also update channel information or remove channels that are no longer required.
- Threads
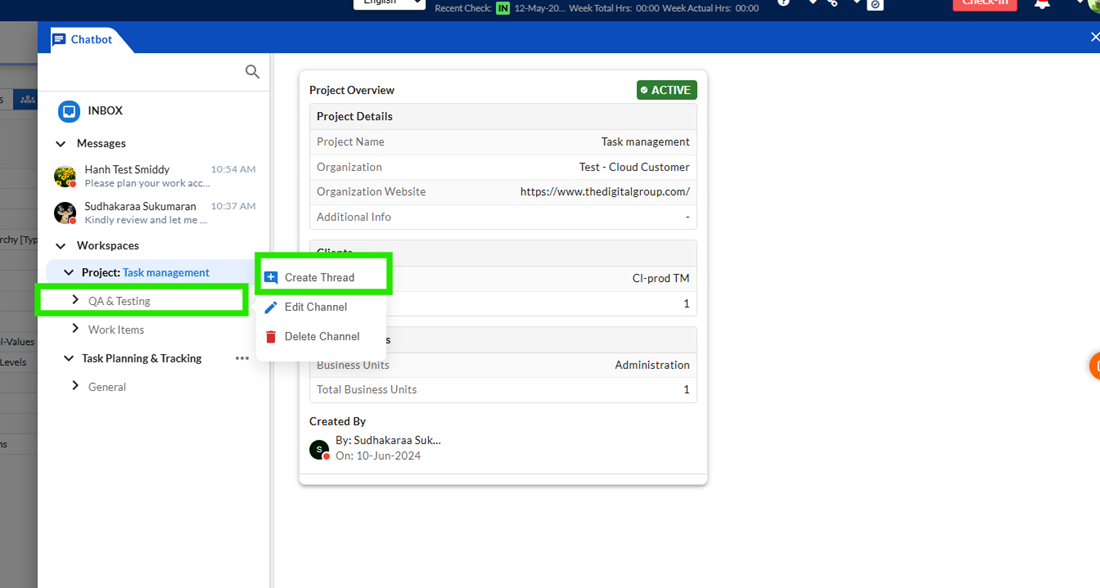
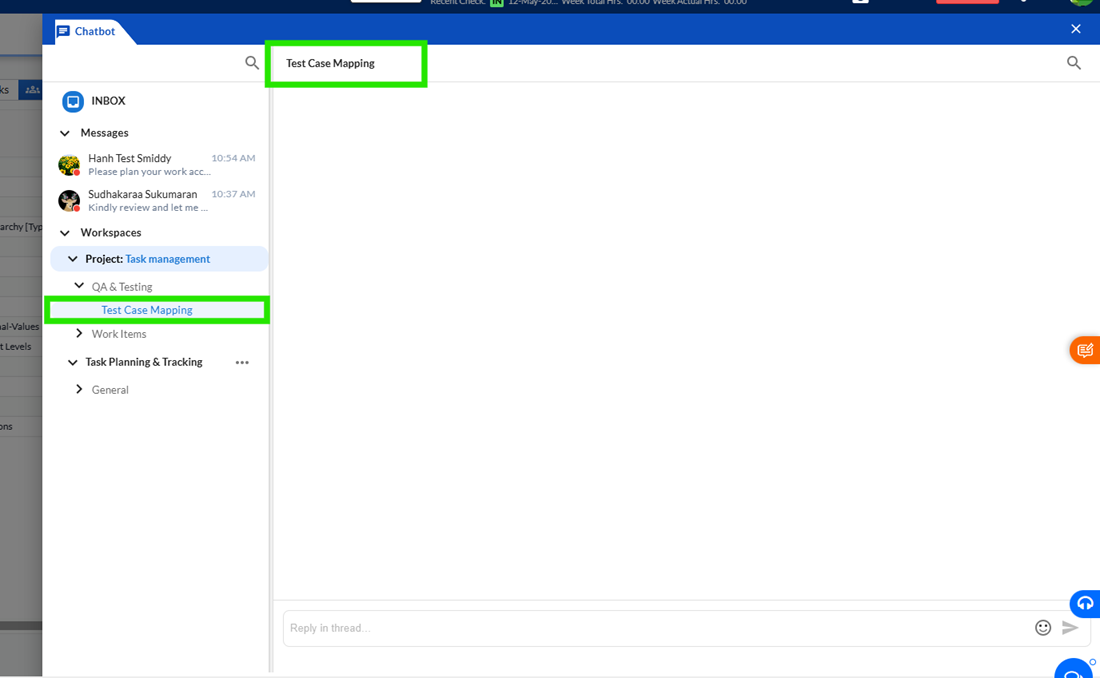
Threads allow users to organize conversations within a channel. Instead of having all discussions in a single location, users can create separate threads for specific topics, helping keep conversations focused and easier to follow.
Every workspace includes a default General Thread that is available immediately after workspace creation. Additional threads can be created whenever users need separate discussions for specific topics, tasks, or activities.
Using threads improves organization and reduces clutter within active channels.
- Search Functionality
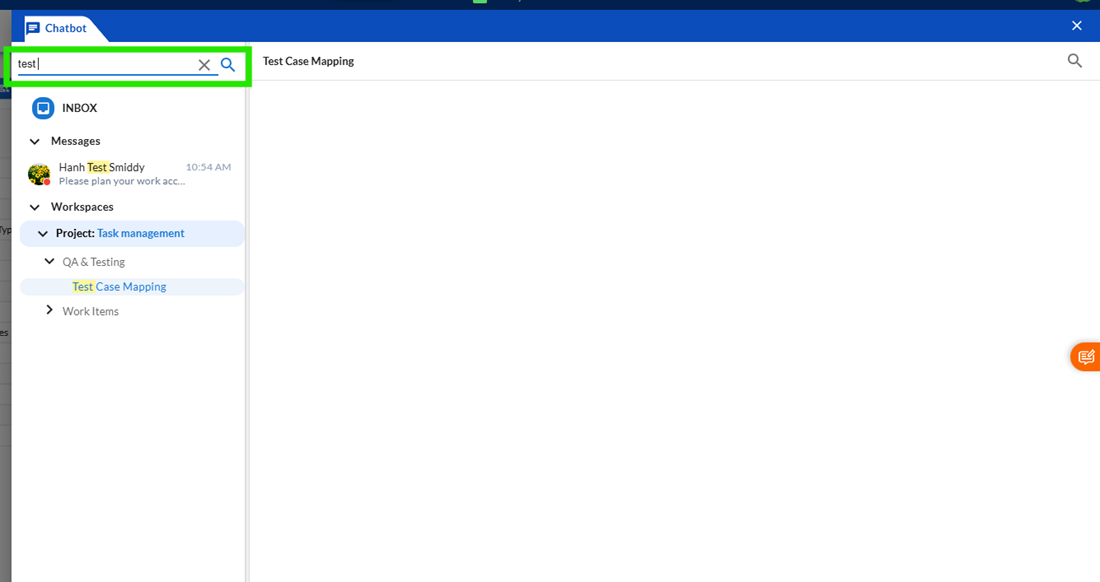
The Chatbot provides search functionality to help users quickly locate conversations and messages.
The global search option allows users to search across direct messages, workspaces, channels, and other available conversations. Search results are displayed dynamically as users type, making navigation faster and more efficient.
Within an active conversation, users can use the Find in Chat or Find in Thread option to search for specific words, phrases, or messages. Matching content is highlighted, helping users quickly locate the required information.
- Collaborating on Work Items
One of the key benefits of the Chatbot is its integration with work items. When users access the Chatbot from a specific task, the system automatically opens the conversation associated with that work item. This allows team members to discuss task requirements, updates, issues, and progress directly within the context of the task.
Keeping conversations linked to work items improves collaboration and ensures that important discussions remain associated with the relevant work.
The Chatbot provides a centralized communication platform for users across the application. Messages, workspace discussions, channels, and task-related conversations are organized in a way that allows users to quickly find information and collaborate effectively.
Unread messages are highlighted within the Inbox, search functionality helps locate conversations efficiently, and workspace structures allow teams to organize communication according to their business needs. By integrating communication directly into the Task Management module, the Chatbot reduces dependency on external tools and ensures that project discussions remain connected to the work being performed.
9 Work Log & Timesheet Synchronization
1. Purpose
The purpose of this functionality is to ensure thatWork Log entries and their descriptions remain fully synchronized with the Timesheet view. This helps maintain:
- Accurate hour calculations
- Consistent task-level details
- Prevention of accidental data loss during edits
This ensures users always seereliable and consistent dataacross all related views.
2.Synchronization Scope
Synchronization is maintained across the following components:
- Work Log Page
- Timesheet View (Time Port)
- Task Editor (where applicable)
Important:
Any update made in one view must reflect consistently across all other views.
3. Timesheet (Time Port) Display Behaviour
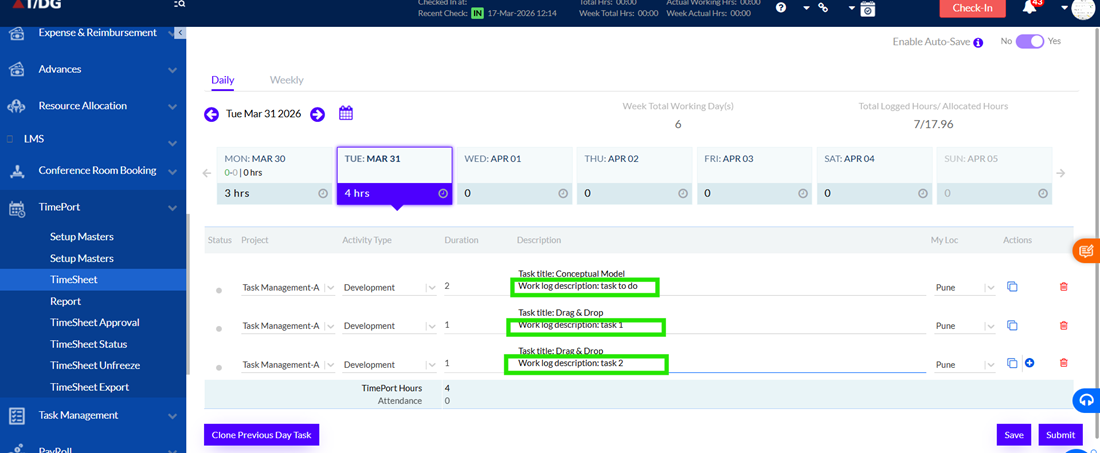
When a user logs multiple entries for the same task (for example, 5 entries totalling 5 hours), the Timesheet must display each entry individually.
Expected Behaviour
- Each work log entry appears as aseparate row
- Each entry retains:
- Its original logged hours
- Its description
- Its timestamp-order
- There should beno aggregationof hours at:
- Task level
- Day level
System Rules
- The Timesheet must reflect Work Log entriesexactly as recorded
- The order of entries must remain unchanged to maintain traceability
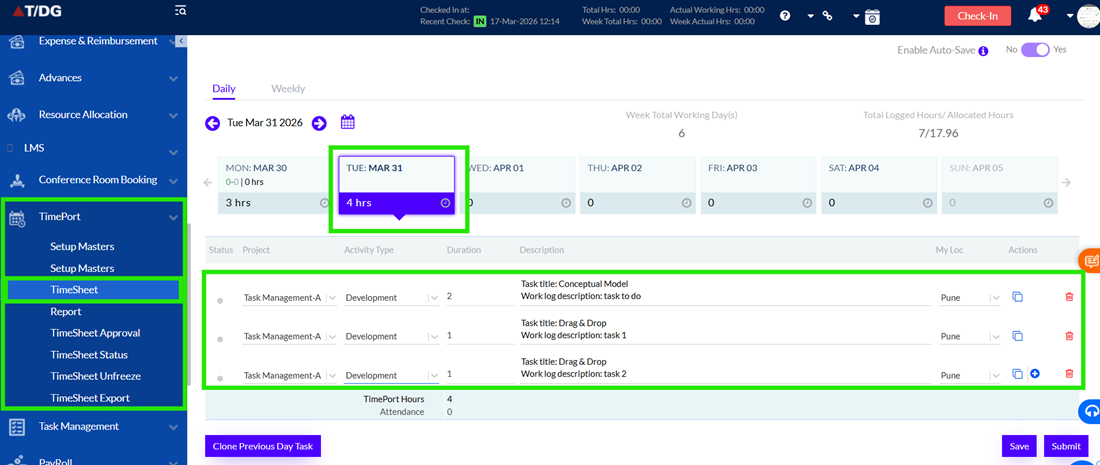
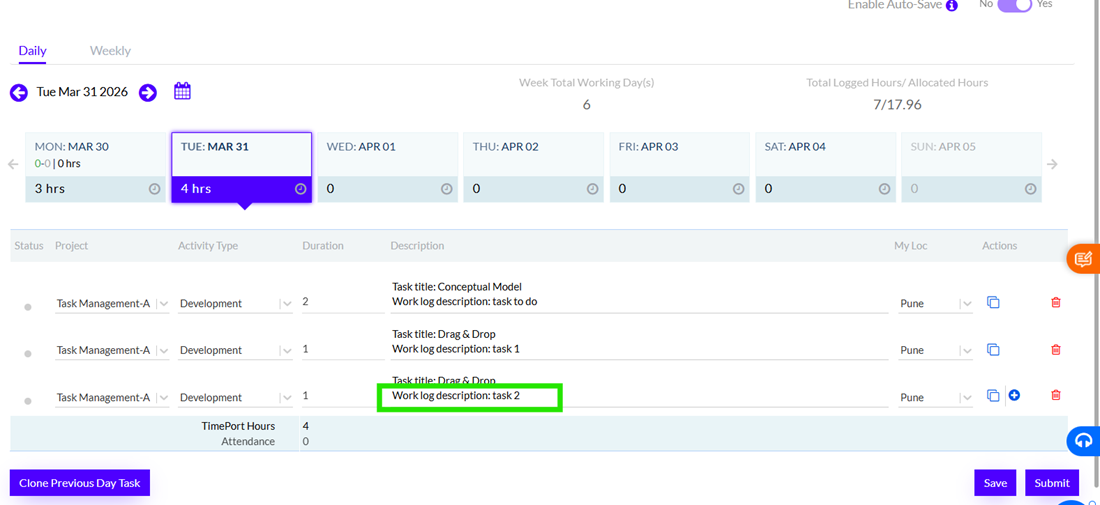
4. Description Handling
Descriptions entered in Work Logs must be accurately displayed in the Timesheet.
Structure
- Task Title Column:Displays the task name
- Description Column:Displays the work log description
Expected Behaviour
- Each work log entry must show itsown description
- Descriptions must not:
- Be overwritten
- Be merged
- Be lost
System Rules
- Description data must always remain linked to its specific work log entry
- The system must preserve descriptions during all operations (viewing, editing, syncing)
5. Edit Synchronization
Users can edit work log descriptions from:
- Timesheet view
- Task Editor
Expected Behaviour
- Changes are saved successfully
- Updates are reflected immediately across:
- Work Log page
- Timesheet view
System Rules
- All updates must remain consistent across all synchronized views
- There should beno mismatch between Work Log and Timesheet data
6. Data Loss Prevention
To prevent accidental removal of descriptions, the system enforces the following behaviour:
If a user clears a description
- Before saving, the system will:
- Automatically restore the previous description
- Fetch it from the Work Log page
Final Save Validation
- The system ensures:
- Descriptions are not removed unintentionally
- Any change or removal must be explicitly confirmed by the user
Important Constraints
- Work log descriptions must never be lost during editing
- Data integrity must always be maintained across all views
- Time Entry Rules
To maintain accurate tracking:
- Start Time and End Time mustnot overlapfor the same user on the same day
- Each work log entry must represent a valid and non-conflicting time range
System Constraints
- Overlapping entries are not allowed
- All time validations are system-controlled
- System Calculations and Progress Tracking
The following fields are automatically calculated by the system:
- % Complete
- Total Logged Hours
- Actual Start Date
- Actual End Date
Behaviour
- Progress is calculated using thelatest work log entries per assignee
- A task is marked complete only when:
- All assignees reach 100% completion
Important Rules
- These values areread-only
- Users cannot manually override or edit them
- All calculations are system-driven and auditable
- Synchronization Integrity
To ensure consistency:
- Work Log and Timesheet data must always remainfully synchronized
- Any update in one module must reflect in all other related modules
System Rules
- No data mismatch should occur between views
- All updates must be processed in real time or near real time
- Key Summary
This functionality ensures:
- Accurate and detailed tracking of individual work log entries
- Complete synchronization across Work Log, Timesheet, and Task Editor
- Strong data protection to prevent accidental loss
- System-controlled calculations for reliability and auditability
It is designed to provide aconsistent, transparent, and reliable time tracking experiencefor all users.
10 Grid Column Filters
- Overview
The Grid Column Filter functionality helps users quickly locate specific work items by applying filters directly to individual columns within the Task Manager grid. Instead of manually searching through large volumes of data, users can filter records based on values such as Work Item Type, Priority, Status, or Assignee.
The filtering options available depend on the type of column being filtered. For columns that allow only a single value, such as Work Item Type, Priority, and Status, the system provides operators that filter based on one selected value. For columns that support multiple values, such as Assignee, the system provides operators that allow users to include or exclude multiple values at the same time.
The filter functionality enables users to focus on relevant information, improve data visibility, and manage tasks more efficiently.
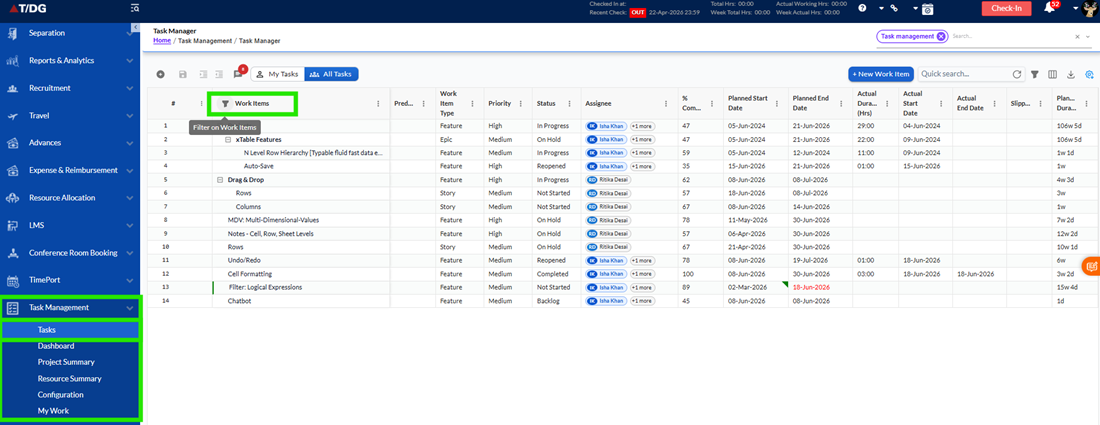
- Accessing Column Filters
Each filterable column in the Task Manager grid contains a filter icon within the column header. Clicking the filter icon opens a filter panel where users can select a filter condition and choose one or more values.
The available filter options are automatically displayed based on the type of column selected. Once a filter is applied, the grid refreshes and displays only the records that match the selected criteria.
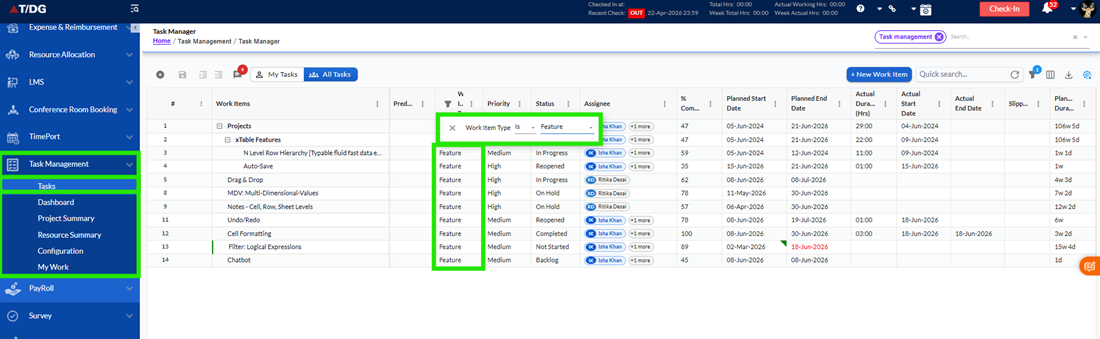
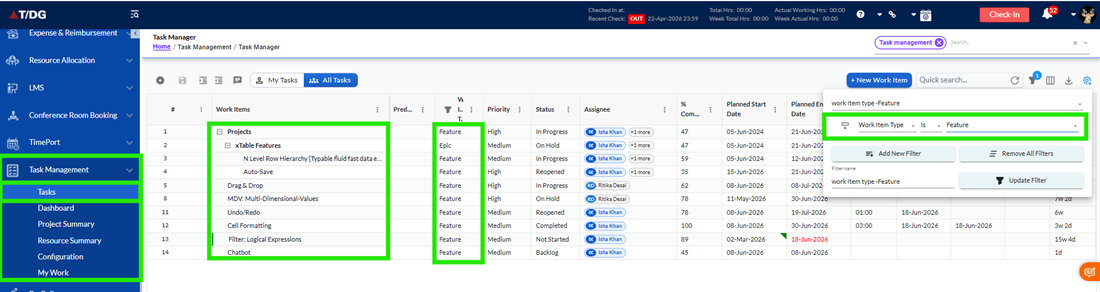
- Filtering Single-Select Columns
Single-select columns contain only one value per record. Examples include Work Item Type, Priority, and Status.
When a filter is opened for one of these columns, the system displays the operators Is and Is not. Users can select one of these operators and choose the required value from the available list.
TheIsoption displays only records that exactly match the selected value. For example, selecting Status as "Backlog" displays only work items currently in the Backlog status.
The Is not option displays all records except those that match the selected value. For example, selecting Priority as "High" using the "Is not" operator hides all High-priority items and displays the remaining records.
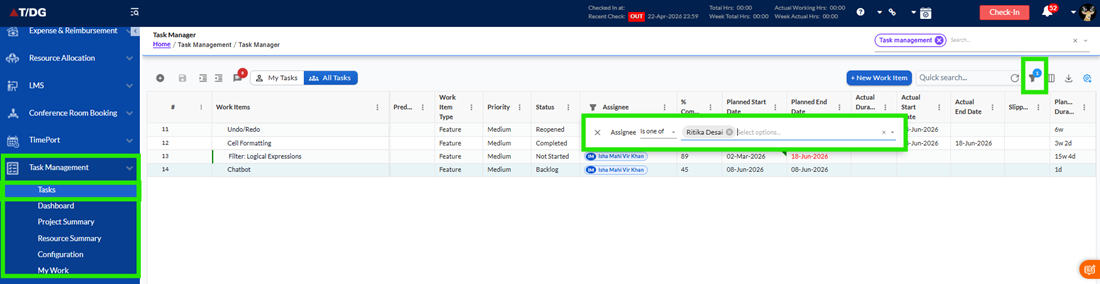
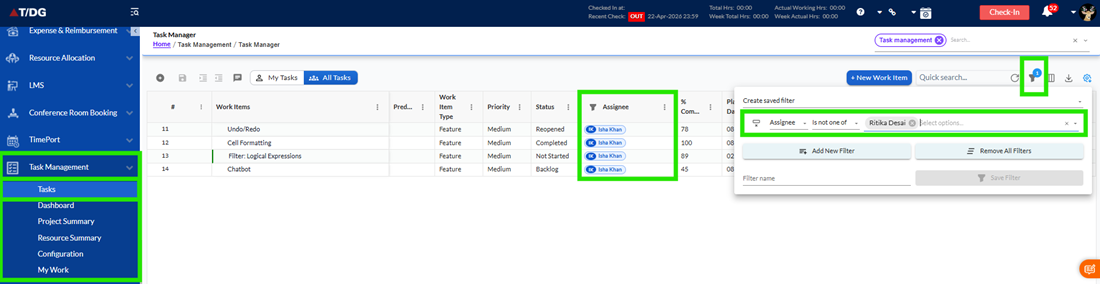
- Filtering Multi-Select Columns
Multi-select columns can contain more than one value within a single record. The Assignee column is an example of a multi-select column.
When users open the filter panel for a multi-select column, the system displays the operatorsIs one ofandIs not one of. Multiple values can be selected using checkboxes.
TheIs one ofoption displays records that match any of the selected values. For example, selecting multiple assignees displays all tasks assigned to any of the selected users.
TheIs not one ofoption excludes records that match the selected values and displays all remaining records.
This functionality allows users to quickly include or exclude multiple users without applying separate filters.
- Working with Filter Values
The filter value list displays only the values that are currently available within the selected column. This helps users choose from valid options and reduces the likelihood of applying incorrect filters.
For multi-select filters, values are displayed with checkboxes, allowing users to select multiple entries simultaneously. For single-select filters, users can choose one value from the dropdown list.
Once the required values are selected, the filter can be applied immediately and the grid updates automatically to reflect the results.
- Filtering Records with Empty Values
Some records may contain blank or undefined values in certain columns. The system handles these records automatically when filters are applied.
When using operators such asIsorIs one of, records with blank values are excluded from the results because they do not match any selected value.
When using operators such asIs notorIs not one of, records with blank values remain visible because they do not match the excluded values.
This behaviour ensures that filtering results remain accurate and predictable.
![]()
![]()
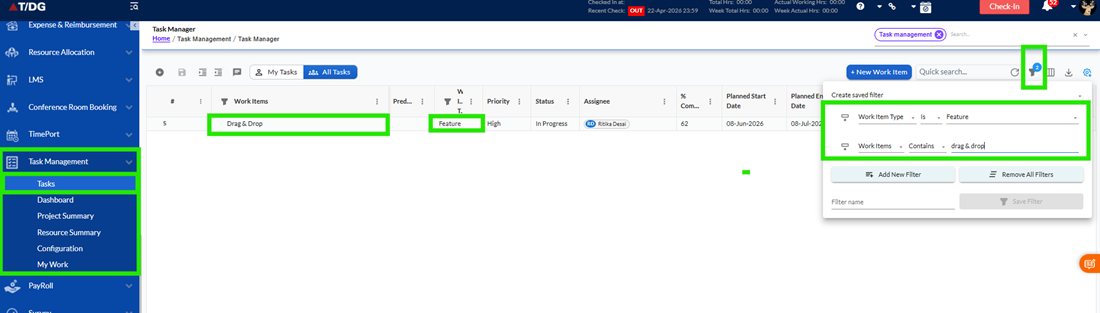
- Applying Multiple Filters
Users can apply filters to multiple columns at the same time. For example, a user may filter tasks where the Status is "Backlog" and the Priority is "High".
When multiple filters are active, the grid displays only records that satisfy all applied conditions simultaneously. This allows users to narrow down large datasets and focus on highly specific task groups.
The filter criteria remain active until they are cleared or modified by the user.
- Identifying Active Filters
When a filter is applied to a column, the filter icon for that column is visually highlighted. This helps users quickly identify which columns currently have active filters.
If a user reopens a filtered column, the previously selected operator and values remain visible, allowing the filter to be reviewed, modified, or removed without needing to recreate it.
This provides a consistent and user-friendly filtering experience.
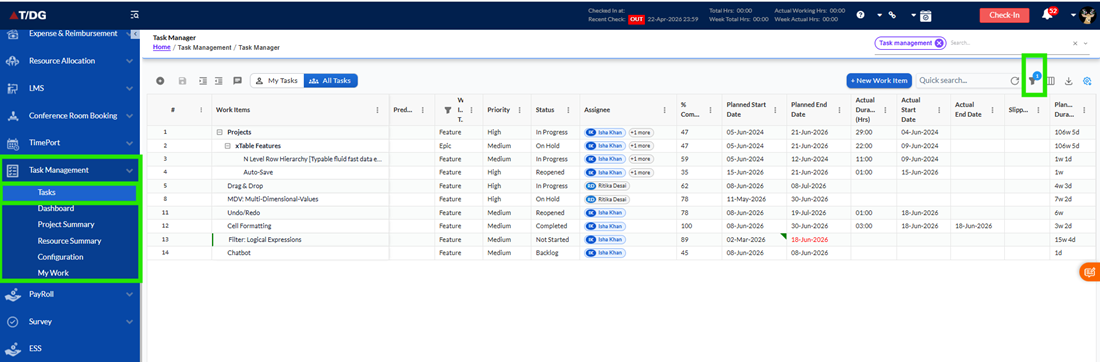
- Clearing Filters
Filters can be removed at any time. Users can clear an individual column filter or remove all applied filters to return to the complete dataset.
Once a filter is cleared, the grid automatically refreshes and displays all available records again. The filter icon returns to its default appearance, indicating that no filter is currently active.
This allows users to easily switch between filtered and unfiltered views of their data.
![]()
- Working with Hierarchical Data
The filtering functionality supports both parent and child work items within the task hierarchy. When a filter is applied, matching records remain visible while maintaining the hierarchical structure of the grid.
This ensures that users can continue to understand task relationships even when working with filtered datasets.
Grid Column Filters provide a fast and efficient way to locate specific work items within large datasets. By allowing users to filter tasks based on status, priority, work item type, and assignee information, the feature improves productivity and reduces the time required to find relevant records.
The ability to apply multiple filters, include or exclude specific values, and work with both single-select and multi-select columns makes task management more flexible and easier to navigate.
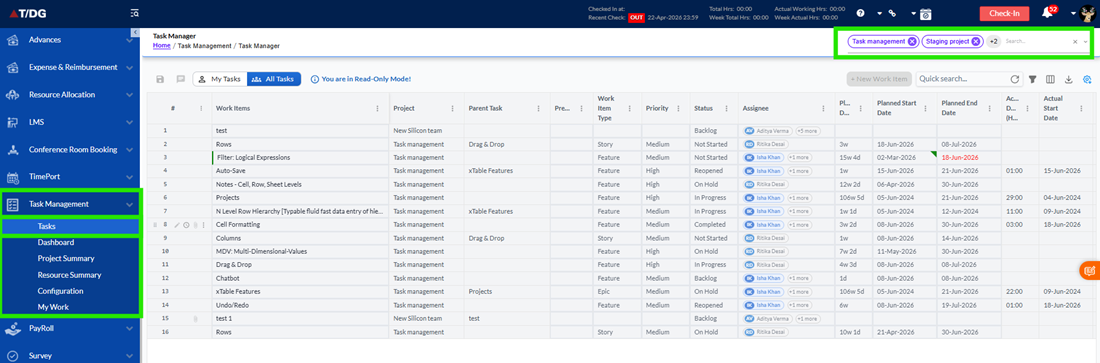
11 Multi-Project Selection
- Overview
The Multi-Project Selection feature allows users to work with tasks from multiple projects simultaneously without repeatedly switching between project contexts. The feature introduces a hierarchical project selector that enables users to choose one or more projects and view their combined task information within a single grid.
Projects are organized in a structured hierarchy consisting of Organization, Business Unit, and Project levels. This structure helps users easily navigate large project portfolios and quickly locate the projects they need to work with.
By allowing users to access information across multiple projects from a single view, the feature improves efficiency, reduces navigation effort, and provides better visibility into cross-project activities.
- Accessing the Project Selector
The Project Selector is available within the Task Management module and is displayed at the top of the page. Users can open the selector to browse available projects and choose the projects they want to view.
Projects are displayed in a hierarchical structure, allowing users to expand and collapse organizations and business units until they reach the desired project level. A search option is also available to help users quickly locate projects within the hierarchy.
Once the required projects are selected, users can apply their selection and the task grid automatically refreshes to display information related to the selected projects.

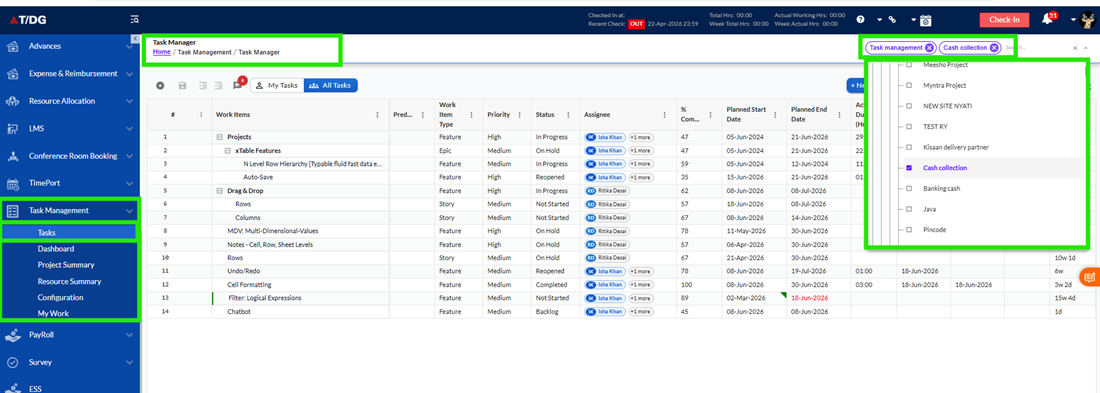
3. Selecting Projects
Users can select one or multiple projects from the hierarchical project structure. Each project is displayed under its corresponding Business Unit and Organization, helping users clearly identify the project location within the hierarchy.
When a project is selected, only that specific project is included in the selection. Projects with similar names that belong to different Business Units remain unaffected and are not selected automatically.
The system supports selecting multiple projects simultaneously, allowing users to review and monitor work across different project areas without changing contexts.
- Viewing Selected Projects
After projects are selected, the chosen projects are displayed as visual tags within the selector area. These selections provide users with a quick overview of the active project context.
When only a small number of projects are selected, each project appears individually. When multiple projects are selected, the system may display a summarized count indicating the total number of selected projects. Users can review the selected projects at any time and remove individual selections when required.
- Working with a Single Project
When a single project is selected, users can continue working with tasks in the same way they do today. The task grid displays project-specific information and supported actions remain available according to the user's permissions.
This mode provides a focused view of a single project while maintaining access to existing task management capabilities.
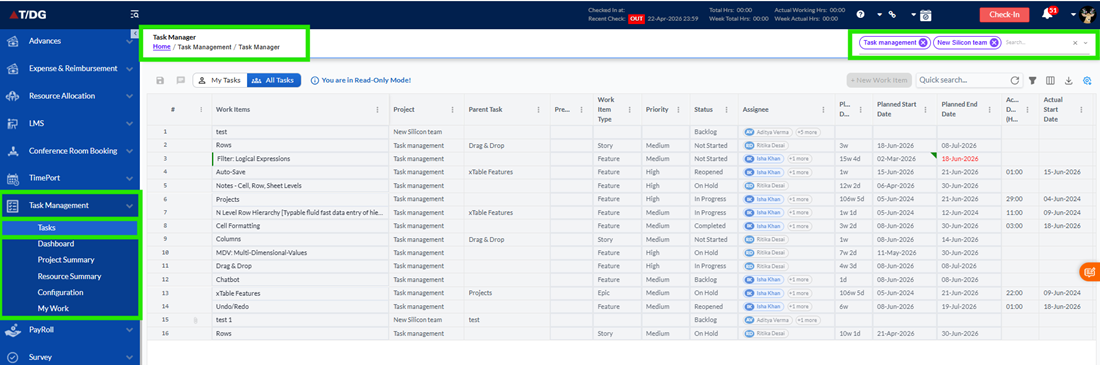
- Working with Multiple Projects
When multiple projects are selected, the task grid displays information from all selected projects within a consolidated view. This enables users to review tasks from different projects without repeatedly changing project selections.
To help users identify task ownership and project context, the Project column becomes visible in the grid whenever multiple projects are selected. This allows users to easily determine which project each task belongs to.
The multi-project view provides a convenient way to monitor activities across projects while maintaining clear project separation.
- Task Grid Behaviour
The task grid automatically refreshes whenever project selections are applied or updated. Tasks from all selected projects are displayed together while preserving the existing grid layout and functionality.
Users can continue using available grid features such as searching, filtering, sorting, and grouping to locate and analyze information more efficiently. These features work seamlessly across all selected projects.
The displayed data remains organized and easy to navigate regardless of the number of selected projects.
- Searching and Filtering Data
The Multi-Project Selection feature works together with existing search and filtering capabilities. Users can perform searches, apply filters, sort records, and group information while viewing one or more projects.
This allows users to narrow down results and quickly locate relevant tasks across multiple project environments without changing project selections.
- Managing Project Selections
Users can modify project selections at any time. Individual projects can be removed from the active selection without affecting the remaining projects. Users can also clear all selected projects and start a new selection whenever required.
Changes made to project selections are immediately reflected in the task grid, ensuring that users always view information relevant to their current project context.
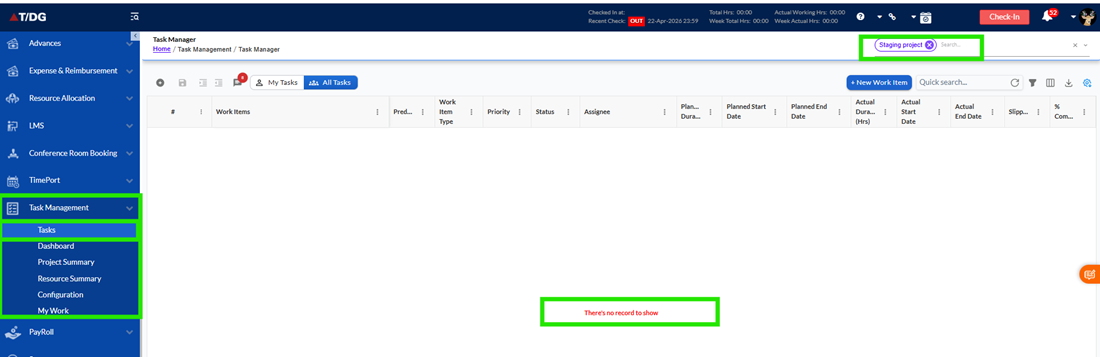
- No Data Available
If no projects are selected, the system displays an appropriate message indicating that a project selection is required. Similarly, if the selected projects do not contain any available tasks, the system displays a message informing users that no task records are available for the current selection.
These messages help users understand the current state of the page and guide them toward the appropriate action.
The Multi-Project Selection feature provides users with greater flexibility when managing tasks across multiple projects. By reducing the need to repeatedly switch project contexts, users can work more efficiently, gain better visibility into project activities, and streamline cross-project workflows.
The hierarchical project selector ensures that projects remain organized and easy to navigate, while the consolidated task view helps users monitor and manage work from multiple projects within a single interface.
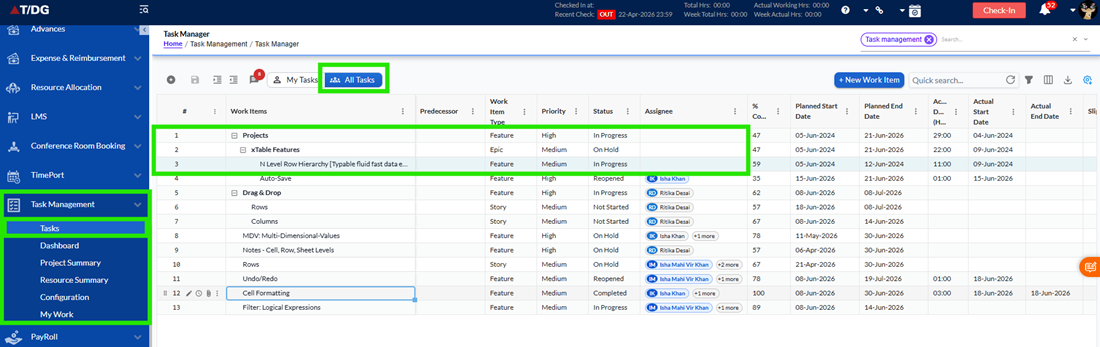
12 My Tasks Filter View
- Overview
The My Tasks Filter View helps users quickly focus on tasks that are directly assigned to them. Instead of navigating through the complete project task list, users can switch to a personalized view that displays only their assigned work items. This feature improves productivity by reducing clutter and allowing users to concentrate on their responsibilities without manually applying multiple filters.
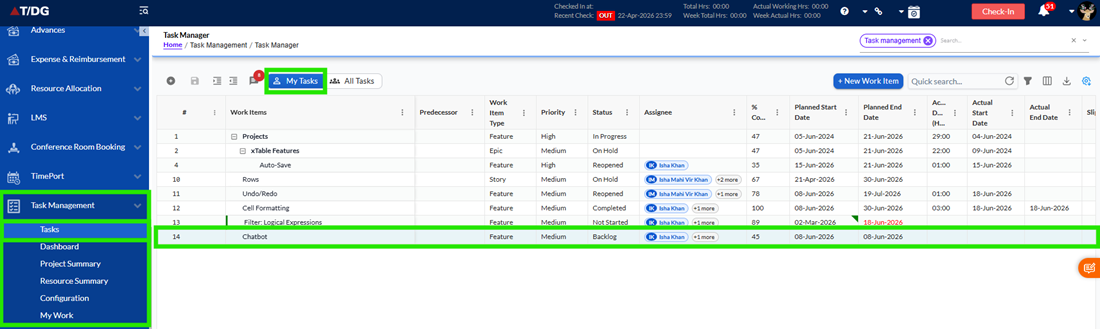
The filter is available within the Task Management module and can be accessed from the Task Grid and My Work Dashboard. Users can easily switch between viewing all project tasks and viewing only their assigned tasks using a simple toggle control.
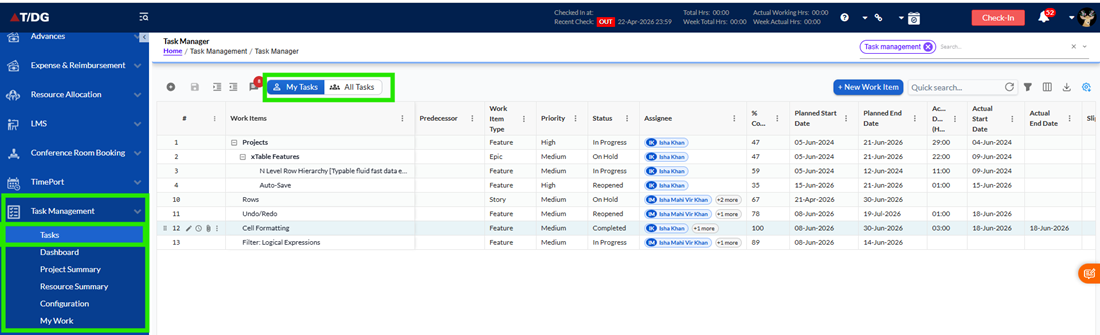
- Accessing My Tasks View
The My Tasks filter is available on the Task Grid toolbar and is displayed as a toggle control. By default, the system displays all tasks available to the user. When the My Tasks option is enabled, the grid automatically refreshes and displays only the tasks assigned to the logged-in user.
Users can switch back to the complete task list at any time by disabling the filter. The transition between both views is immediate and does not require navigating away from the page.
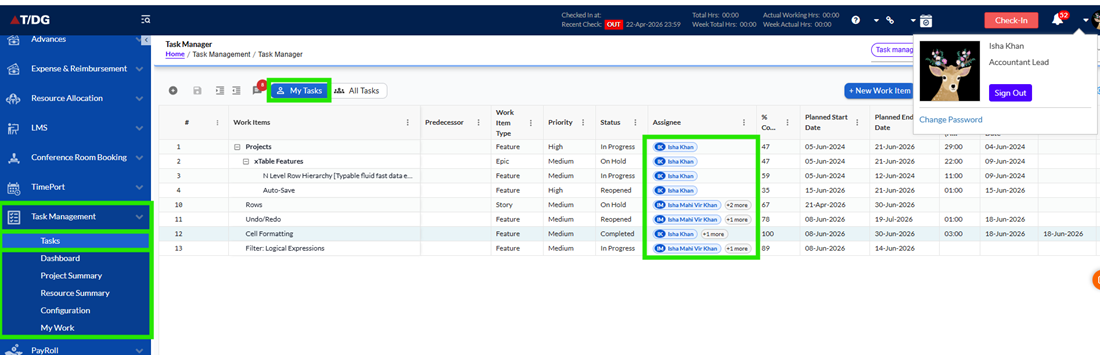
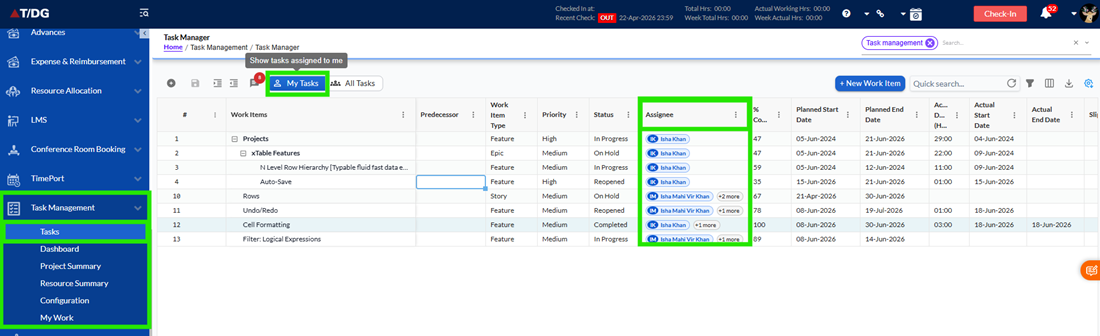
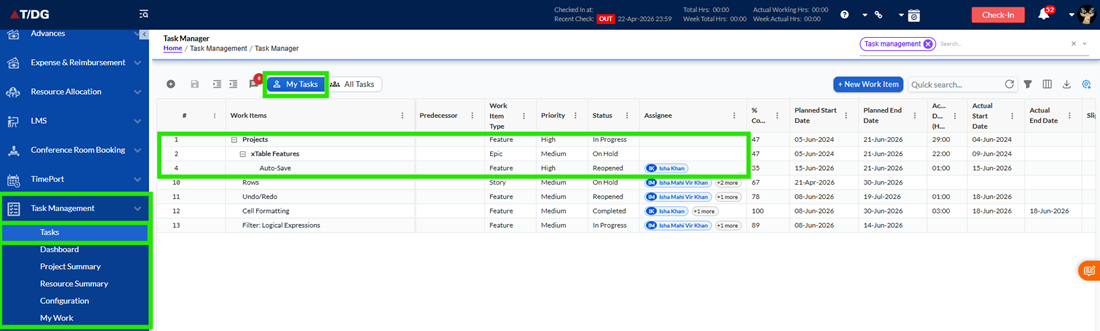
- Viewing Assigned Tasks
When the My Tasks filter is enabled, the system displays only those tasks where the logged-in user is assigned. This provides a personalized view of work items and allows users to quickly identify pending, active, completed, and overdue tasks that require their attention.
The filtered view continues to display task information in the same format as the standard Task Grid, ensuring a familiar user experience. Users can perform their normal activities such as viewing task details, updating work items, and reviewing progress while using the filtered view.
- Hierarchical Task Display
Many projects contain parent and child task relationships. When the My Tasks filter is enabled, the system preserves the hierarchy structure to ensure users can understand how their assigned work fits within the overall project.
If a child task is assigned to the user, the related parent task is displayed to provide context. Similarly, if a parent task is assigned directly to the user, it remains visible regardless of child task assignments. This approach helps users maintain visibility into the complete work structure while focusing only on relevant tasks.
Users can continue using expand and collapse functionality to navigate task hierarchies as they normally would in the Task Grid.
- Working with Task Information
The My Tasks view supports all standard task management activities available within the Task Grid. Users can open task details, review assigned work, update progress, manage work logs, and collaborate through task-related discussions.
Any updates made to tasks are reflected in the filtered view, ensuring that users always have access to the latest information regarding their assigned work.
- Searching and Filtering Tasks
The My Tasks view works seamlessly with existing search and filtering capabilities. Users can apply additional filters, perform keyword searches, sort task information, or group records while keeping the My Tasks filter active.
When multiple filters are applied, the displayed results reflect only those tasks that satisfy all selected conditions. This allows users to narrow down their assigned work further and quickly locate specific tasks.
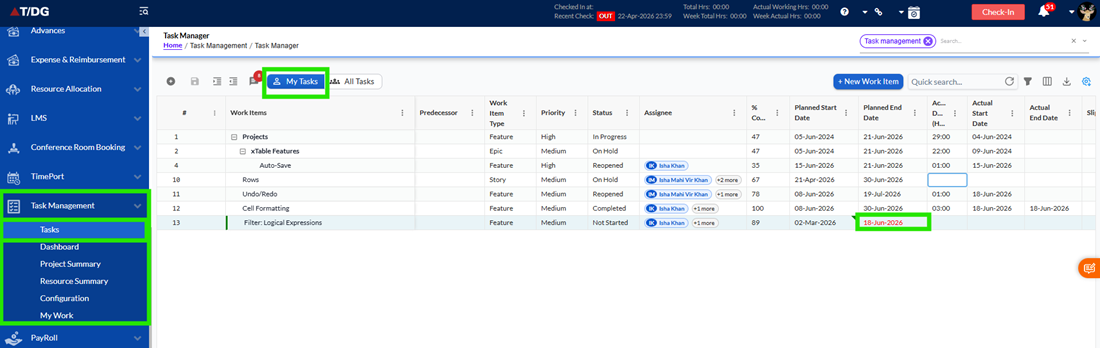
- Monitoring Overdue Tasks
The My Tasks view helps users identify overdue work more effectively. Tasks that have exceeded their planned completion date are highlighted with visual indicators, making them easy to recognize within the grid.
These indicators allow users to prioritize delayed activities and take corrective action where necessary. Overdue information displayed within the My Tasks view is based only on the tasks currently visible to the user.
- Real-Time Task Updates
The My Tasks view automatically reflects changes to task assignments whenever task information is updated. If a user is assigned to a new task, that task becomes available in the My Tasks view after the system refreshes. Similarly, if a user is removed from a task assignment, the task is no longer displayed in the filtered list.
This ensures that users always have an accurate and up-to-date view of their assigned responsibilities.

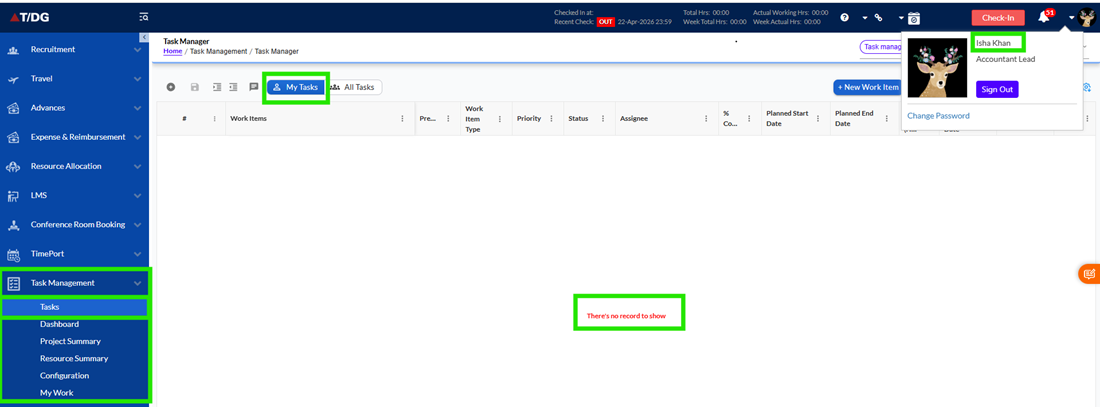
- No Assigned Tasks Scenario
If no tasks are currently assigned to the logged-in user, the system displays an informational message indicating that there are no assigned tasks available. This helps users clearly understand that the filter is working correctly and that no matching records exist.
Users can return to the complete task list at any time by switching back to the All Tasks view.
The My Tasks view provides a simplified and focused experience for users who need to track and manage their assigned work. By reducing unnecessary information and highlighting only relevant tasks, the feature improves productivity, enhances task visibility, and helps users stay organized throughout the project lifecycle.
The ability to combine the My Tasks filter with existing search, sorting, and grouping features ensures that users can efficiently manage their workload while maintaining full access to all standard Task Management functionality.
13 Email Notifications
- Overview
The Email Notification feature helps users stay informed about important task-related activities within the Task Management module. Whenever significant actions occur, such as task assignment, completion, reopening, overdue reminders, work log completion, or timeline extension requests, the system automatically sends email notifications to the relevant users. These notifications ensure that users are aware of task updates without needing to continuously monitor the application.
Notifications are generated automatically based on system activities and are delivered through configured email templates. Depending on the type of activity performed, notifications may be sent to task assignees, task creators, or other relevant users involved in the task.
- Verifying Email Notifications
When a task-related action is performed in the application, the system automatically triggers an email notification based on the configured notification settings. The email may take a few minutes to arrive, as it is processed in the background by the system.
Once the email has been generated and delivered, users can view it in their Outlook mailbox. Depending on the type of notification, the email will be sent to the Task Creator, the Task Assignee, or both.
To verify that the notification has been received, simply open Outlook and check your Inbox for the latest email related to the task action performed.
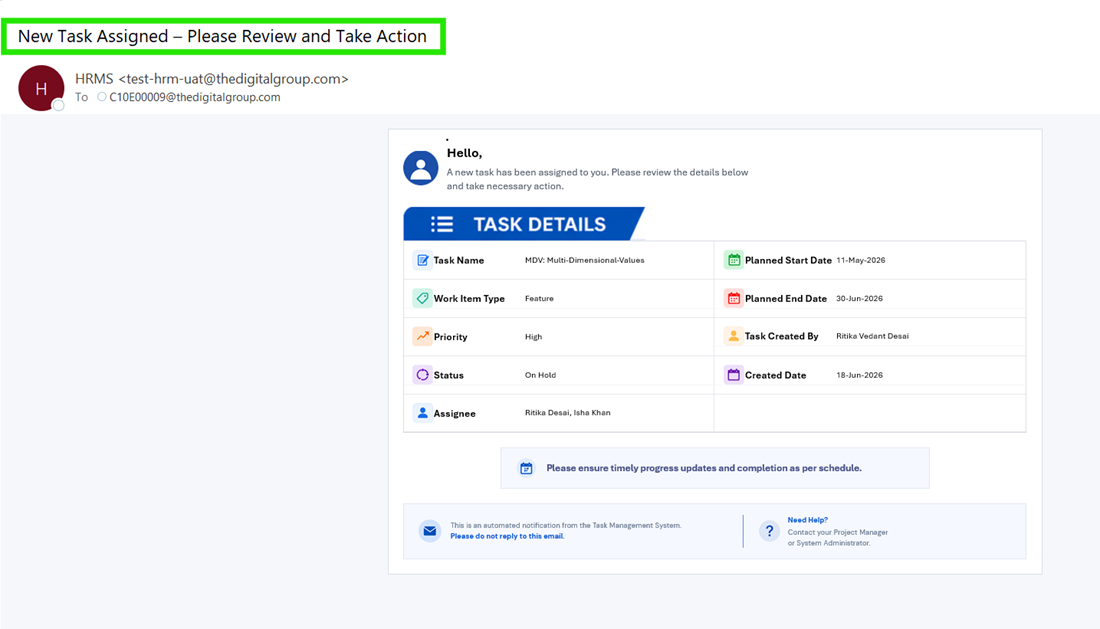
- Task Assignment Notification
A Task Assignment Notification is sent whenever a task is assigned to one or more users. The purpose of this notification is to inform users that a new task has been assigned to them and requires their attention. The email contains relevant task information to help assignees understand their responsibilities and begin work accordingly.
Users assigned to a task will receive this notification automatically after the assignment is completed successfully.
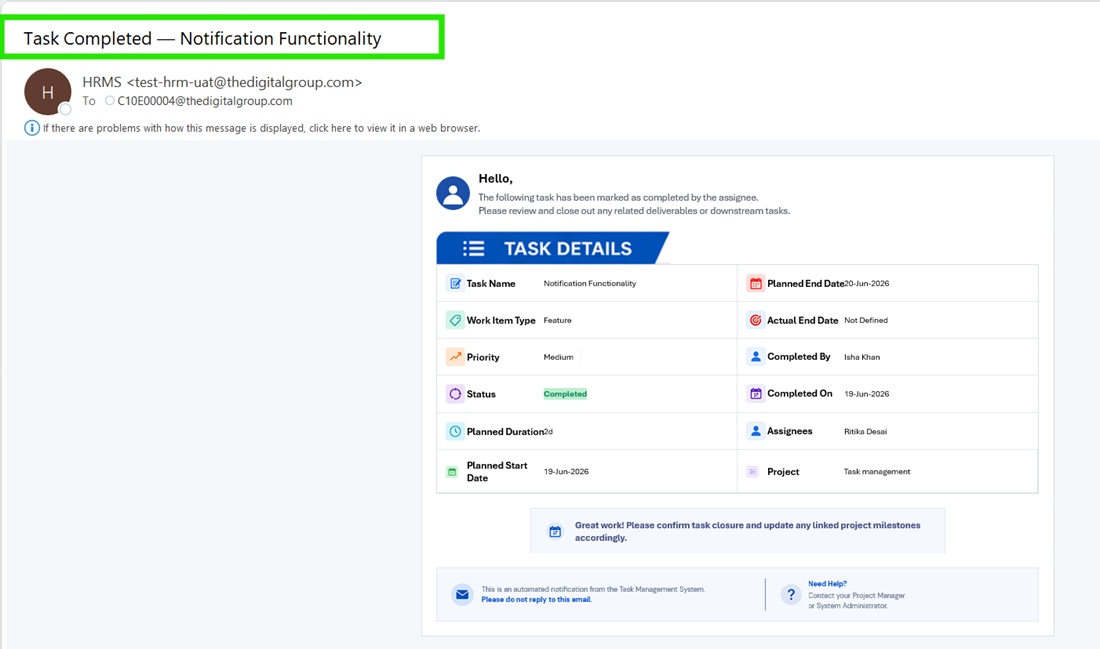
- Task Completion Notification
A Task Completion Notification is sent to the task creator when a task is marked as completed. This notification informs the creator that the assigned work has been successfully finished and allows them to review the completed task if necessary.
The notification provides visibility into task progress and helps ensure that completed work can be reviewed or closed appropriately.
- Task Reopened Notification
A Task Reopened Notification is sent when a previously completed task is reopened for further work. This notification informs task assignees that the task requires additional attention and that work may need to continue.
Receiving this notification ensures that assignees remain aware of changes to task status and can take the necessary actions to address any outstanding requirements.

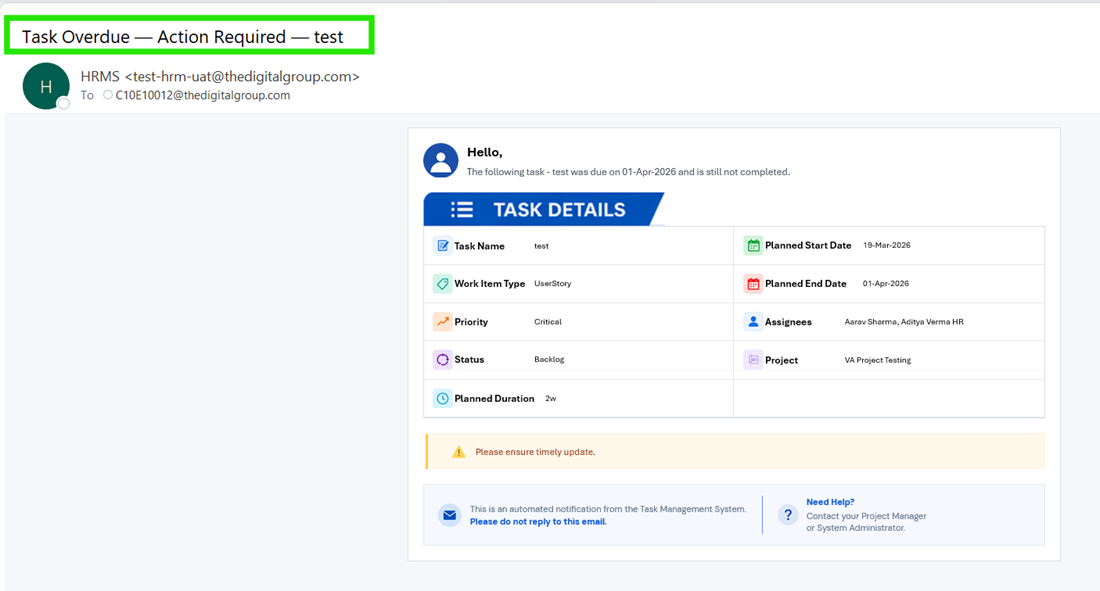
- Task Overdue Notification
A Task Overdue Notification is sent when a task exceeds its planned end date and remains incomplete. The purpose of this notification is to remind assignees that action is required to complete the overdue work.
These notifications help users prioritize delayed activities and improve overall task tracking and project management.
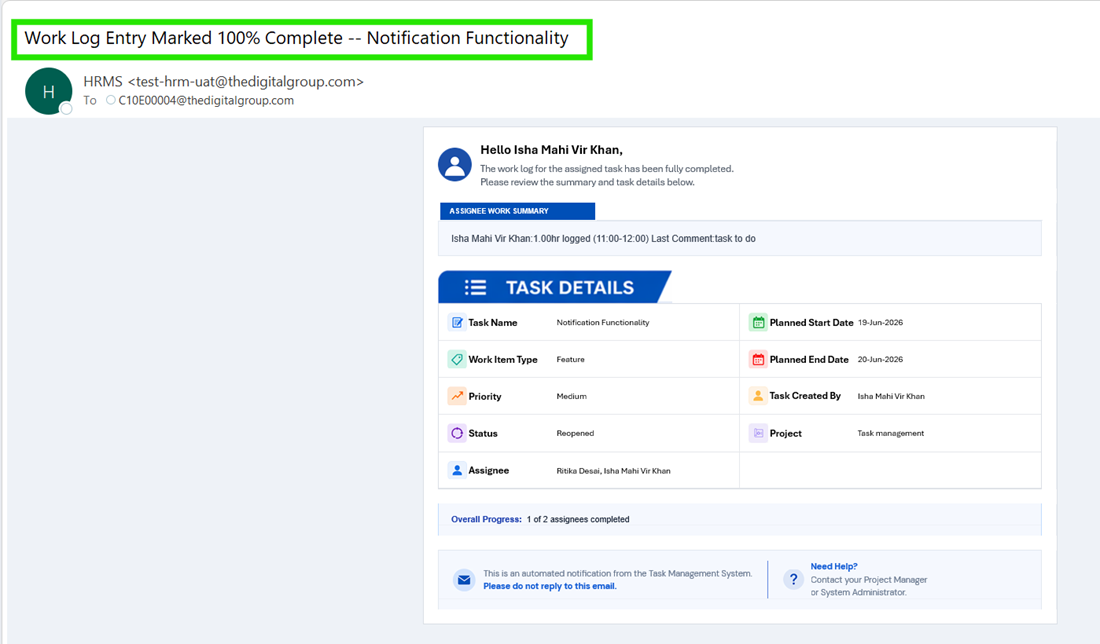
- Work Log Completion Notification
A Work Log Completion Notification is sent when the work logged against a task reaches 100% completion. This notification informs the task creator that the assignee has completed the planned work effort associated with the task.
The email may include information related to the completed work, such as effort logged, duration, and recent comments, providing visibility into the completed activity.
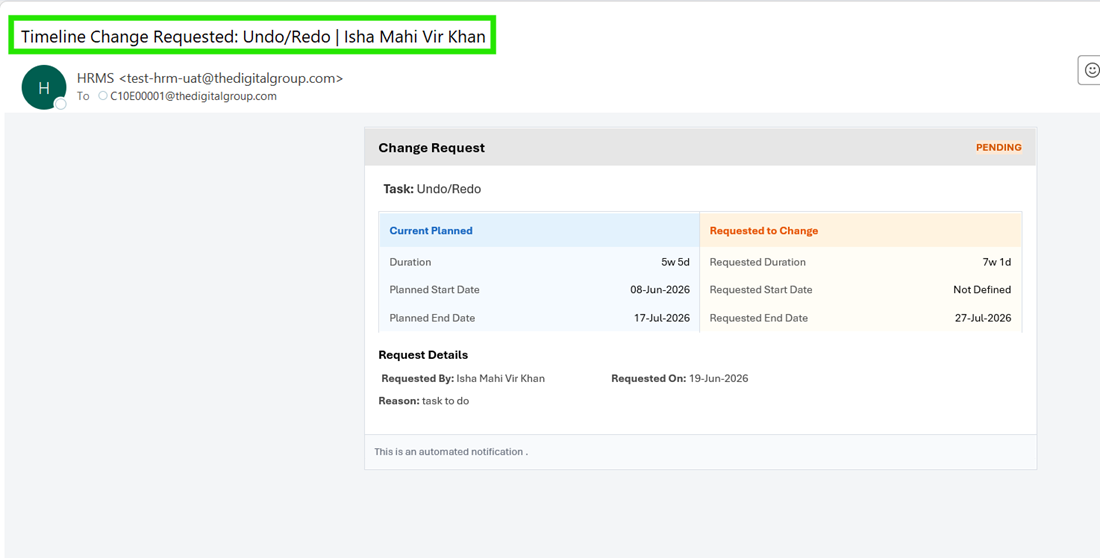
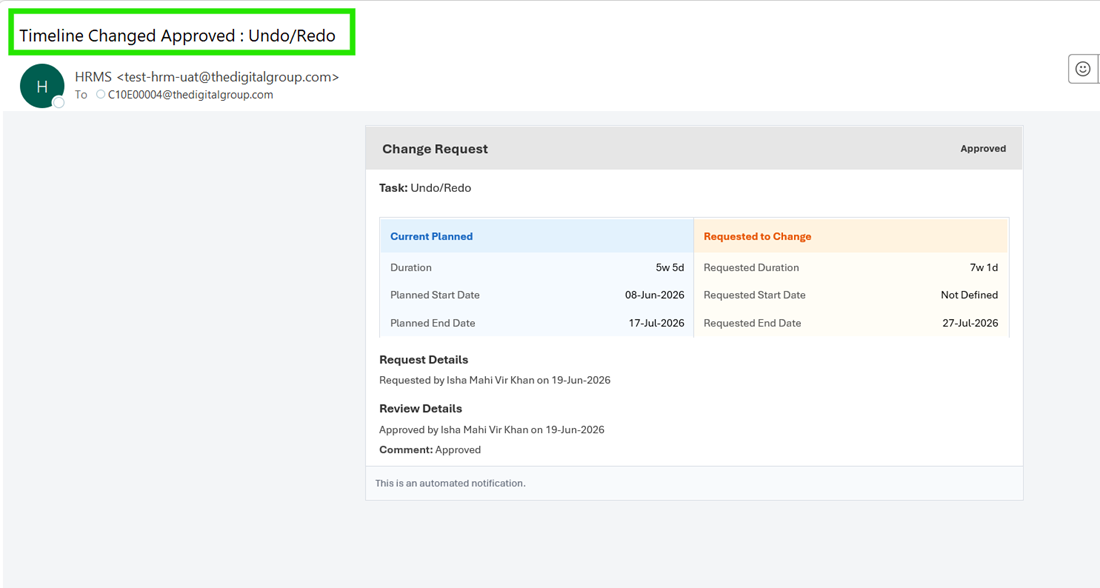
- Timeline Extension Request Notification
A Timeline Extension Request Notification is sent when an assignee requests an extension to the planned task schedule. This notification informs the task creator that the assignee requires additional time to complete the assigned work.
The notification enables the task creator to review the request and take the appropriate action based on project requirements and timelines.
- Timeline Extension Approval or Rejection Notification
Once a timeline extension request has been reviewed, the system sends a notification informing users whether the request has been approved or rejected. This notification provides clear communication regarding the final decision and ensures that all involved users remain informed about updated task schedules.
Users can review the notification to understand the outcome of the request and proceed accordingly.
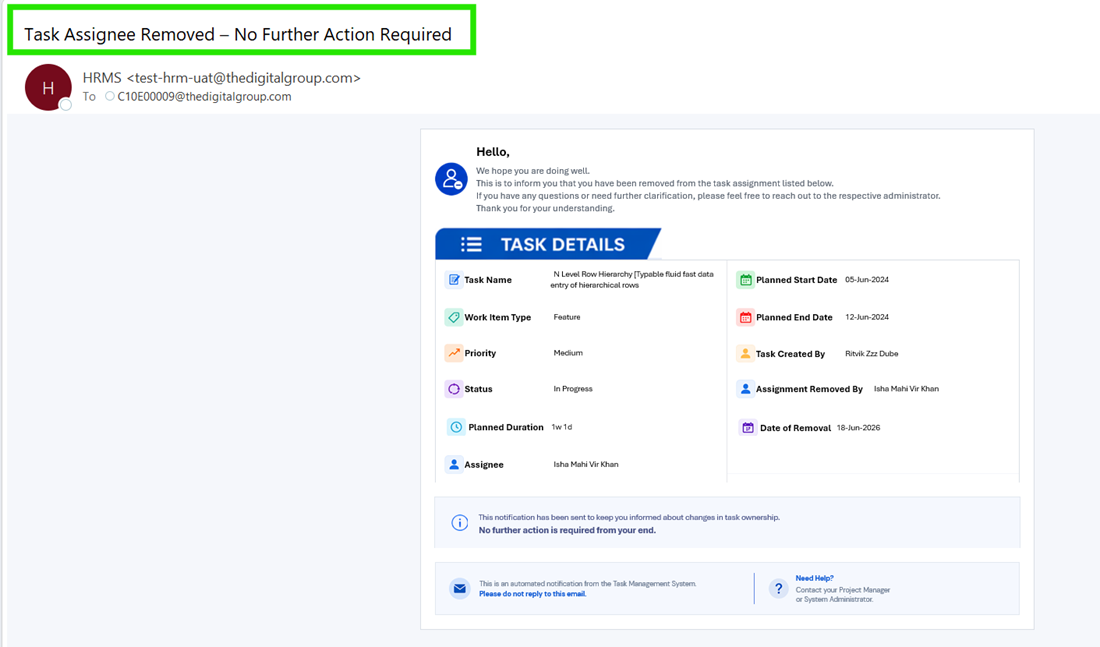
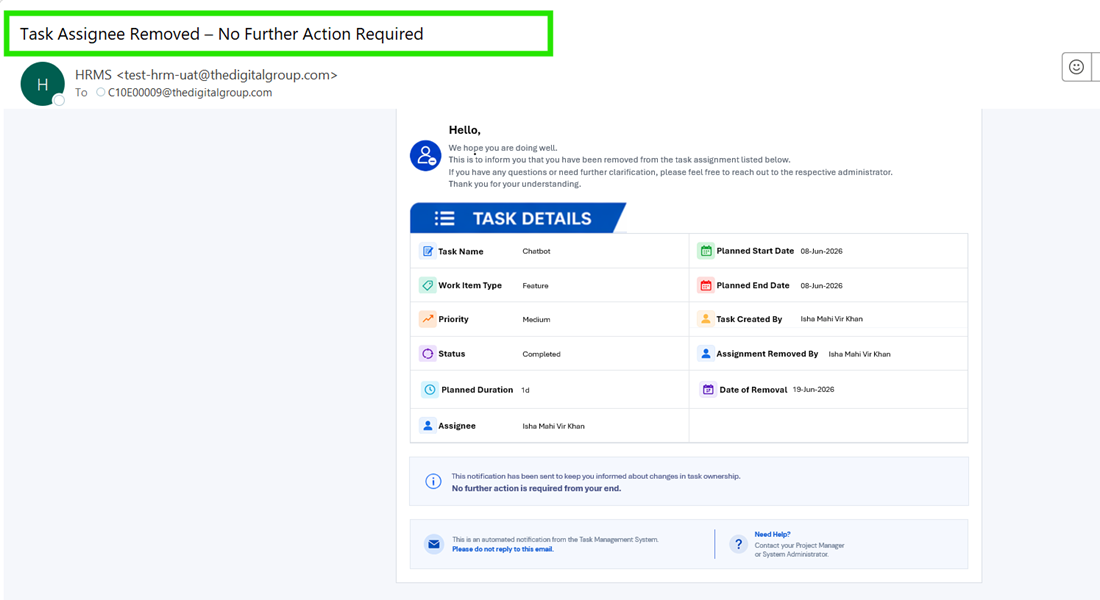
- Assignee Removal Notification
An Assignee Removal Notification is sent when a user is removed from a task assignment. This notification informs the affected user that they are no longer responsible for the task and provides visibility into the assignment change.
The notification helps prevent confusion regarding task ownership and ensures that users are aware of their current responsibilities within the system.
Email notifications are generated automatically based on task activities performed within the application. Notification delivery depends on system processing and may take a few minutes to reach the recipient's mailbox. Users should ensure that their email information is configured correctly within the system to receive notifications successfully.
The Email Notification feature improves communication, increases visibility into task activities, and helps users stay informed about important updates throughout the task lifecycle.