Visitor Dashboard
The Visitor Dashboard categorizes all visitor records across multiple tabs, supporting different stages of the visit. Users can filter records by selecting a date or range using the date picker. Each tab includes a Quick Search bar for faster access to specific records. User can download visits from the download option. All tabs are suffixed with the record counts. Visitor records are divided into seven key tabs:
Tabs in the Visitor Dashboard
- All Visitors
- Checked-In
- Checked Out
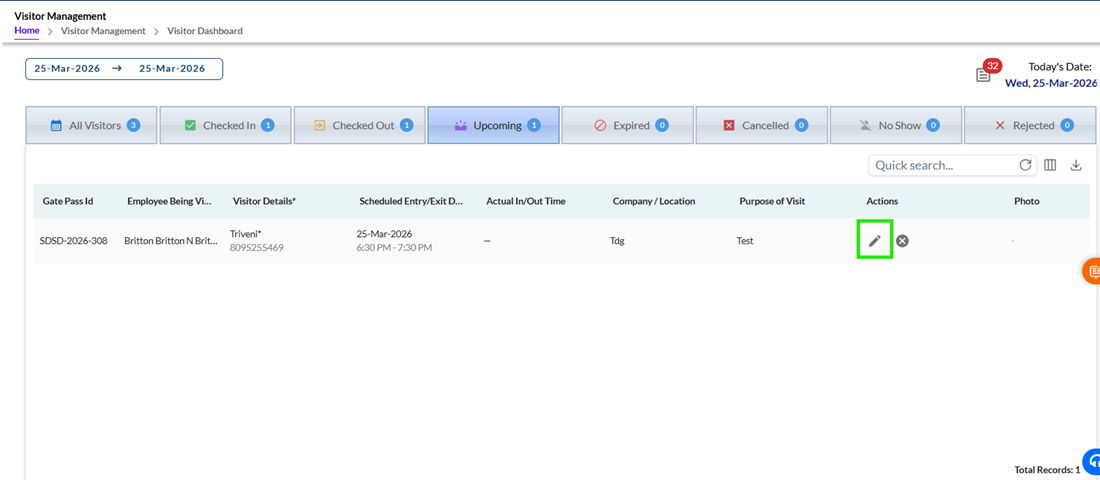
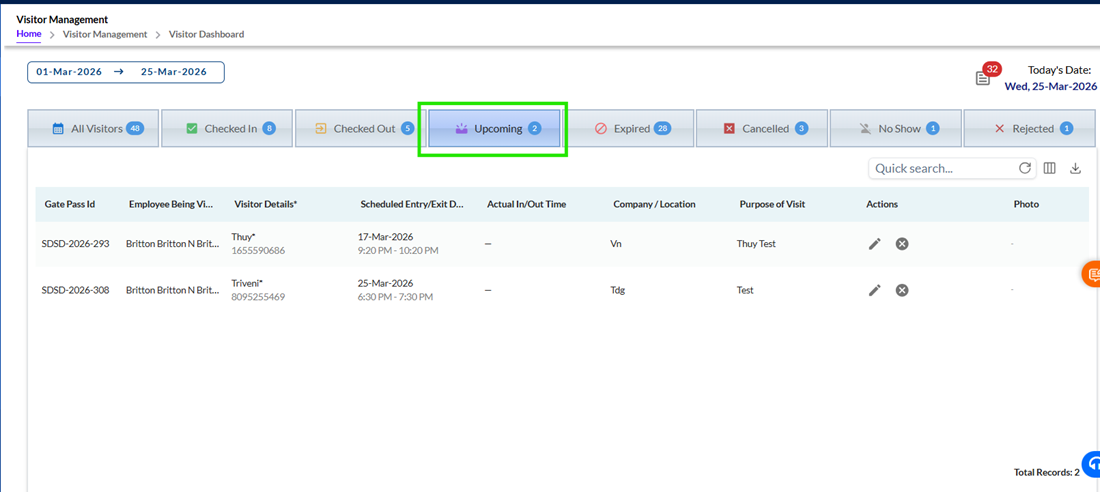
- Upcoming
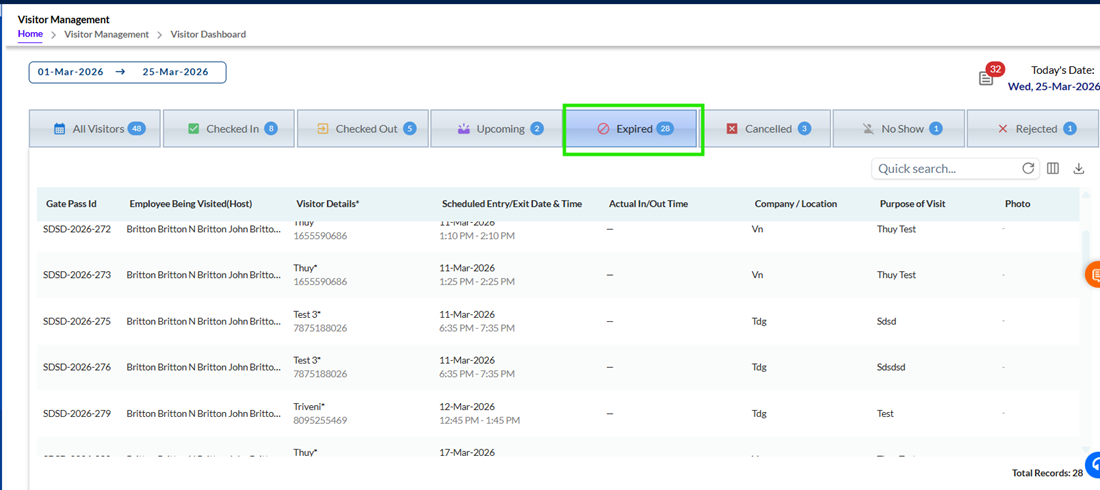
- Expired
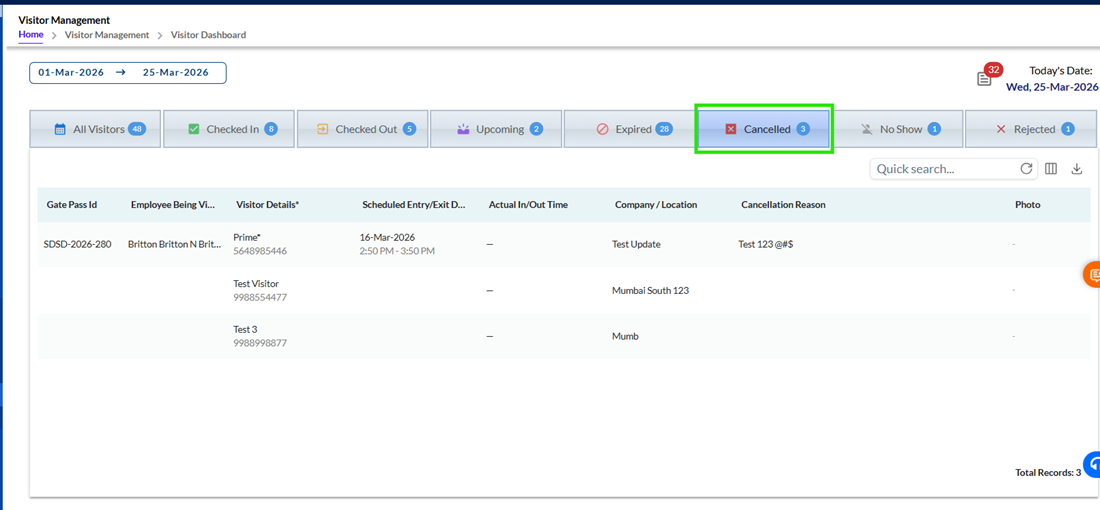
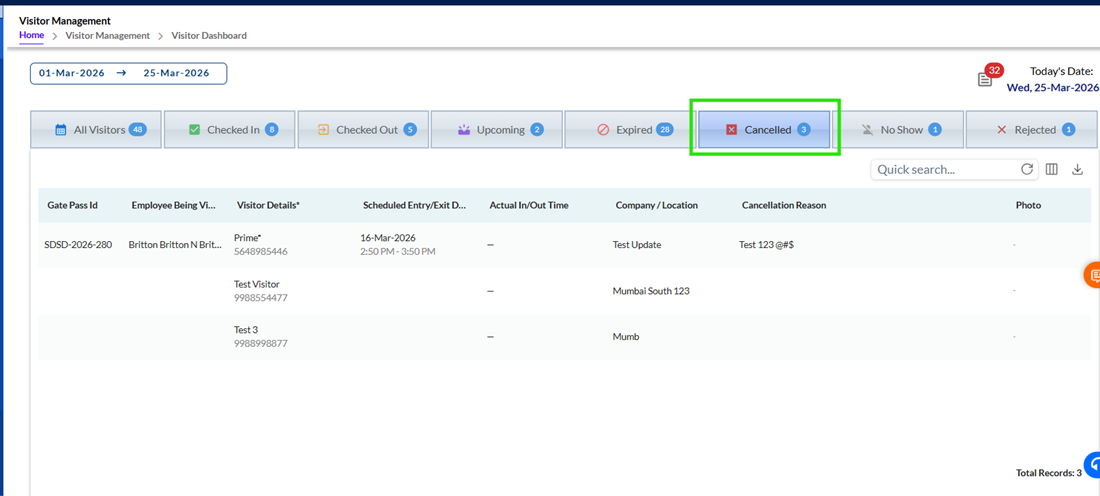
- Cancelled
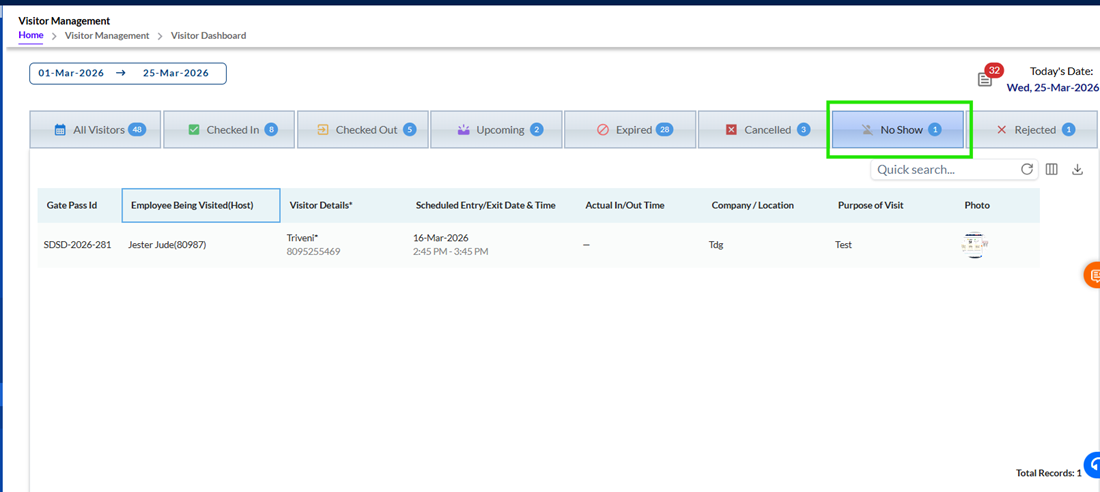
- No Show
- Rejected
- Activity Feed
These tabs help categorize and filter visitor data based on their visit status.
Masked ID Type: When visitor identification numbers (such as Aadhaar, PAN, Driving License, or Passport) are displayed on the screen or included in reports, they appear in a masked format, showing only the last four digits (for example, ****5678). This ensures the protection of sensitive personal information. The complete ID is securely stored in the backend database for validation purposes, but it is never visible or accessible to unauthorized users.
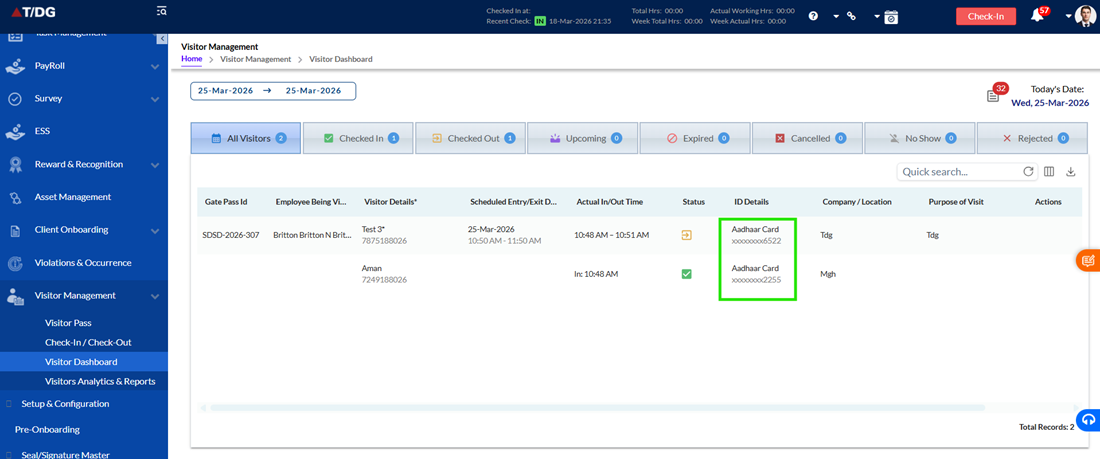
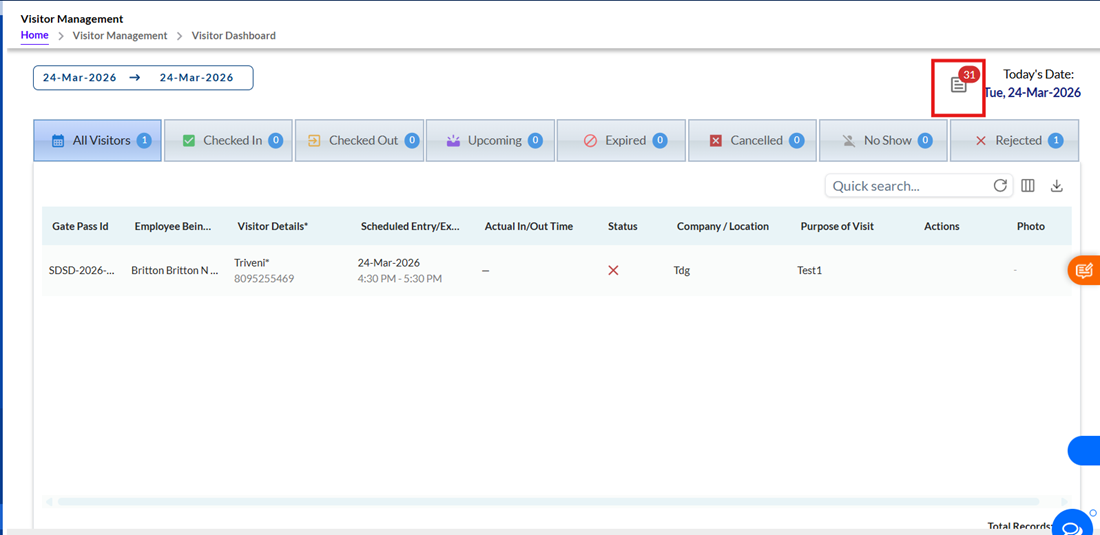
This tab shows a complete view of all visitors on a selected date or within a specified date range. Information includes Gate Pass ID, host name, visitor name and contact number, scheduled entry and exit time, actual check-in and check-out time, visit status, ID type and number with last 4digits, company and location, and the Purpose of visit. The Actions column allows users to view or edit the entry. Additionally, a Quick Search bar is available to help users filter across all visible columns using any keyword or visitor detail, making it easy to locate specific records. There is a Download Icon (Arrow Down) to Export the report in available formats, such as PDF or Excel. The photo column is shown to display the photo of a visitor. Initially, the image will be displayed as a small icon. On hovering over it, the image will enlarge to show the full view of the visitor.
In the “All Visitors” tab, some columns are intentionally hidden, such as ID details, Checked In By, and Checked Out By. If users want to view these detailed sections, they can enable them through the column visibility option.
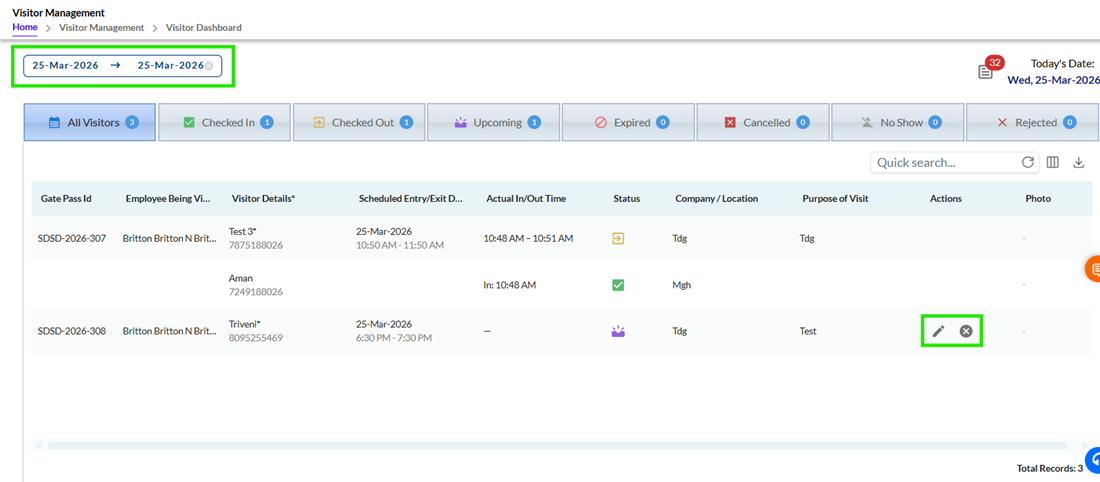
In the All-Visitors tab, users can view and manage all visitor entries. For upcoming visits, two key actions are available: Edit and Cancel.
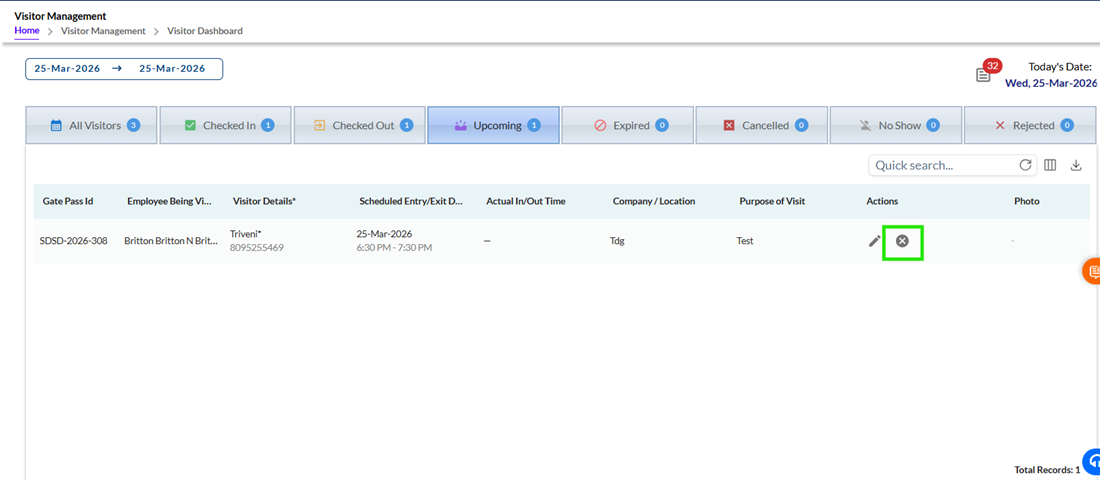
1.1. Cancel Visit
The Cancel icon is only visible for entries that are still in the Upcoming stage — once the visit is checked in or marked otherwise, the option is no longer available. Clicking on the Cancel icon triggers a confirmation pop-up, asking the user to confirm whether they truly wish to cancel the selected visit. This pop-up also contains a mandatory text field where the user must provide a reason for cancellation (up to 500 characters). This step ensures that visit cancellations are intentional and justified.
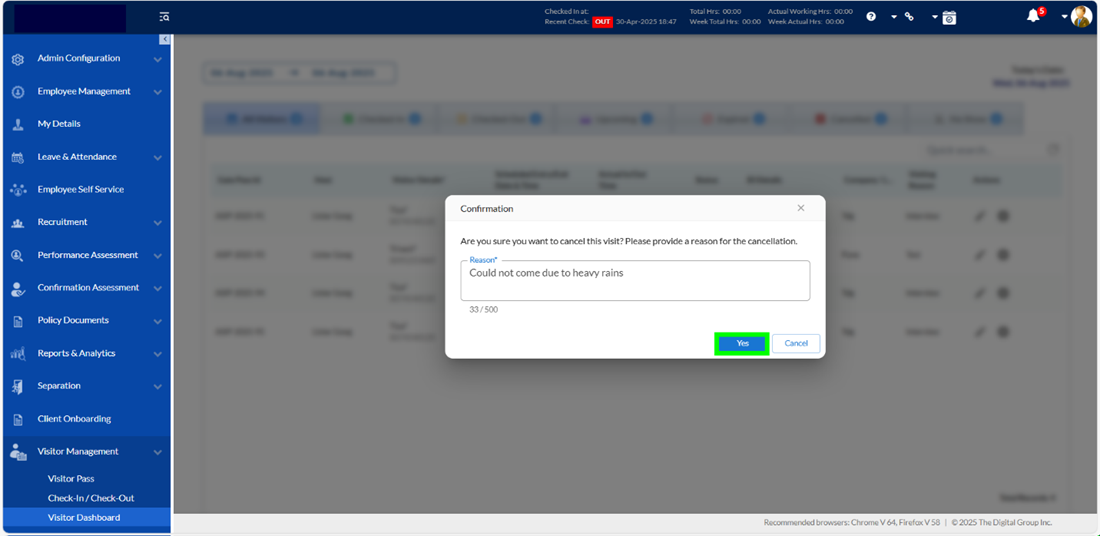
Once confirmed, the system marks the visit as Cancelled rather than deleting it. The entry is then moved to the Cancelled tab, where the cancellation reason is displayed alongside other visit details. This enables better transparency and audit tracking for withdrawn visits.
1.2 Edit Visit
Similarly, only upcoming entries can be Edited. When the Edit icon is selected, the user is redirected back to the Visitor Gate Pass screen where they can modify visit details. If changes are made to the host employee, scheduled date/time, or primary visitor, the system automatically generates a new WhatsApp message with an updated QR code and Gate Pass ID. This ensures that the visitor receives the latest visit credentials, always maintaining accuracy and access control.
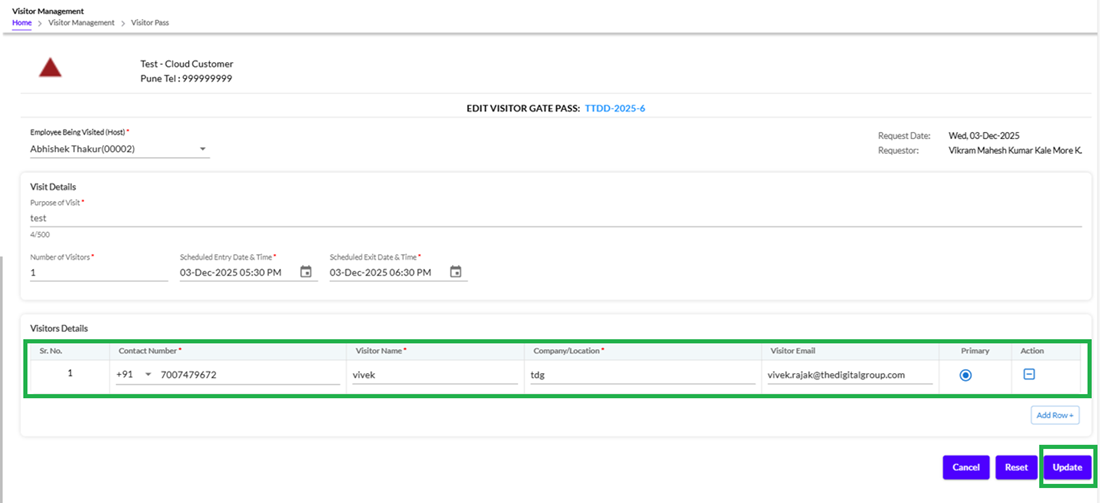
The screen below is displayed where action can be taken or Add Row can be used for adding new visitors.
After the changes are done the pop-up displayed for the same.
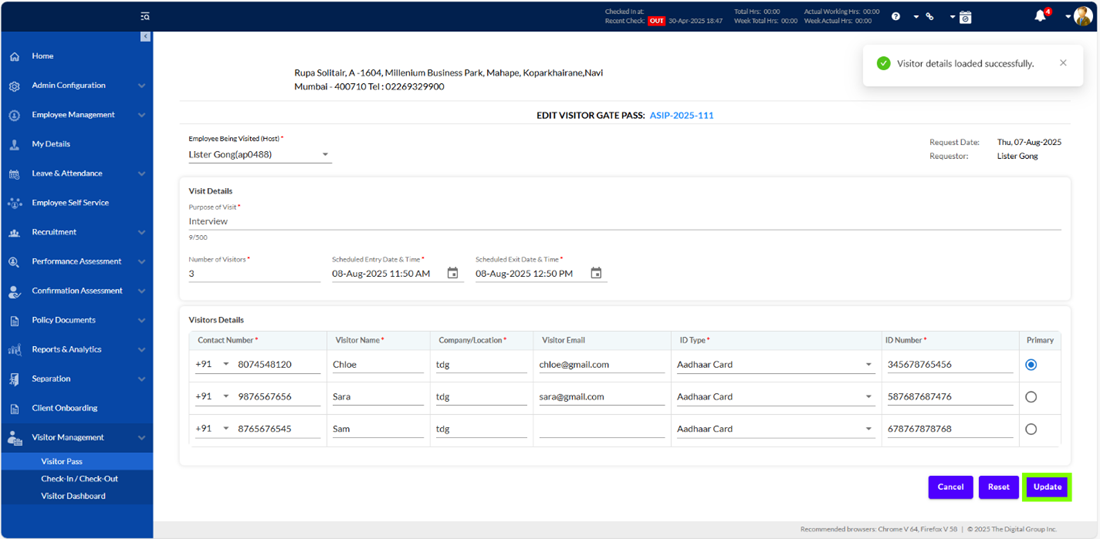
After updating details click the update button as highlighted above.
When a user edits an upcoming visitor entry — for instance, by changing the visitor’s name and assigning them as the Primary Visitor — the system immediately updates the visitor’s details. Upon saving the changes, a new WhatsApp message is automatically sent to the updated primary visitor. This message includes the revised Gate Pass ID and a new QR code to reflect the latest information. The old message and QR code become invalid, ensuring security and consistency at the gate.
This behavior is especially important when the Primary Visitor is changed, as they are the one who receives the QR code and acts as the main point of entry for group visits.
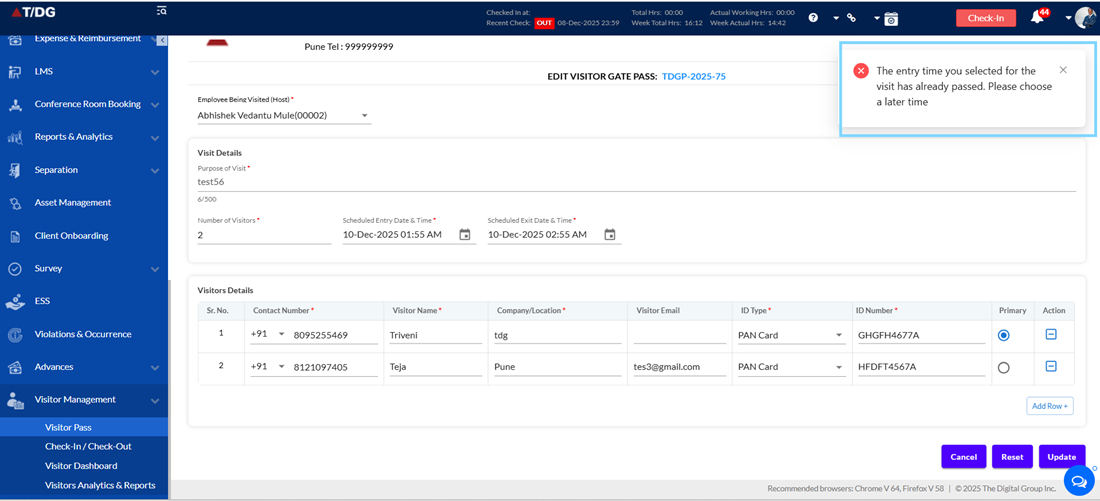
When updating an existing visit, the system validates both the scheduled entry time and exit time. If either of these times is earlier than the current time, a validation popup will appear. The message informs the user that the selected entry or exit time has already passed and prompts them to choose a valid future time before saving the update.
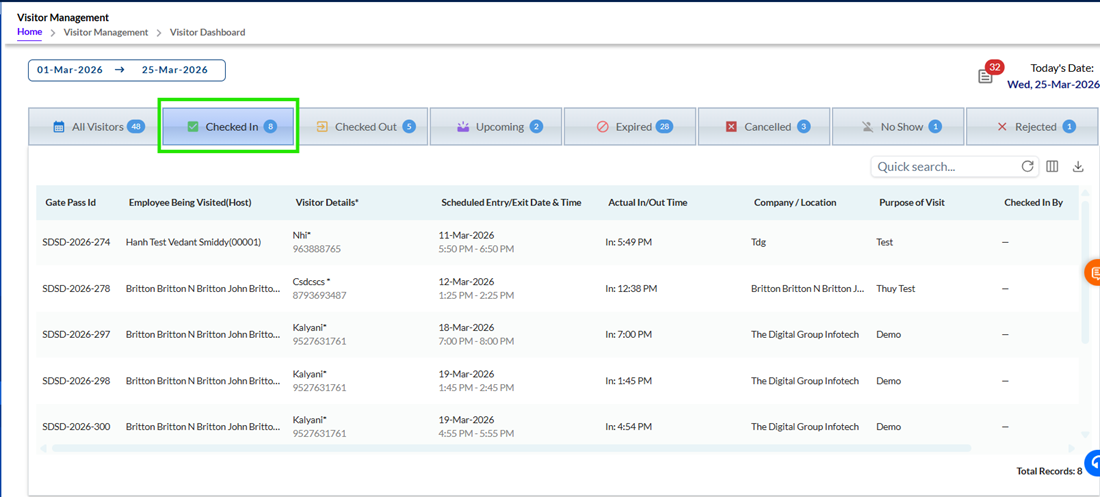
This tab shows visitors who are currently on the premises. It helps security personnel and administrative staff monitor active visitors in real-time. Quick Search functionality is included for efficient filtering and search. There is a Download Icon (Arrow Down) to Export the report in available formats, such as PDF or Excel.
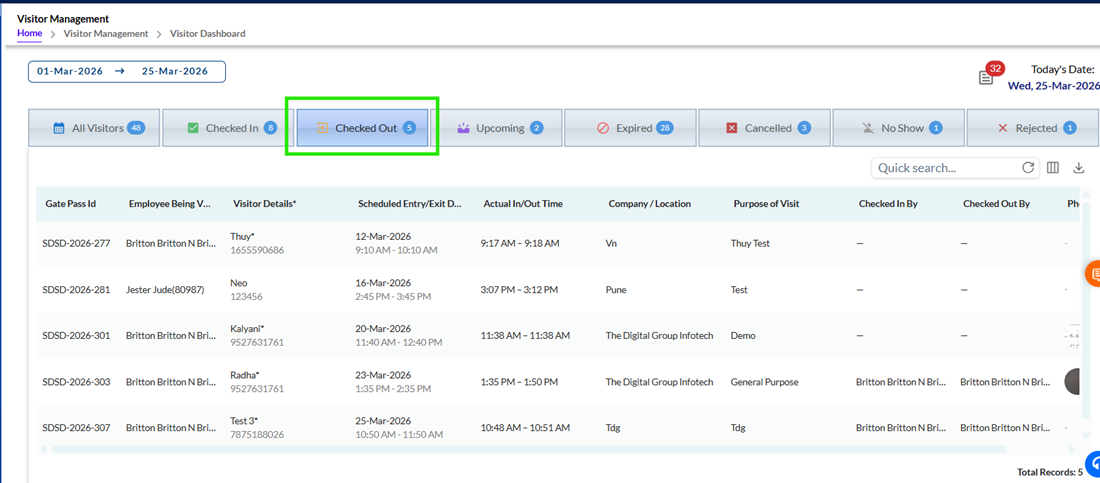
Visitors who have exited the premises are listed in this tab. It helps ensure all visitor check-outs are recorded properly. The Quick Search bar remains available for quick access to historical visitor records. The Quick Search bar is available to locate records quickly. There is a Download Icon (Arrow Down) to Export the report in available formats, such as PDF or Excel.
This tab displays visitors scheduled to arrive later the selected day. It includes host name, visitor details, scheduled entry and exit time, and visit purpose. Action buttons allow users to edit visit details, cancel visits, or view the declaration form. Quick Search is also available. There is a Download Icon (Arrow Down) to Export the report in available formats, such as PDF or Excel.
If a visitor misses their scheduled entry window without checking in, or if no action is taken on the created visit 6 hours after the scheduled-out time, the visit is automatically marked as Expired and moved to this tab. This section displays details such as the host name, visitor information, and the missed schedule. A Quick Search bar is also available to help you find records easily. There is a Download Icon (Arrow Down) to Export the report in available formats, such as PDF or Excel.
This tab lists visitors whose visits were cancelled before check-in. It includes host and visitor details, and scheduled date and time. Records in this tab are helpful for auditing purposes. Quick Search functionality is provided. There is a Download Icon (Arrow Down) to Export the report in available formats, such as PDF or Excel.
In group visits, if some attendees check in while others are unable to join or miss the visit, the absent individuals are marked as No Show. In such cases, the overall visit remains active, but the specific participants who did not attend are recorded as No-Show and listed in this tab. This section displays the details of the host and visitor, scheduled entry and exit times, and the visit status. A Quick Search feature is also available to quickly find specific no-show records. There is a Download Icon (Arrow Down) to Export the report in available formats, such as PDF or Excel.
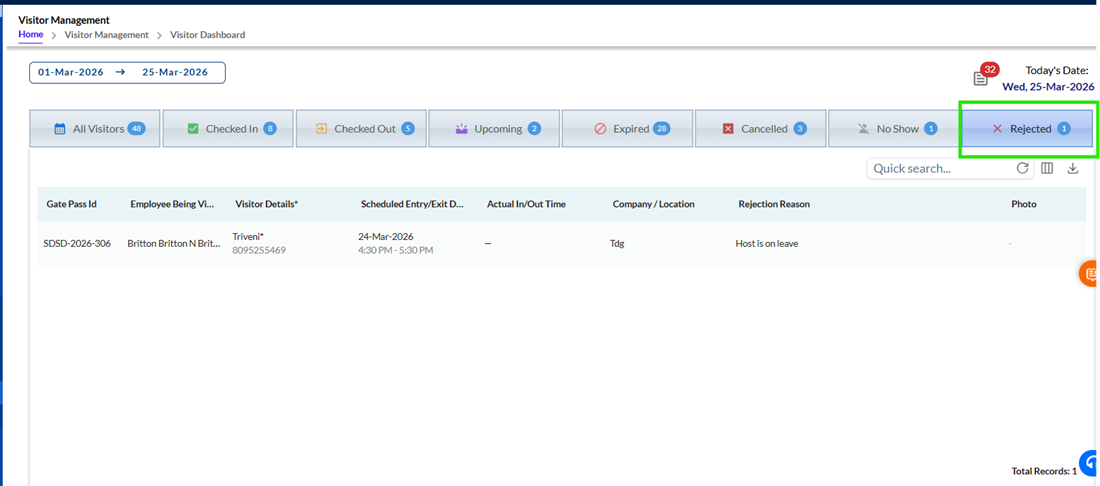
This tab show information about the rejected unplanned visits.
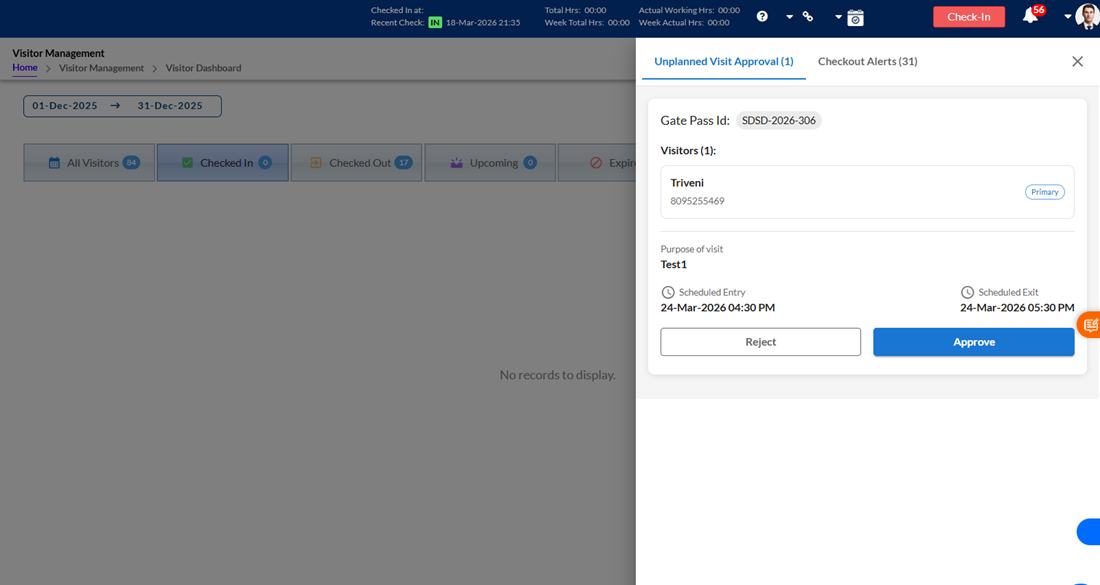
The top section shows Activity Feed.
The Activity Feed is a real-time notification panel that keeps users informed which is upon clicking opens a slider panel having two different tabs as 1) Checkout Alerts 2) Unplanned Visit Approvals
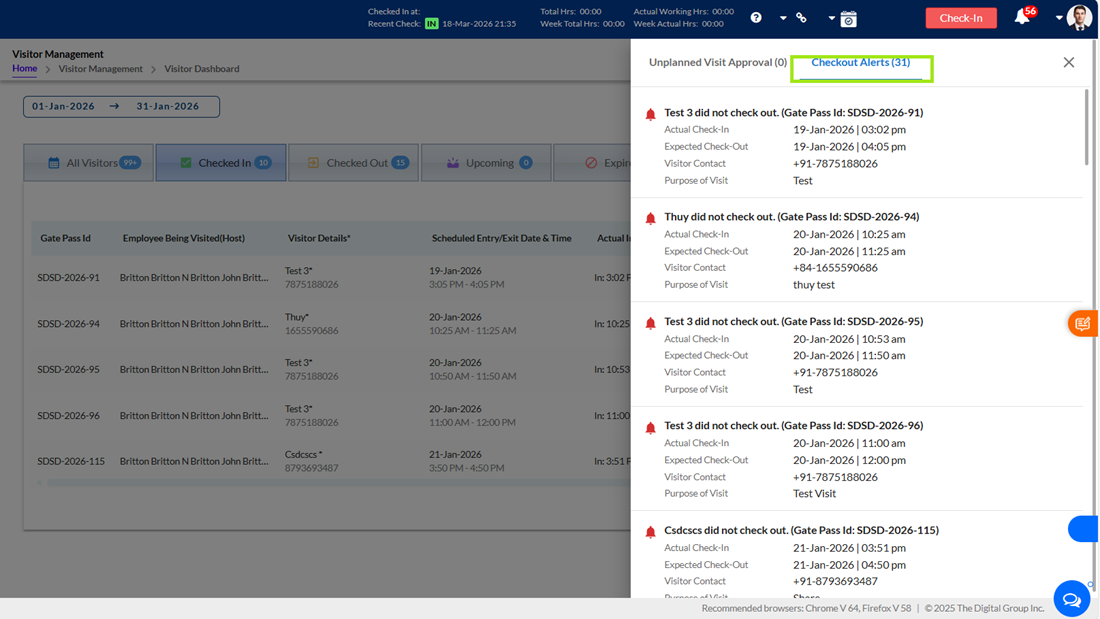
Displays a list of visitors who have not checked out within the expected time.
The information shown includes:
- Visitor name
- Gate pass ID
- Check-in time
- Expected checkout time
- Contact details
- Purpose of visit
At the end of each day, based on a configurable duration (e.g., 7 hours), the system automatically identifies visitors who have checked in but have not checked out.
On clicking the ‘Activity Feed’ button, a list of such pending visitors is shown. Users can review the list, manually check out visitors if required, or follow up with the respective hosts.
This ensures accurate visitor records and prevents pending or overnight check-ins.
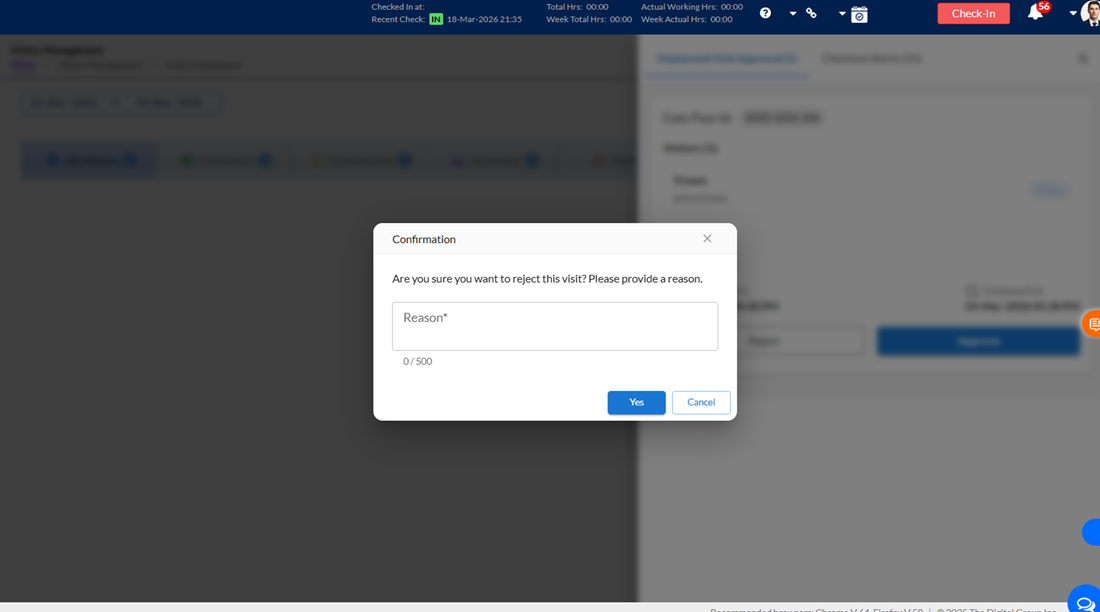
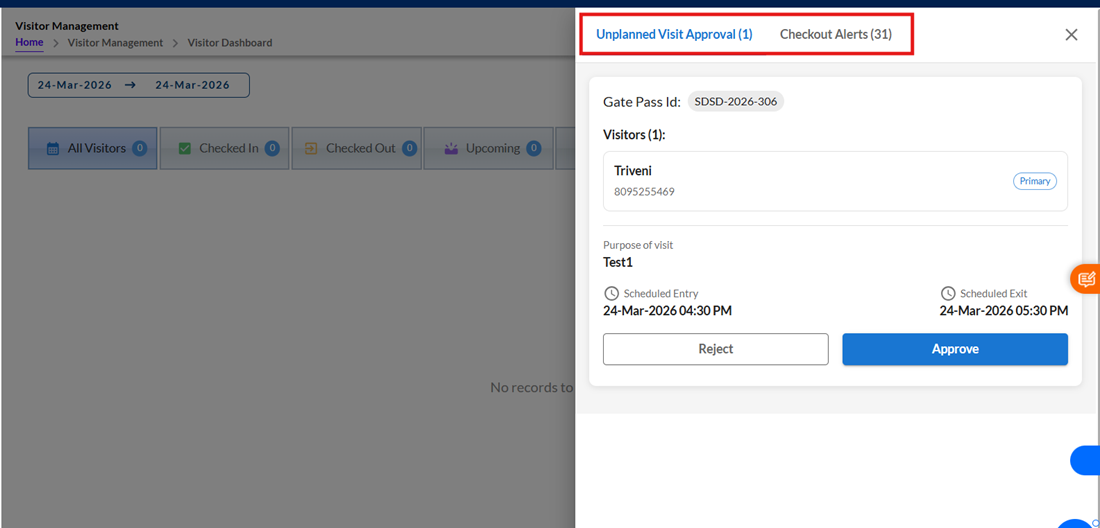
9.2. Unplanned Visit Approvals
When a visitor raises a request via QR code:
- The host receives an approval request
- They can approve or reject it
Approved visits move forward to upcoming tab, while rejected ones are tracked separately under rejected tab on the dashboard.
If host rejects the visit it asks for the reason for the rejection.