TimePort/Task Management- Setup Masters
To access Setup Masters, the Admin needs to click on the left panel, as shown in the screenshot below. Roles wise permission is given to access.
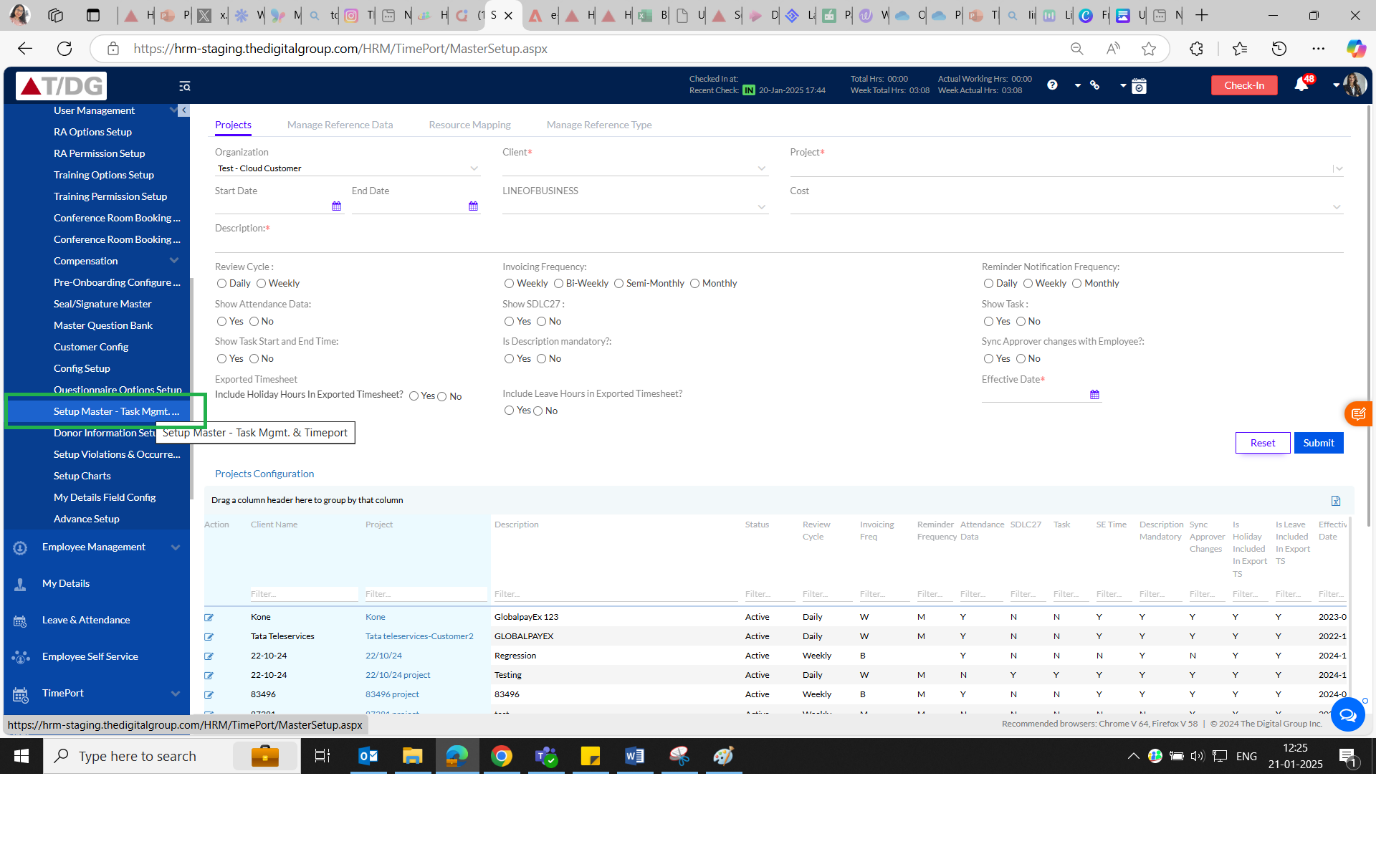
Only the Admin has the access to configure the Timeport Module by clicking on the Setup Masters menu. The Setup Masters menu consists of the following tabs:
- Projects
- Manage Reference Data
- Resource Mapping
- Manage Reference Type
- Configuration
1.2.1. Projects
The Projects tab allows the Admin to configure the projects that need to show up in the drop-down when employees fill the Timesheets. These value setup in RA options Setup of Admin Config.
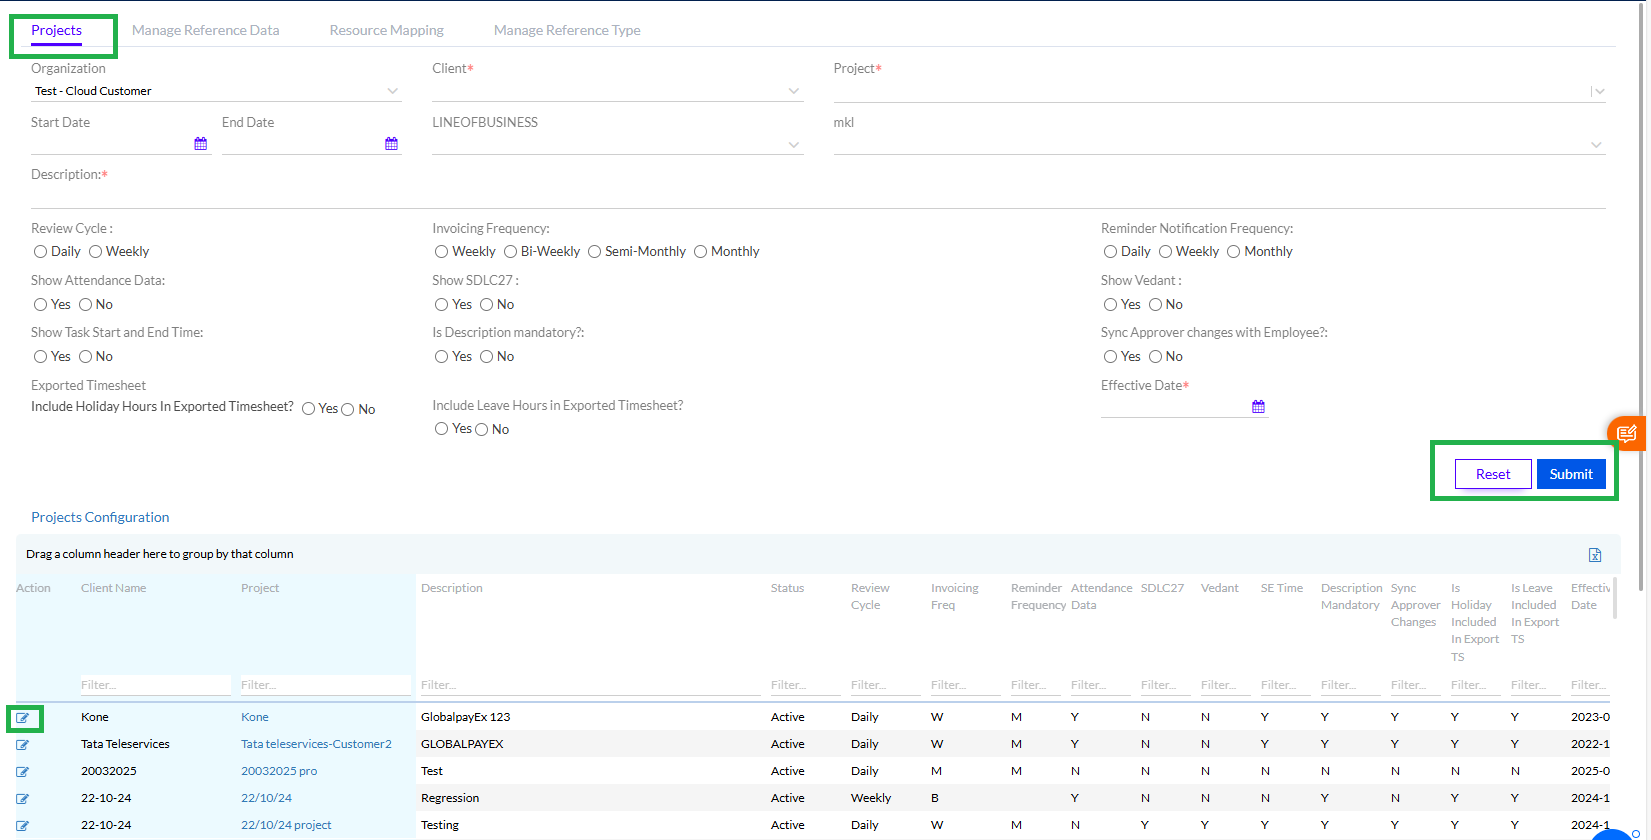
Here the Admin needs to select the Organization from the drop-down menu, along with selecting the mandatory fields, namely the Client and the Project, as well as entering the Description for the project, which is also mandatory. If we have similar configurations for 2 projects we can add both together.
The Admin needs to fill the following other details:
• Review Cycle (Daily/Weekly): This defines the frequency of review of the submitted timesheets.
• Invoicing Frequency(Daily/Weekly/Semi-Monthly/Monthly): This defines the frequency of review of invoice.
• Reminder Notification Frequency (Daily/Weekly/Monthly): Defines the Frequency of the reminder notifications to be sent to the employees.
• Show Attendance Data (Yes/No): Defines whether the Attendance data needs to be showcased to the employees
• Show SDLC (Yes/No): Defines whether the SDLC needs to be displayed at the time of filling Timesheets.
• Show Work Product Type (Yes/No): Defines whether the Work Product Artifact needs to be displayed at the time of filling Timesheets.
• Show Task Start and End Time (Yes/No): Defines whether the Task Start and End Time needs to be displayed at the time of filling Timesheets
• Is Description Mandatory? (Yes/No): Defines whether adding a description is mandatory at the time of filling Timesheets.
• Sync Approver changes with Employee (Yes/No): Defines whether the changes made by the Approver should be synced with the data entered by the employee.
• Effective Date (Calendar): Here the Admin needs to enter the Effective Date which is the date from which the project comes into effect .
• Include Holiday Hours in Exported Timesheet: Yes/No
• Include Leave Hours in Exported Timesheet: Yes/No
Click on Submit button to submit and configure the project.
The Admin also needs to edit the other details as applicable in previously added data and then click on the Submit or Reset buttons, to submit or reset the data. The Client Name and Project columns are freezed and not scrollable.
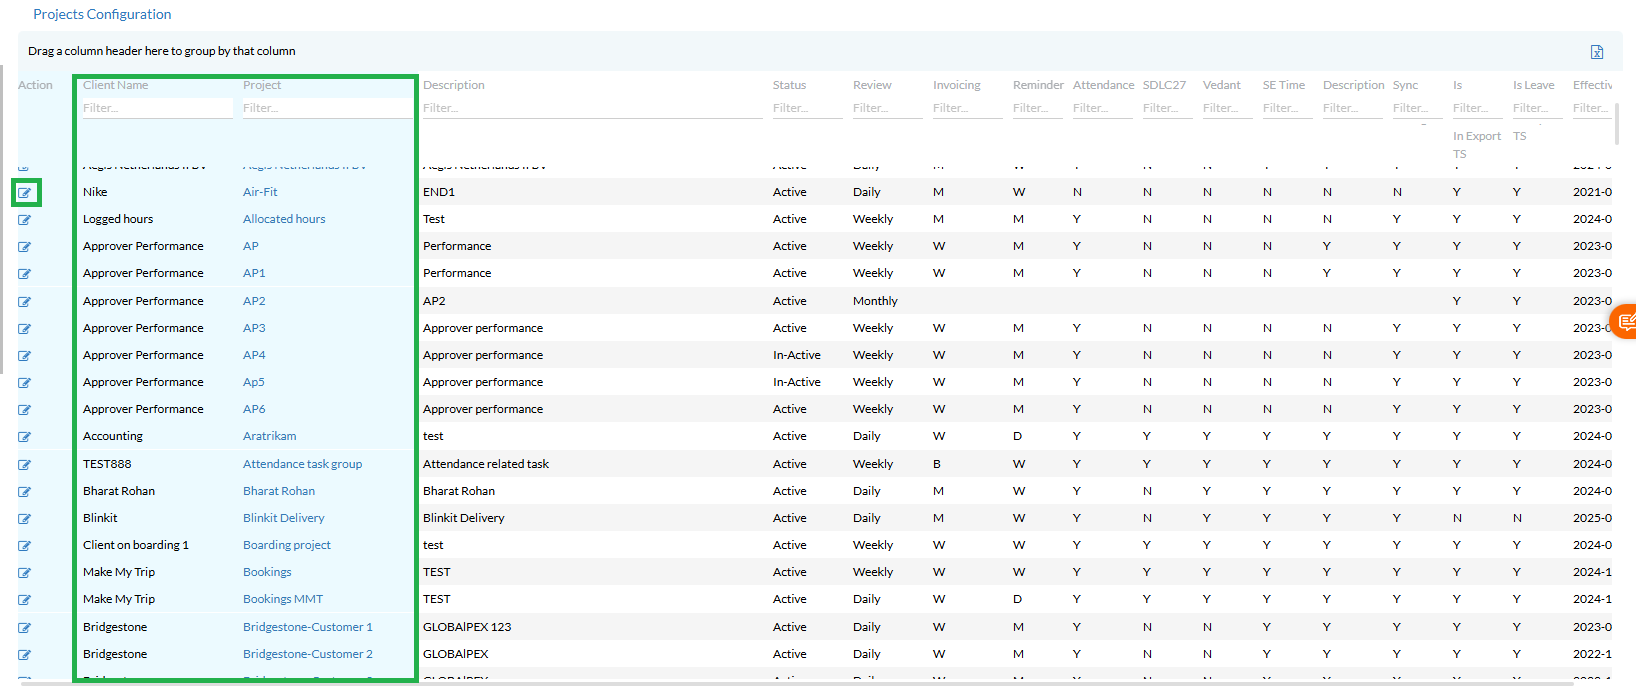
The Admin can edit the projects by clicking on the Edit icon. Once the Admin clicks on the Edit button, the screen appears as shown below.
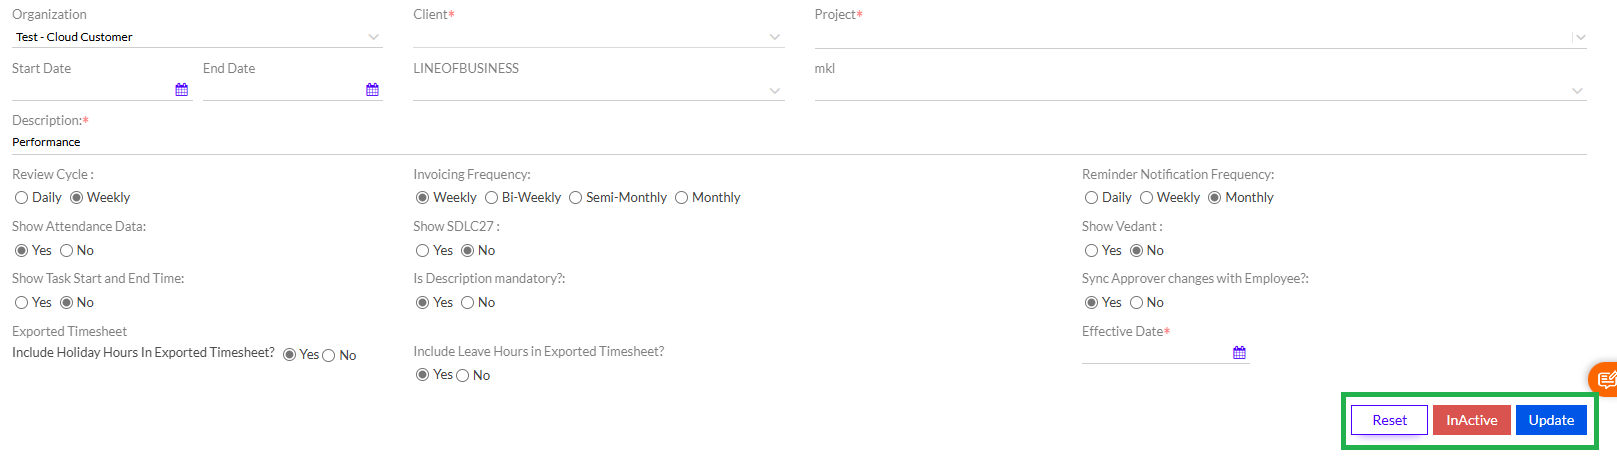
After editing or updating the required details, the Admin needs to click on the Update button to update the changes, Reset button to reset the entered data and the InActive button to change the status of the Project to InActive from remaining Active.
1.2.2. Manage Reference Data
This section is used by the Admin to Manage the reference data for the Timeport module.
There are two separate sections
1.2.2.1. Search Reference Data
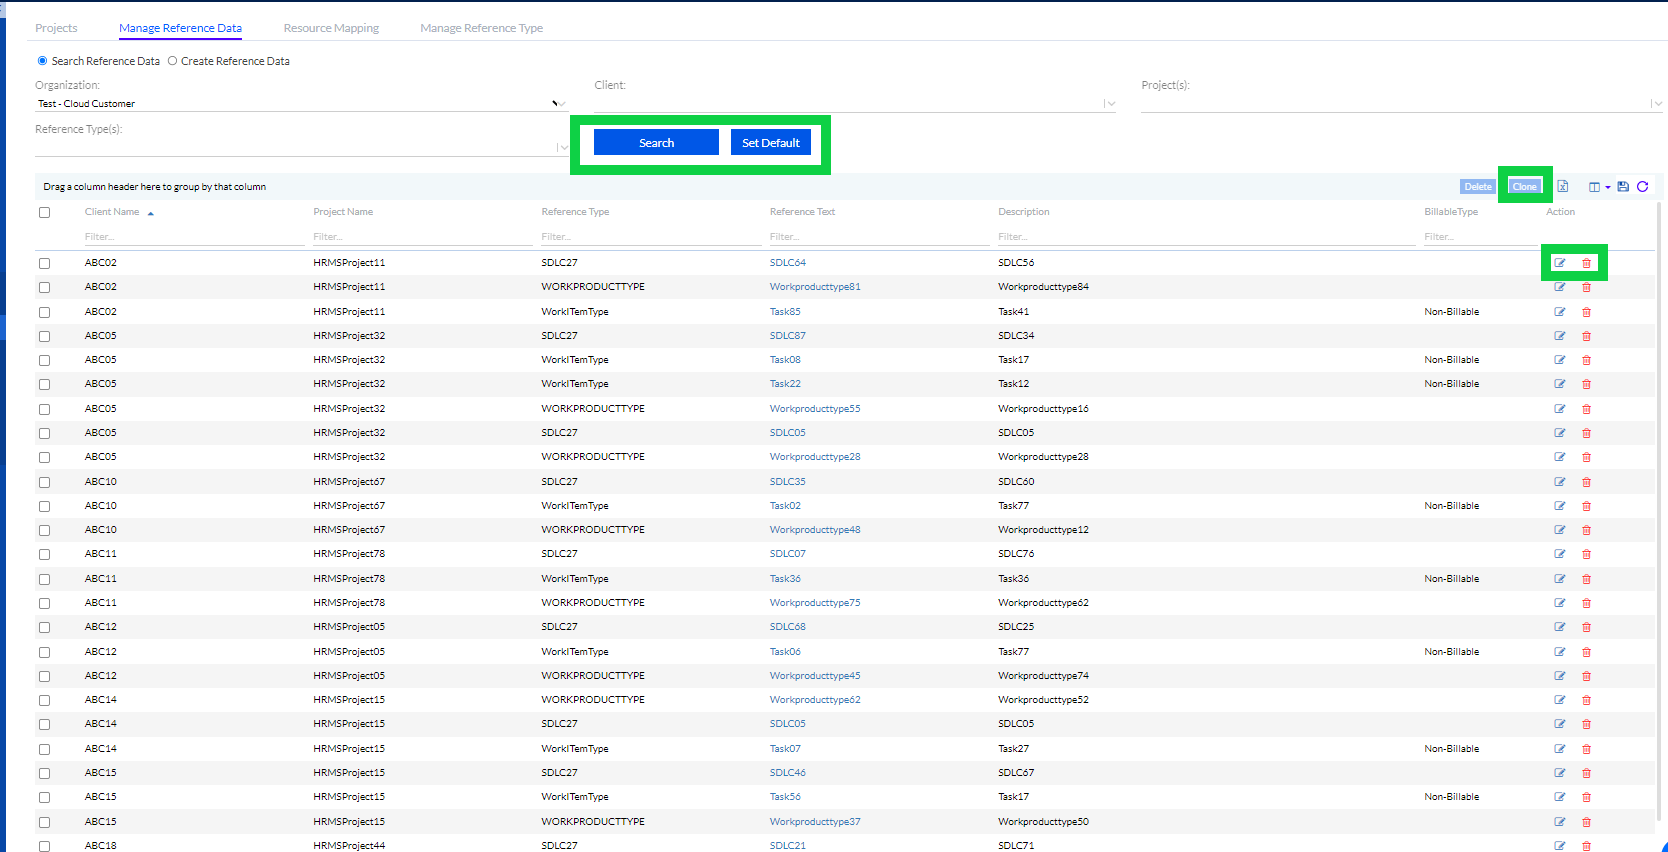
Reference Data is the set of data associated with a project that is fixed and added from Database side. To add reference data, the Admin needs to select the Organization from the drop-down menu, select the Client from the drop-down menu, select Project from the drop-down menu, select the Reference Type, and then click on the Search button.
Reference Types
1. SDLC: SDLC is an acronym for ‘Software Development Life Cycle’. The SDLC menu may be used to track the time spent in each phase of a typical project.
2. Work Item Type: The broader task type or category.
3. Work Product Type: The sub-tasks that need to be entered.
4. Cost Center: This will help to define the Resource Cost Centre and Project Cost Centre within the Organization.
5. Line of Business: Line of business defines the business units in the organization. This will be helpful to categorize the project.
6. Location: This refers to the location of the project.
Grouping can be done for the records of the grid by dragging the column header and dropping it above the column header.
The Clone functionality can be used to clone the Reference data to other projects. The Save Icon can be used to save the Grid Format.
The data in the grid can be exported into a MS Excel spreadsheet by clicking on the MS Excel icon.
To edit or delete an entry on this list, the Admin needs to select the checkbox next to it and then click on the Edit or Delete icons.
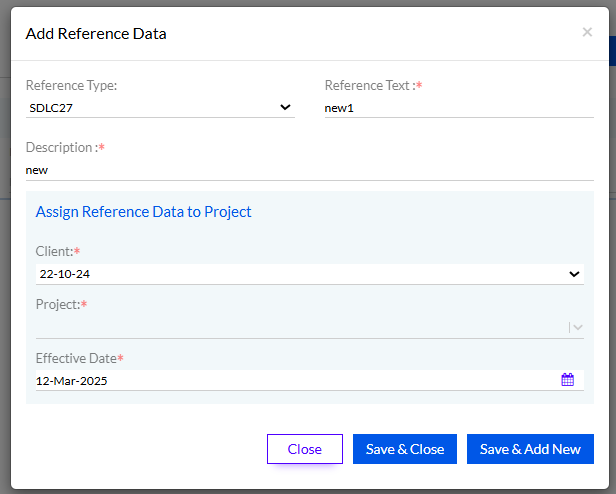
Once the Admin Clicks on the Add button, a pop-up appears as shown below. Here the Admin needs to add the details for the new reference Data, and then click on the respective buttons.
1.2.2.2. Create Reference Data

Reference Data is the set of data associated with a project that is fixed and added from Database side. To add reference data, the Admin needs to select the Organization from the drop-down menu, select the Client from the drop-down menu, select Project from the drop-down menu, select the Reference Type, and then click on the Add button.
Once the Reference Data is added, it appears in the grid below.
1.2.3. Resource Mapping
This section allows the Admin to map the resources available in the Organization, to the different projects. It consists of the following tabs:
• Search Mapping
• Create Mapping
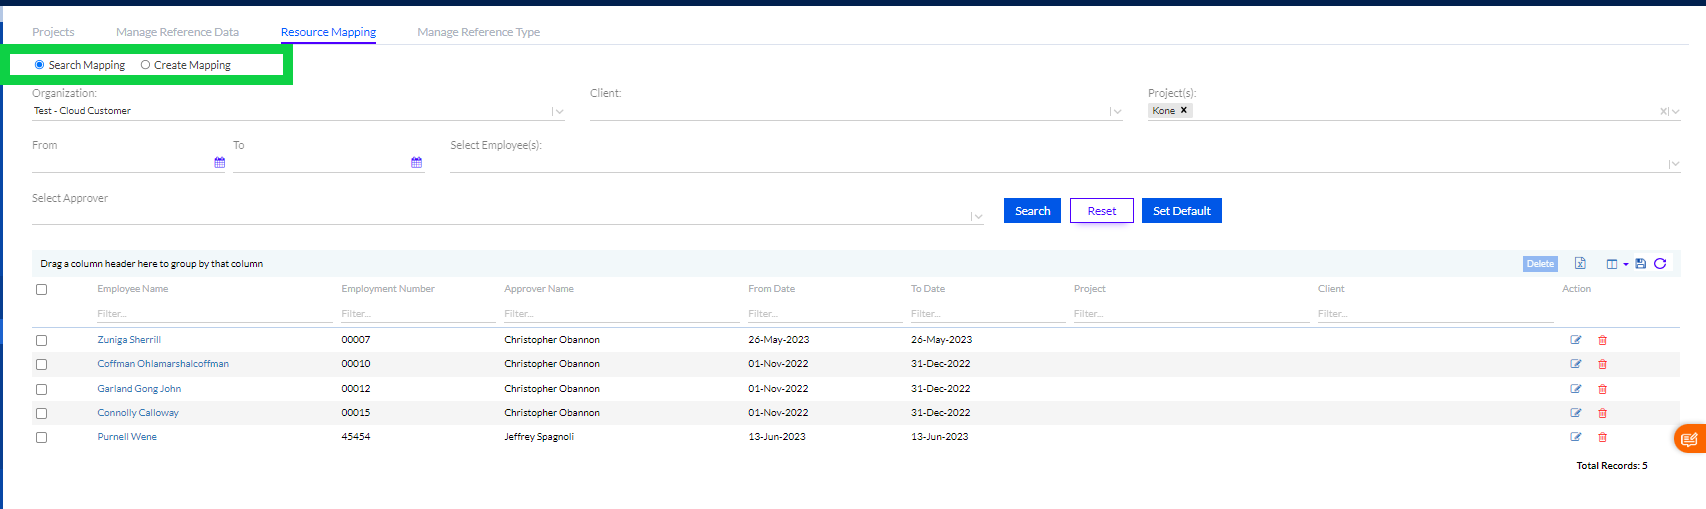
1.2.3.1. Search Mapping
This tab helps in the Search of employees mapped to the different projects.
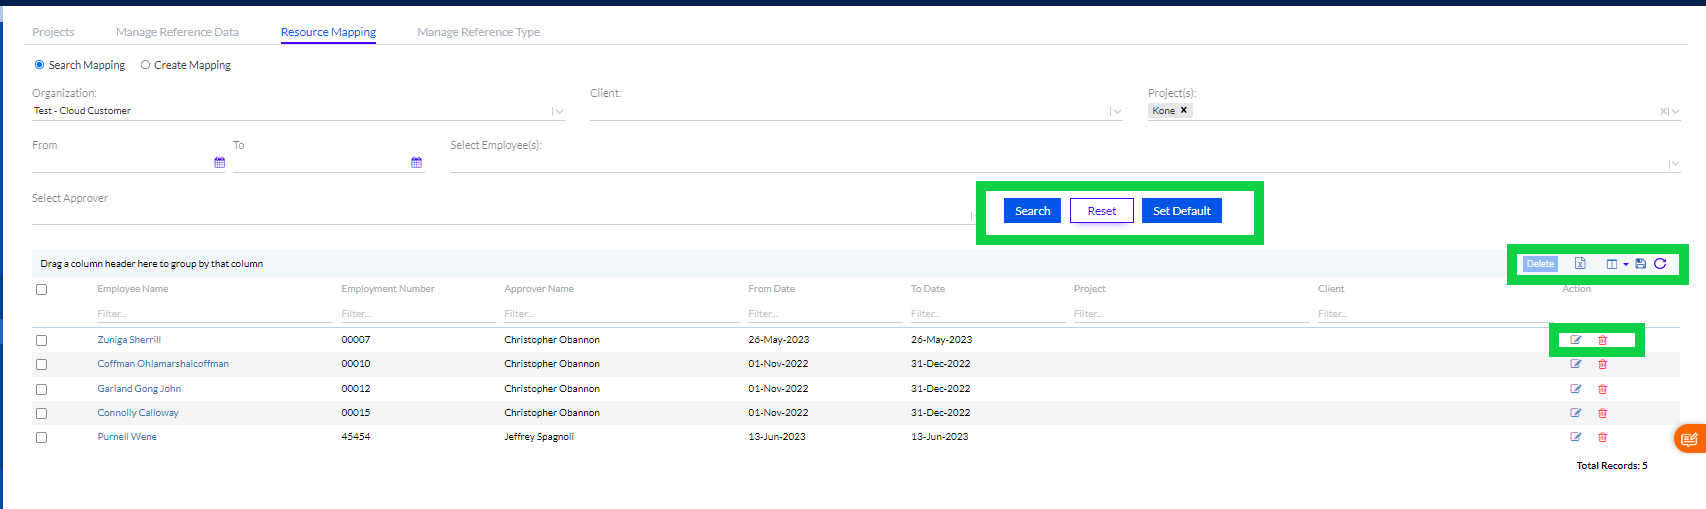
Here the Admin can Search using any of the following fields, and click on the Search button to search using the chosen parameter, or click on the Reset button to refresh the data entered.
• Organizations: Allows you to search on the basis of organizations.
• Client: Allows you to search on the basis of the clients name.
• Projects: Allows you to search on the basis of the project names.
• Select Employees: Allows you to search on the basis of the employees assigned to that project.
• Select Approver: Allows you to search on the basis of the Approver for an Allocation
The Admin has the provision to use the Delete button to delete a duplicate entry. There is also the provision to export the data in the grid to an MS Excel sheet as well as Save the data, Refresh the grid results, add/remove the columns on the grid and also save the grid format. The user can view the results by selecting the columns by selecting the column icon.
The entries on the grid can be edited or deleted using the Edit or Delete icons.
1.2.3.2. Create Mapping
This tab helps the Admin to map the employees to the different Projects.
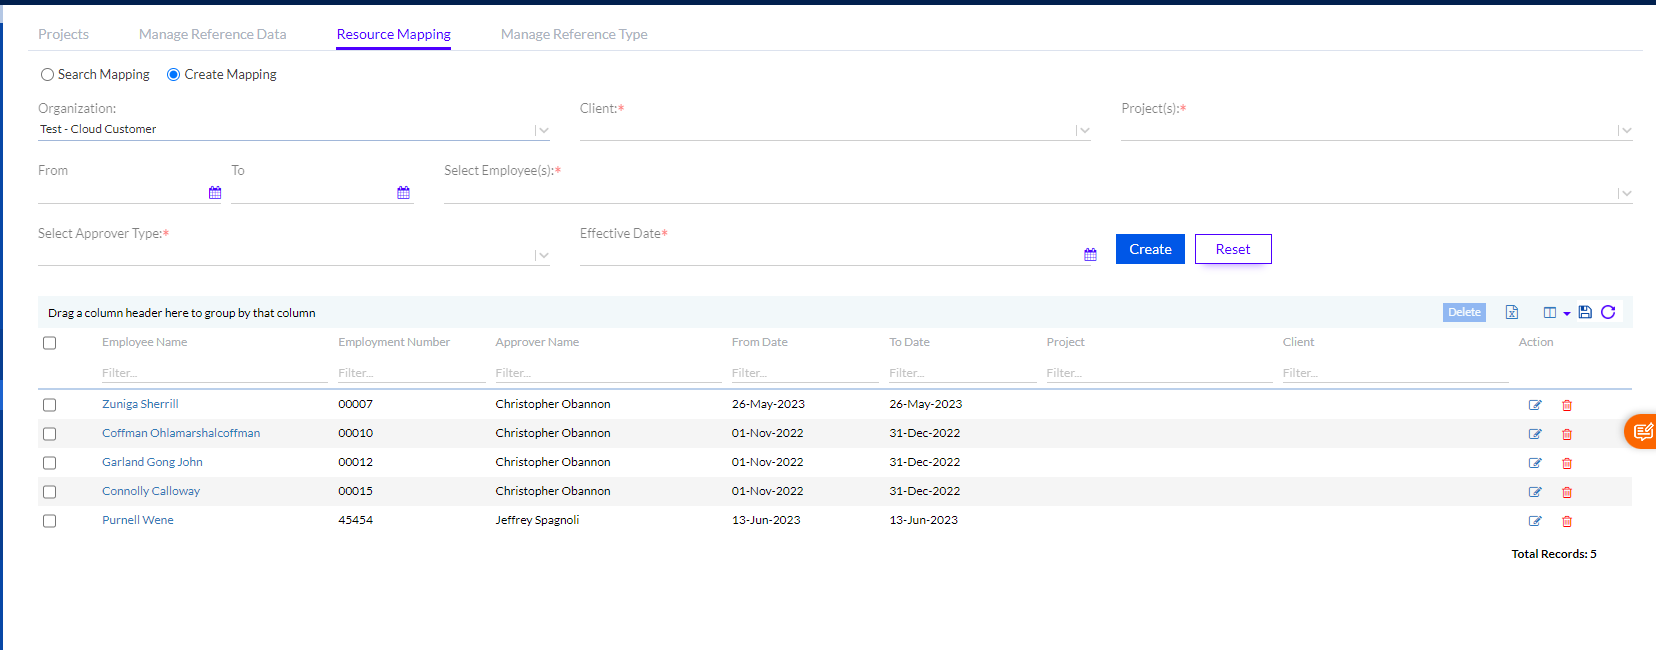
The Admin has to fill in the following details:
• Organization: Name of the organization needs to be selected from the dropdown (optional)
• Client: Name of the client needs to be selected from the dropdown
• Projects: Allows you to search on the basis of the project names
• From & To Dates: The Dates that define the time period for which the employee is assigned to that project.
• Select Employees: Admin needs to select the employees from the drop-down menu
• Select Approver Type: Admin needs to select the type of Approver (Functional Manager/Reporting Manager/Custom)
• Effective Date: Admin needs to select the date from which this comes into effect.
The Admin has the provision to use the Delete button to delete a duplicate entry. There is also the provision to export the data in the grid to an MS Excel sheet as well as Save the data, Refresh the grid results, add/remove the columns on the grid and also save the grid format. The user can view the results by selecting the columns by selecting the column icon.
The entries on the grid can be edited or deleted using the Edit or Delete icons.
1.2.4. Manage Reference Type
The admin can update the reference type in the Manage Reference Type here.
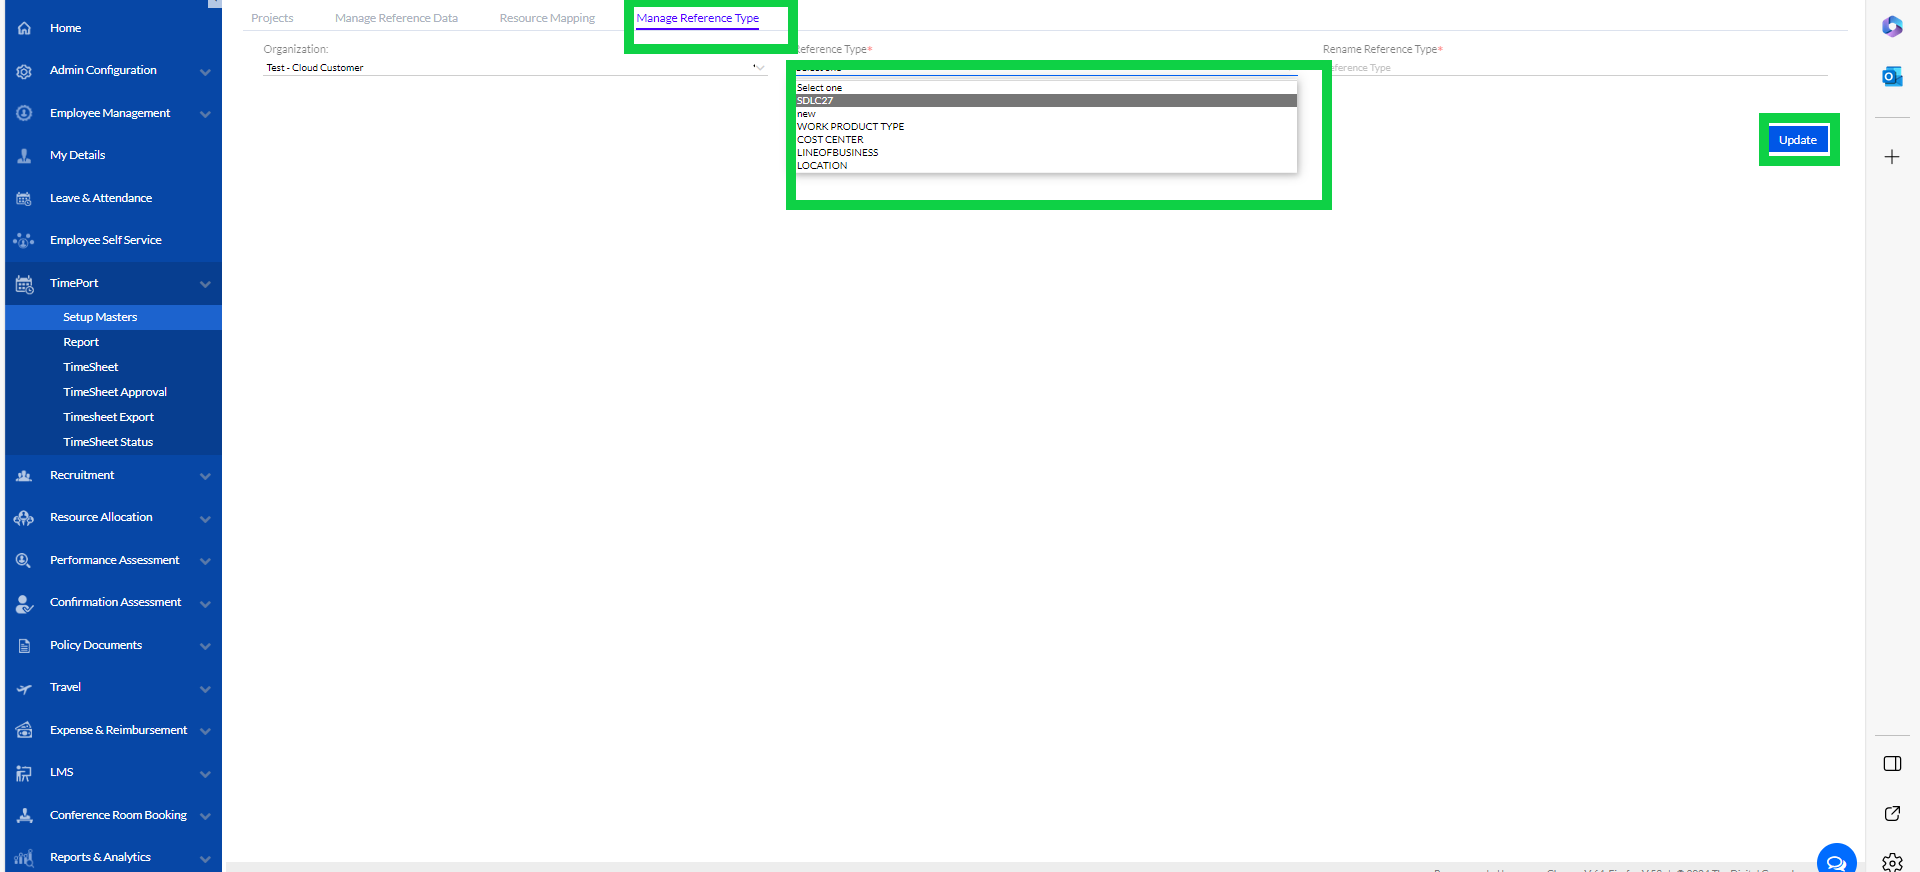
The user needs to Select the Organization, then select the Reference Type and the add the text to Rename Reference Type and then click on Update to manage/rename the reference type.
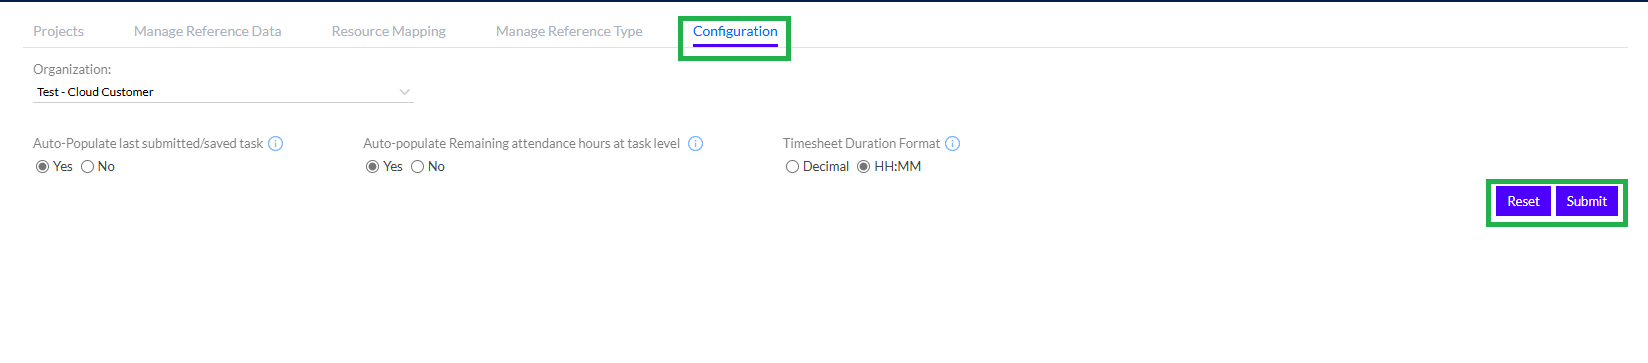
1.2.5. Configuration
The configurations for the reference data can be set here.
Select the Organization, Auto-Populate last submitted/saved task- select -Yes/ No, Auto-populate Remaining attendance hours at task level -select- Yes/No, add Timesheet Duration Format (Decimal/HH:MM) and click submit.