Check-In/Check-Out
The system provides three convenient methods for processing visitor check-in and check-out. Each method is designed to ensure quick access, accurate verification, and seamless visitor movement within the premises. Additionally, the system supports both individual and group-based entries, including partial check-in/check-out for visitors arriving or leaving at different times.
If the Declaration Form has not been submitted, the system automatically redirects the visitor to complete the form before allowing check-in. This ensures compliance with the organization’s security protocols.
I) Check-In/Check-Out Using Gate Pass ID
Visitors or security personnel can manually enter the Gate Pass ID into the system.
Once the ID is entered, the system retrieves the corresponding visitor record and displays all relevant details, including visitor name, host information, purpose, and scheduled visit timings.
After verification, the check-in or check-out can be completed with a single action.
This method is ideal when the visitor presents a printed or digital gate pass received during pre-registration.
II) Check-In/Check-Out Using QR Code Scan
Visitors receive a QR code via WhatsApp during the pre-registration process.
At the security gate, the QR code can be scanned using the system’s built-in scanner or a compatible device.
Upon scanning, the system instantly pulls up the visitor’s entry record and allows the security team to process check-in or check-out without manual data entry.
This method offers the fastest and most error-free experience for both visitors and security staff.
III) Check-In/Check-Out Using Mobile Number Search
On the CIO (Check-In/Out) Window, security staff can enter a visitor’s mobile number in the search field.
The system displays a dropdown or list of all active or past visit records associated with that number. Each record includes key details such as:
- Visit ID / Gate Pass ID
- Visitor Name
- Purpose of Visit
- Host Employee
Security personnel can easily select the correct visit entry to proceed with check-in or check-out.
This method is especially useful when visitors forget their gate pass or cannot access their QR code.
Overall, this promotes seamless visitor flow, enhances operational efficiency, and reinforces access control across the organization.
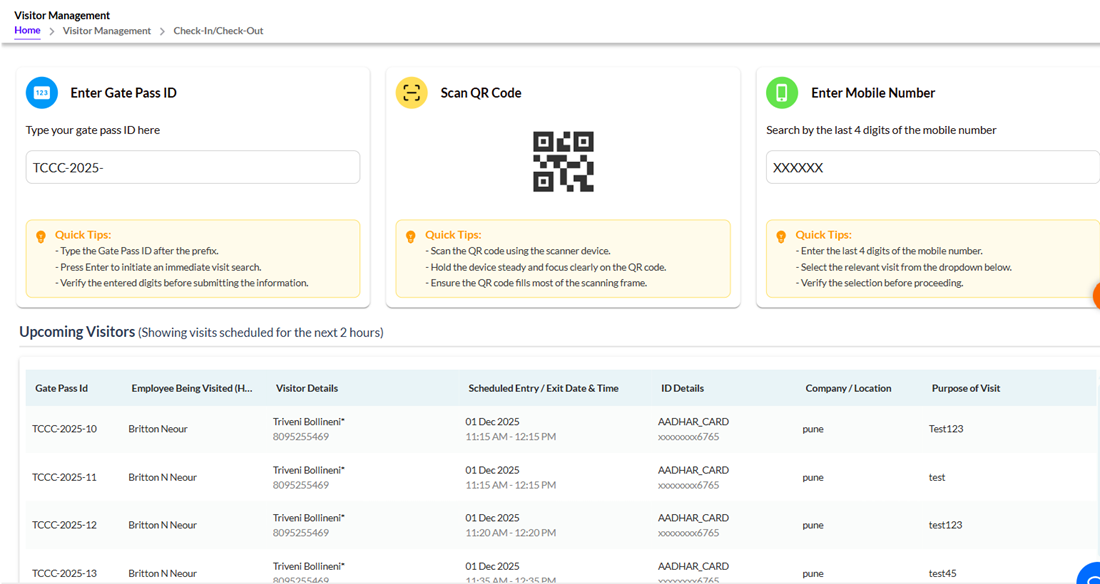
There are ‘Quick Tips’ for the user’s help.
Upcoming Visitors – Summary (Next 2 Hours)
The Upcoming Visitors section provides a real-time list of all visitors who are scheduled to check in within the next two hours. This helps the front-desk or security team stay prepared for arrivals and quickly verify each visitor’s details.
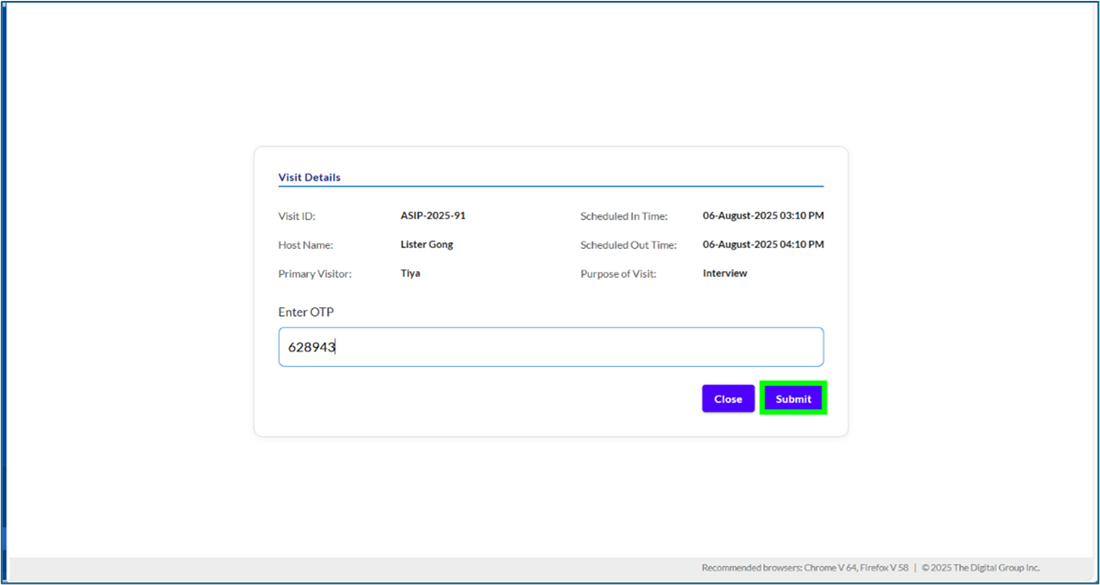
1. Visitor Verification After Gate Pass Entry Using Gate Pass ID
After entering the Gate Pass ID i.e. manually inputting the Gate Pass ID—the system navigates to the Visitor OTP Verification screen. This step is crucial to validate and confirm the visitor’s entry before check-in is finalized.
2. Filling the Visitor Declaration Form
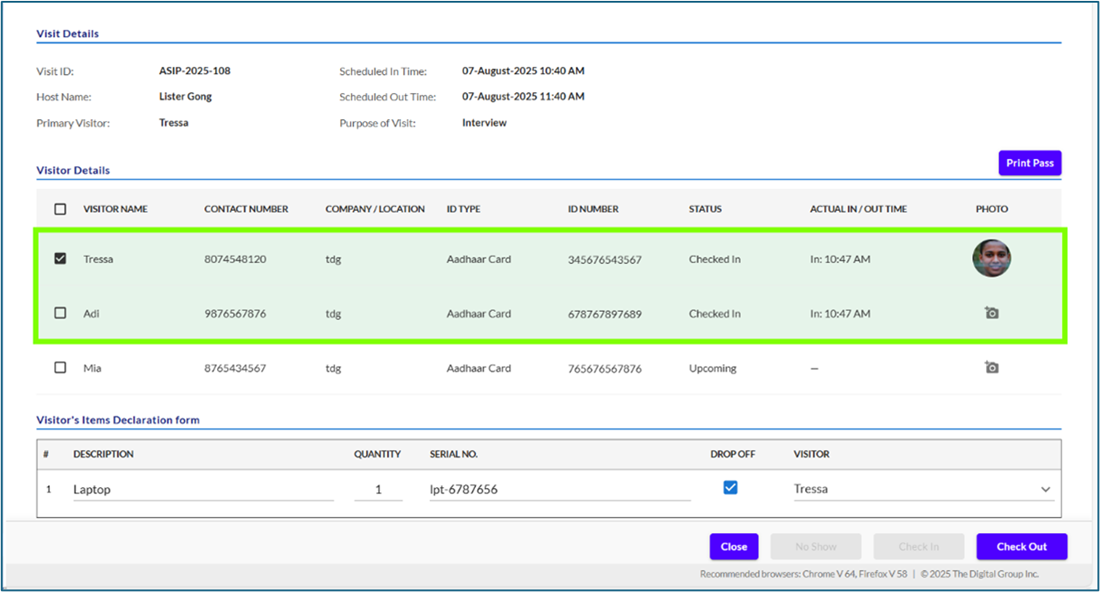
To proceed with filling in the visitor declaration form, at least one visitor must be selected using the checkbox next to their name. This selection is necessary for initiating the check-in process. Only visitors who have been checked in can add item descriptions to the declaration form. Until a visitor is selected and checked in, the system will not allow you to proceed further. Once a visitor is selected and checked in, fields become available to input item details such as item name, quantity, and serial number. Each item must be assigned to a visitor using the dropdown menu. The user can also indicate whether the item is intended to be dropped off at the premises. Additionally, a photo of the visitor can be uploaded, which will appear on the printed gate pass, aiding in identification and enhancing security during the visit.
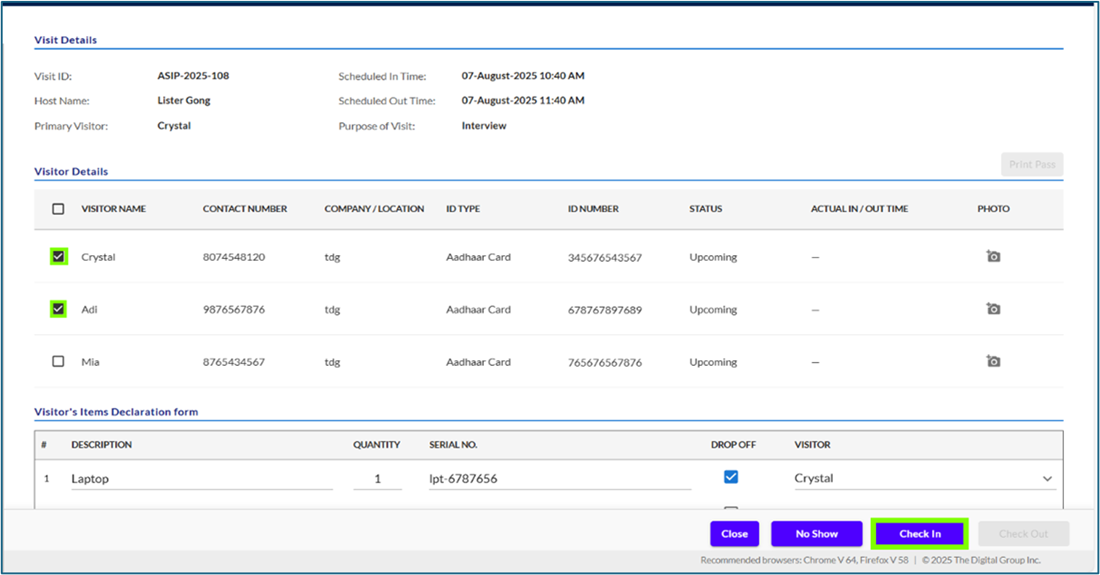
The visitor can add- Item: Laptop- Quantity: 1, Serial Number: (enter serial number), Map it to a specific visitor.
After check-in, the following screen will be displayed. To print the gate pass, select the checked-in visitor by ticking the checkbox next to their name, then click the "Print Pass" button.
The same screen also provides a "Check-Out" button, allowing you to complete the visitor's exit process directly from this view.
Partial Check-In / Check-Out
The Visitor Management System supports Partial Check-In and Partial Check-Out, which is particularly useful in scenarios where a group of visitors is registered under a single gate pass, but individual members of the group arrive or leave at different times.
In such cases, the system allows individual validation of visitors, meaning that one group member can be checked in or checked out independently of others. For instance, if a group of five visitors is expected and only one arrives on time, that visitor can be checked in while the rest remain in a pending state. If another visitor arrives later, they too can be verified and checked in individually. Visitors who never arrive are automatically recorded as No Shows once the scheduled entry time expires.
This flexible approach ensures accurate tracking of each individual, even when they’re part of a group registration. The Visitor Dashboard reflects these individual statuses — showing one member as “Checked-In,” another as “No Show,” and the rest as “Upcoming” or “Partial” until their status changes.
Partial check-in/out ensures better accountability and avoids rejecting or delaying visitors who are present simply because others from their group have not yet arrived.
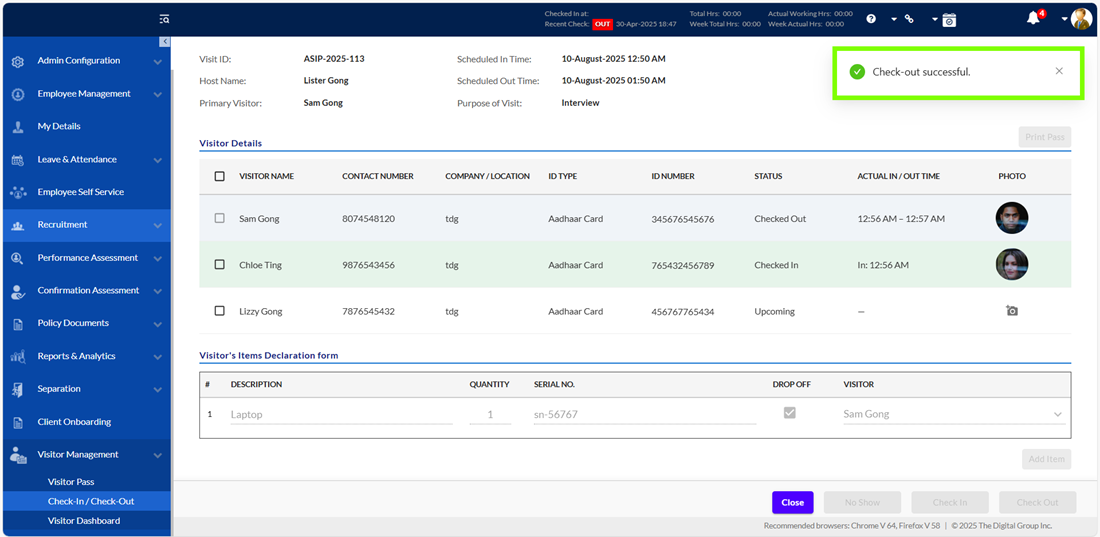
In the screenshot shown below, the visitor Sam Gong has successfully completed the check-out process. A green confirmation message appears at the top-right corner indicating “Check-out successful.”
Within the Visitor Details section, Sam Gong’s status is updated to Checked Out, confirming that the system has accurately recorded his departure.
Once this update is applied, Sam Gong is no longer included in the active visitor list, and his visit log is officially closed for the current session.
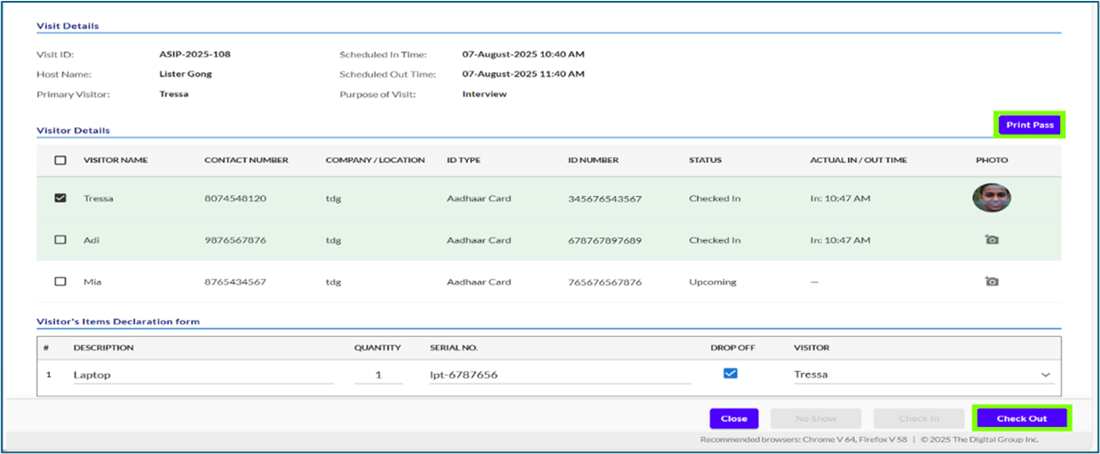
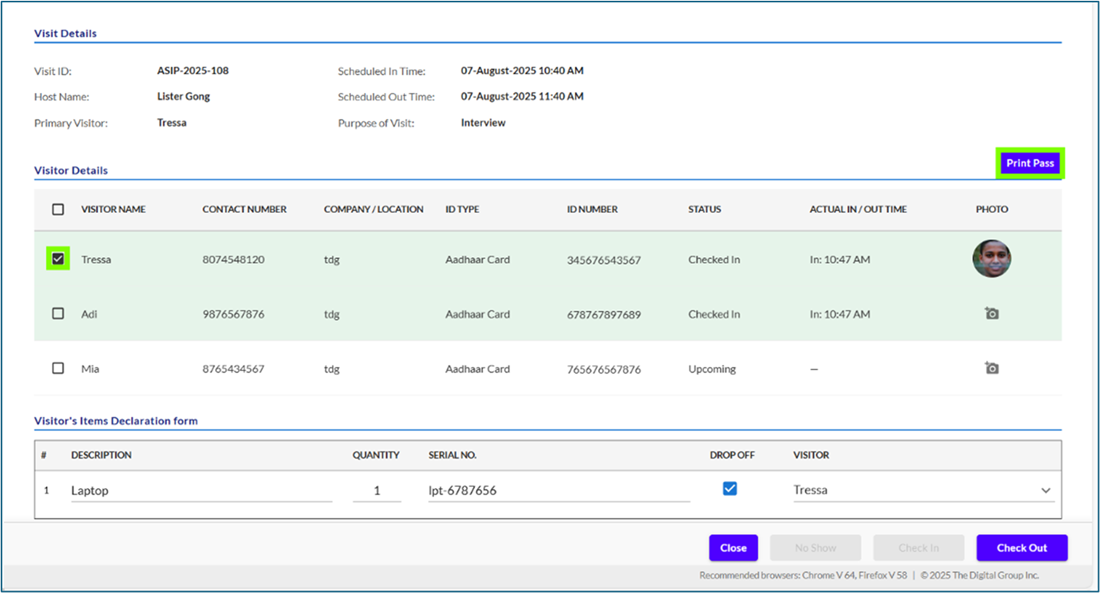
Print Pass Functionality
After check-in, the visitor details screen displays key visit information and allows further actions. To print the gate pass, select the visitor by checking the box next to their name under the Visitor Details section. Once selected, click the "Print Pass" button available on the top right. This will generate the physical gate pass for the selected individual.
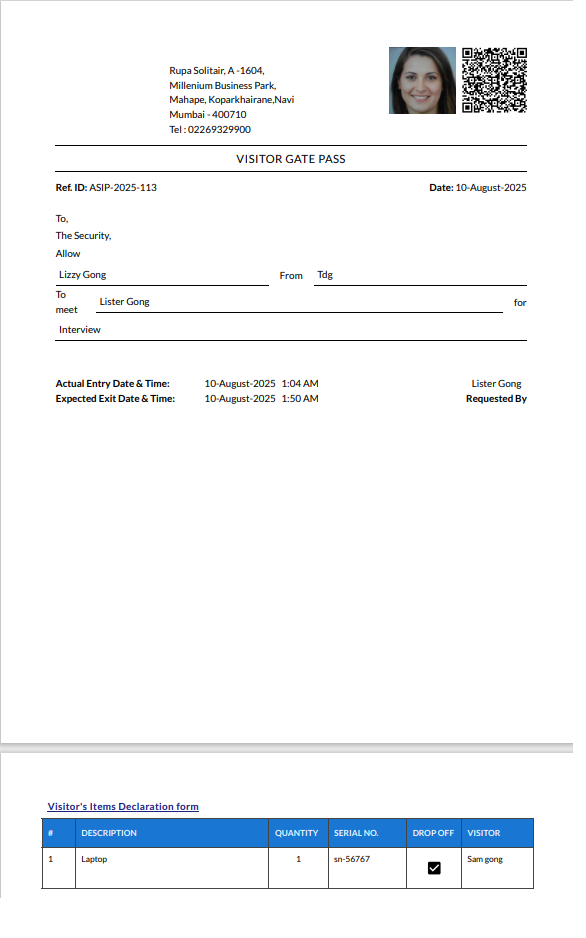
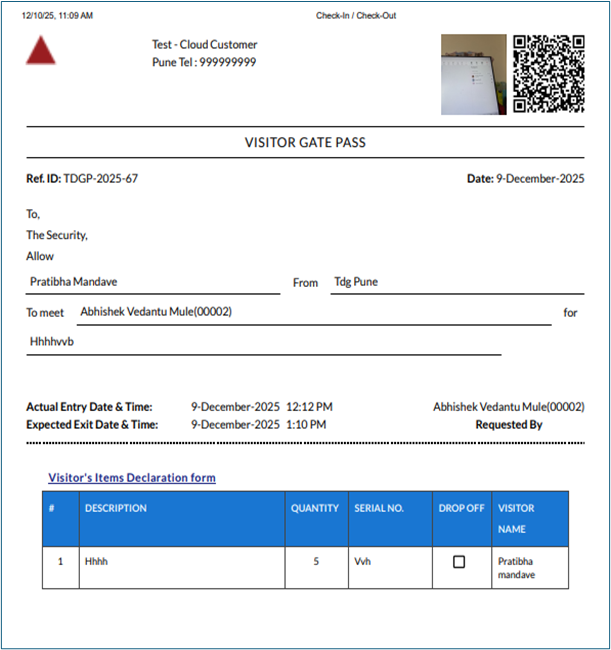
Once the visitor has been successfully checked in, a Gate Pass can be printed directly from the Visitor Details section by selecting the respective visitor and clicking the “Print Pass” button. This action generates a printable Gate Pass that contains all essential visit information, including the Gate Pass ID, visitor’s name and photo (if uploaded), host name, scheduled entry and exit times, company or location details, ID type, and ID number.
A QR code is also embedded on the pass, which can be scanned at security checkpoints for check-out purposes.
Alternatively, the Gate Pass ID printed on the pass can be entered manually into the system.
This printed Gate Pass serves as a valid, scannable document that authorizes the visitor’s presence on-site and can be issued at the security gate or reception desk.
Note: It is important to ensure that the visitor's photo is uploaded in the system before printing, as it will be displayed on the Gate Pass for identification purposes.
The VMS module provides an end-to-end, secure, and highly flexible visitor management system with key features like partial visit handling, declaration tracking, gate pass printing, and centralized dashboards. It supports real-time monitoring and improves organizational transparency, operational readiness, and workplace security.
Gate Pass Print Mode
The Gate Pass Print Mode setting in the Admin Configuration determines how visitor gate passes are arranged and displayed during printing. When the option “Each Gate Pass on a New Page” is selected, the system prints every individual gate pass on its own dedicated page. A page break is automatically applied after each pass, ensuring clean separation and improved readability. This format is especially useful when passes need to be handed out individually, attached to documents, or archived with clear distinction between visitors.
On the other hand, selecting “Print Continuously on Same Page” allows all gate passes to be printed one after another on a single continuous sheet. No page breaks are inserted between passes, and they appear in a stacked vertical layout. This option is ideal for bulk printing, internal referencing, or scenarios where saving paper and consolidating information on fewer pages is preferred.
Overall, the Gate Pass Print Mode offers flexibility by allowing administrators to choose between neatly separated passes for individual use or a compact continuous layout for operational efficiency.