Expense - Team Request
This is for the manager of a team. There are 3 functionalities in team requests. The manager can create requests on behalf of his team members, view requests of the team members with status and approve the requests from the teammates.
Creating a New Request
In order to create a new Expense request, the user has to click on the Click New Request button on the bottom right corner of the Expense Requests page, as highlighted in the screenshot below.
 x`
x`Note: The Reporting Manager can also create an Expense Request on behalf of a team member.
On clicking the button, the user gets the following page.
The process of creating of a new Expense Request requires the user to enter information in the following 2 steps, as highlighted in the screenshot below:
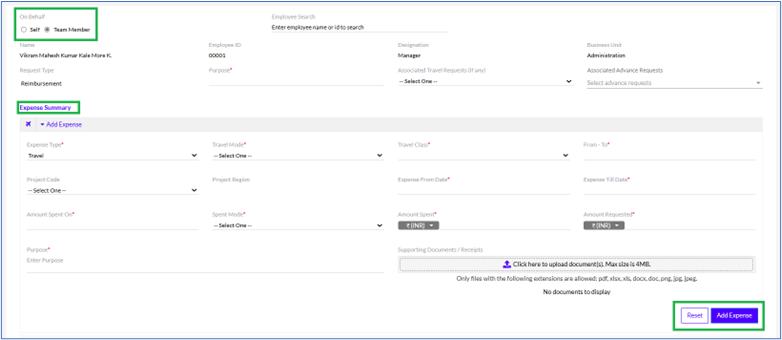
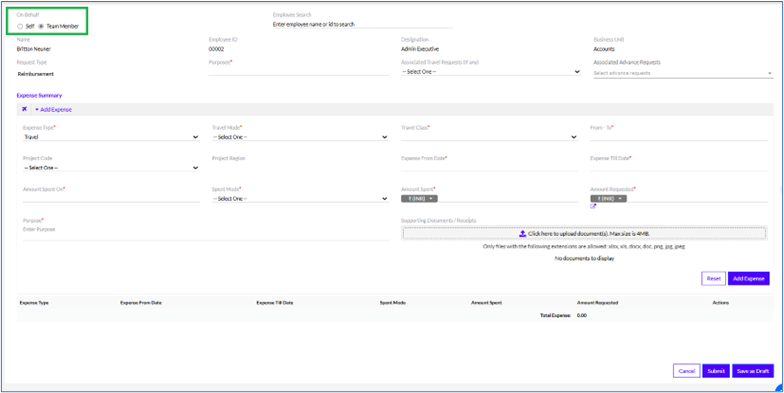
A. On Behalf
B. Expense Summary
The Reporting Manager can also create an Expense Request on behalf of a team member, by selecting the Team Member radio button under On Behalf, as highlighted in the screenshot below .
A. On Behalf
In this section, the Name, Employee Id, Designation, Department, of the employee are fetched automatically, highlighted in the screenshot below.

The details that need to be filled
Note: When the user submits the Expense request, an email is triggered to all the stakeholders.
Rest is same as Creating New Request in My Request.
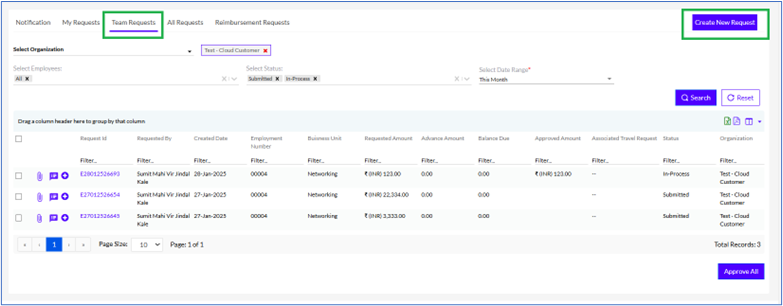
View Requests
The user can view all the previous requests of team members here .
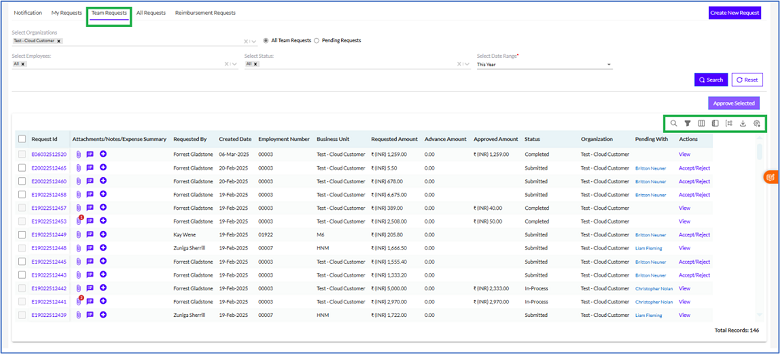
The Total Records or the total number of requests is also displayed at the bottom right corner of the page, as highlighted in the above screenshot.
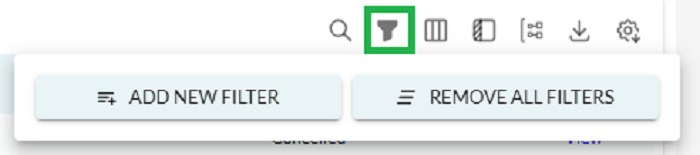
There in the Filter option, there are multiple options to Add New Filter and Remove All Filters as shown above.
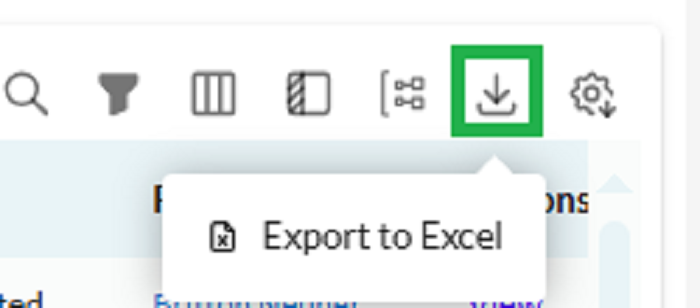
Also, the user has the option to export the list of requests to by clicking on the icon at the top right corner of the page, as highlighted in the above screenshot. On clicking it there is an option to Export to Excel.

There is an option for quick search, on clicking the icon the option is displayed as shown above.
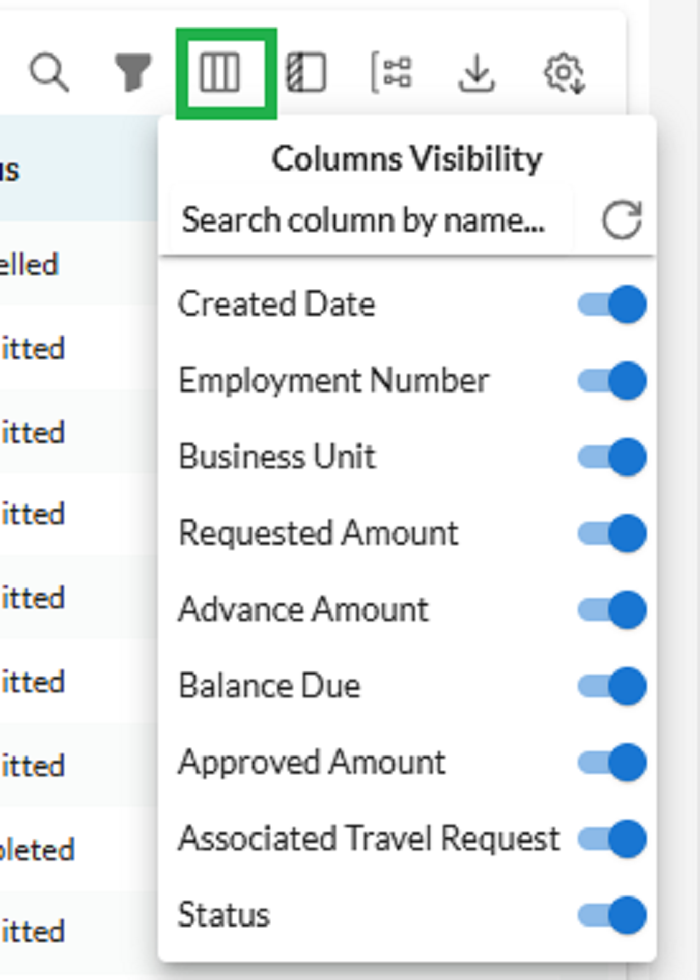
The user can also select/unselect any column header to the box above the list of records, in order to automatically sort the data based on that parameter. This is highlighted in the screenshot above.
There is also a Status column that shows the status of each request, which can be any one of the following, as highlighted in the screenshot below .
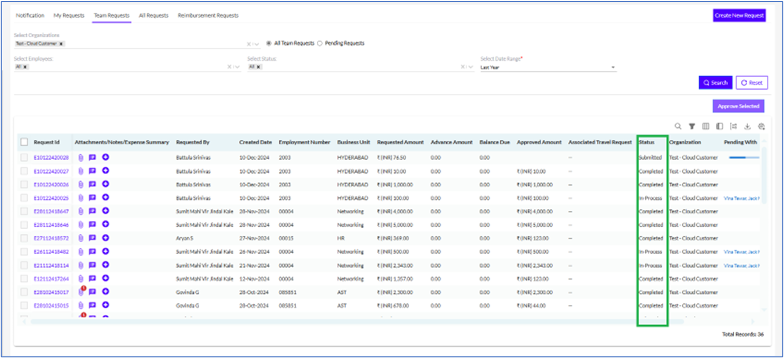
The status column in the requests has several different types as described below
- Submitted: Indicates the employee has filled in all the details and submitted the request.
- In-Process: Indicates that the request is being currently worked upon, and is not yet approved.
- Completed: Indicates the request has been approved and all the necessary actions have been completed.
- Rejected: Indicates the request has been rejected by the approvers.
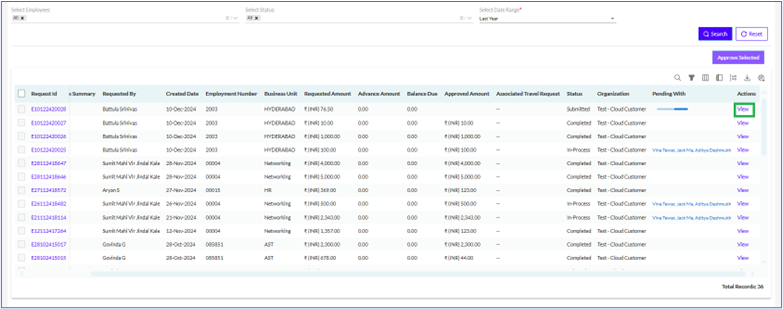
The user can click on the View button next to each request to get detailed information about that particular request, as highlighted in the screenshot below.
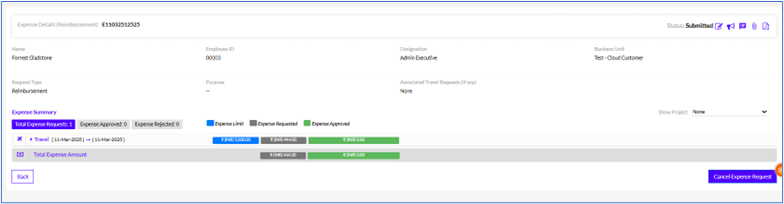
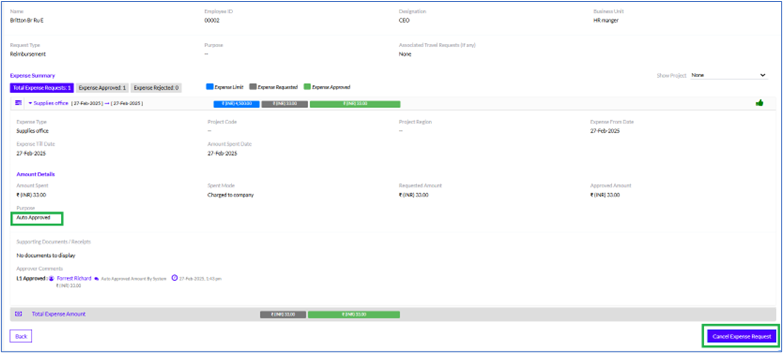
Clicking on the View button takes the user to the Expense Details page where the user can view all the details of the request, including the Request Type, Purpose, and Associated Travel Requests (If any). This is shown in the screenshot below.
For approver before approve the below screen will be visible.
After Approval below screen will be visible
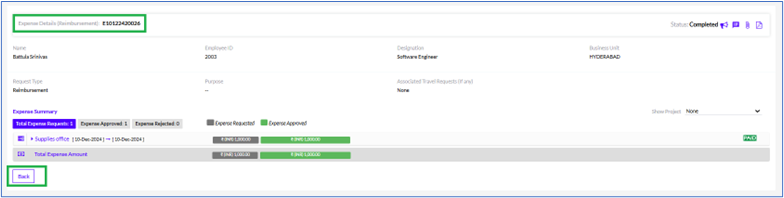
The user needs to click on the Back button to go back to the Expense Requests page, as highlighted in the screenshot above.
Approval of Expense Request
Once the employee submits the request, it goes to the L1, L2 and L3 manager(s) for approval . To view the expense requests, the L1/L2 Manager needs to click on the Expense & Reimbursements tab as highlighted in the screenshot below.
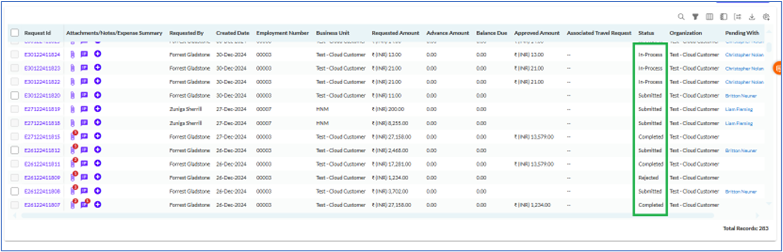
Once the Manager clicks on Notifications or Team Requests tab, a list of requests raised by the team appears, as shown below.
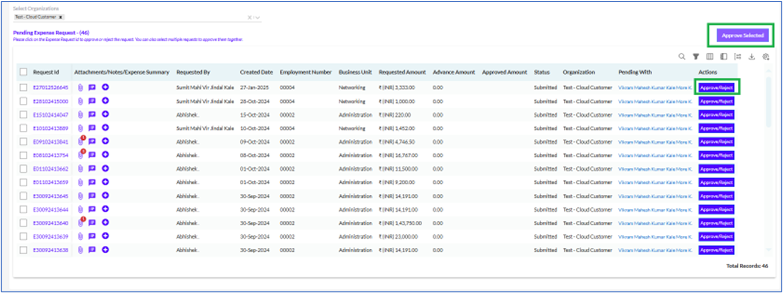
The Manager can select one or more requests from the list as highlighted in the screenshot above and Approve or Reject.
Note: The first organization in the drop-down list is selected by default. However, the manager can select multiple organizations by clicking on the tick marks against each one.
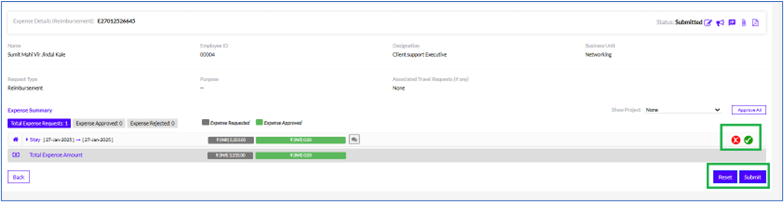
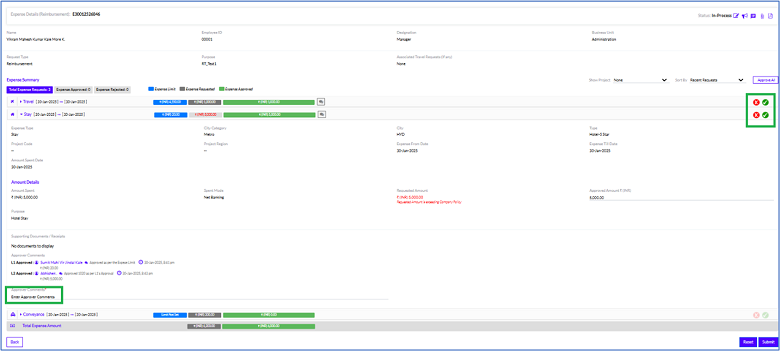
After clicking on the Approve/Reject Link, the Manager can view the details of the Expense request, as highlighted in the screenshot below.
There is “ ” icon to see all updates about the request.
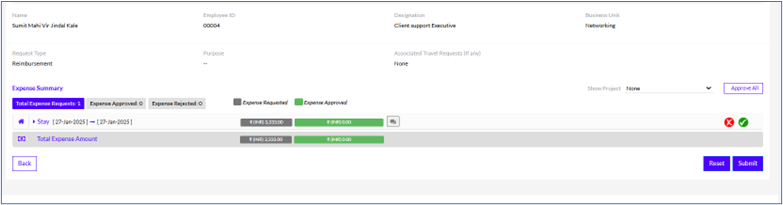
After clicking on the request to Approve/ Reject, the Manager can view the details as shown below.
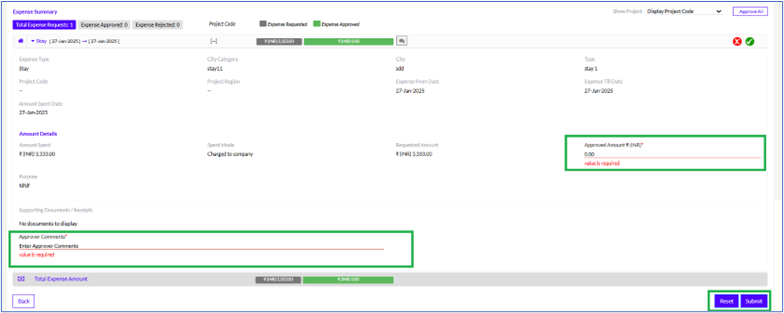
After going through the details, the Manager needs to add the Approved Amount and also add Approver Comments as highlighted in the screenshot above.
Once the approved amount and comments are added, the Approved Amount added by the Manager is reflected in a green button, as highlighted in the screenshot below.

Note: The Manager has to repeat the steps for all the Expense requests submitted by the Employee.
The Manager can Approve or Reject individual requests by clicking on the Cross or Tick marks to the right of each request, as highlighted in the screenshot below .
There are two additional functionalities (Approve All and Auto Approve) available for the managers which need to be previously set for convenience.
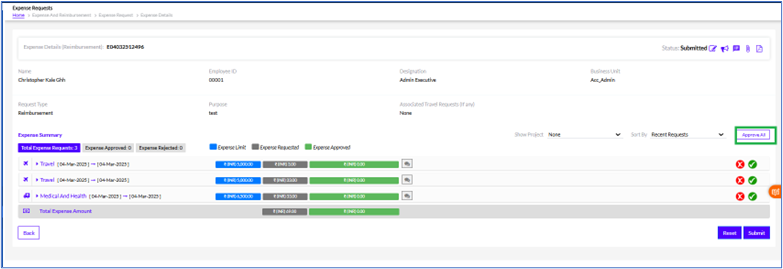
Approve All
If the user wants the ability to Approve all Expense Types in one Expense Request ID, then the Approve All button comes into the frame. Let us assume, we have 10 Expense Types in one Expense Request Id.
Scenario 1: For all items, the Manager is Ok with the Requested Amount, then he/she can Approve all items in one go by clicking on the "Approve All" icon.
Once the "Approve All" button is clicked, an informative message should display like "Do you want to "Approve All" pending requested amounts by Employee"? - Yes/No
If No, then the Informative message should be closed and no line item should be approved.
If Yes, then prompt the mandatory Enter Comment box with an Ok button so that he can be able to enter one comment for all.
When the user clicks Ok Then the Requested Amount of every line item should become its Approved Amount and the Comment should be updated for all line items for which he clicked "Approve All".
Scenario 2: For some Expense types Manager is Ok with the Requested Amount, & few items, the Manager is not Ok.
Then, first, he/she should “Reject” these items (for which he is not Ok) as per the existing process for each line item.
Approve/Reject icon is available as existing for each line item.
After that, he/she can click on the "Approve All" button, so that all other 8 items can be approved with the requested Amount in one go.
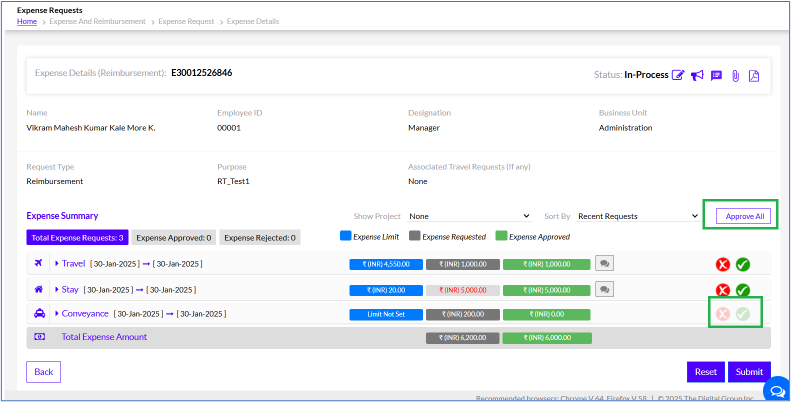
Note: if all the Line items are approved or rejected individually and no action needs to be taken then the "Approve All" buttons need to be disabled.
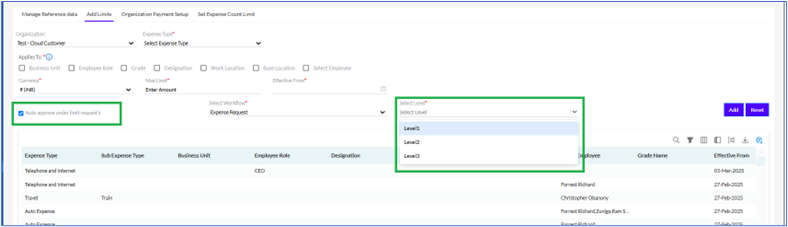
Auto Approve:
The processes are following
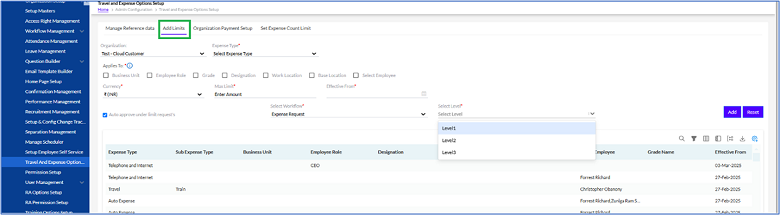
1: Add limit:
This can be set in the Admin Config, by selecting Travel and Expense Option. The Maximum Expense limit is set here. Requests amounts requested below which will be auto-approved.
There are two functionalities
C - Basis of the limit set will be as per the Expense request/ Expense type/ Project
D - Basis of frequency do we need this limit (Daily (eg: Travel)/ Weekly (eg: Stay)/ Monthly (eg: Phone bills)
- Expenses Type – Frequency Daily
- And you can split & multiply the Limit as per the number of co-employees selected along with the submitter
2: Till which level auto-approval (Level 1/Level 2/etc. is needed ):
- All Levels can be selected
3: Auto-Approval email notifications:
If the user wants the email notification to go to the manager when the request is submitted by the employee or only when the requests get auto-approved by the system under a set limit the email notifications are sent.
- Employee can enter data anytime, but submitting for approval should be one time.
4: The user needs to check-box fields "Allow auto-approval", and options as Yes or No in Workflow Management >>Add Workflow
5. The user needs to add a drop-down field as "Workflow Name" in Travel & Expense option Setup >>Add Limits tabs and then the levels of workflow should be selected in the "Levels" drop-down.
Given that the user is in Admin Config>>Travel & Expense Option
6. A configurable check box “Auto approve under limit requests” is created when selected the user needs a drop-down field "Auto Approve Levels".
Note: The manager should get notifications for auto-approval requests as well. In the setup page, when the user selects “Auto Approval under limit requests” we need a multi-select drop-down “Auto Approve levels:” which will only have values (Level names like Admin, L1, L2, Accounts, etc) as per the workflow defined.
Once the request is auto approved, the status is updated as Approved as highlighted in the screenshot below.
Once the Manager has approved or rejected the individual expense requests, there is the option to Submit the request or click on the Reset button to revert the ‘Approved’ or ‘Rejected’ status of each request.
Note: Once the Reporting Manager (L1, L2, L3) has approved or rejected the Expense Request, an email is triggered to all stakeholders.
Once the Expense & Reimbursement request has been approved by the L1/L2/L3 Manager, it goes to the Accounts Manager for approval.