1. Set Shifts
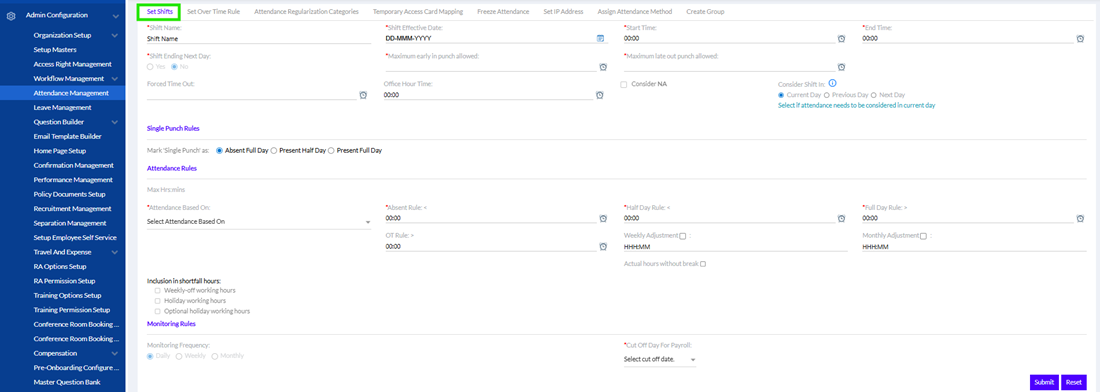
Here admin can add Shift Name, Attendance Regularization Categories, Shift Effective Date, Start Time, End Time, Shift Ending Next Day- Yes/No, Maximum early in Punch allowed, Maximum late out Punch allowed.
Forced Time Out if set the system will forcefully log out the employee after the designated time and the worked time after that will not be calculated.
Office hour time is a display purpose field just to add information about office hour time (for example 9 hour is office hour time).
Consider N/A simply means a shift which doesn`t have any half day, full day and absent rule; usually assigned to top management people whose present count is not considered.
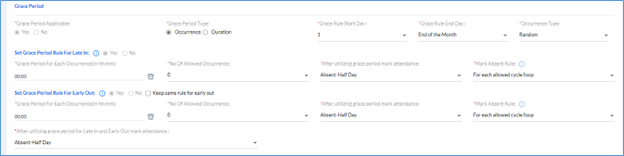
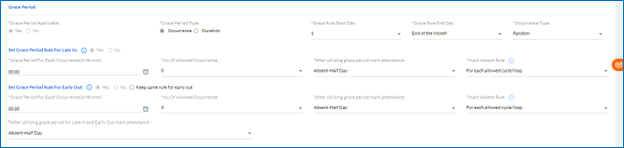
In Grace Period section, if Grace Period Applicable is selected as Yes, then Grace Period Type (Occurrence/ Duration), Grace Rule Start Day, Grace Rule End Day, Occurrence Type (Random/ Consecutive). If Roster is enabled then this section of Grace Period is not visible and new Tab Create Group is visible. When duty shift roaster is not assigned then the attendance can be calculated based on the default shift, the attendance will be calculated.
The Admin has to “Set Grace Period Rule for Late In”, “Grace Period For Each Occurrence (in hh:mm)”, “No Of Allowed Occurrence”.
Admin also has to set rule in “After utilizing grace period mark attendance” (Absent-Half Day/ Absent-Full Day), so that when employee crosses the grace period he/she will be marked half day absent and more than limit they will be marked full-day absent.
In “Mark Absent Rule”, admin can select it to be For each allowed cycle or loop/For each occurrence after allowed occurrence/ For 1st occurrence. When user selects ‘For each allowed cycle/loop’ option, then functionality should work after the occurrence exceeds allowed for the cycle/loop, when user selects ‘For each occurrence after allowed occurrence’ option, then functionality should work for each reoccurring occurrence and when user selects ‘From 1st occurrence’ option, then functionality should work form 1st occurrence of the grace period rule.
Similarly, the Admin has to “Set Grace Period Rule for Early Out”, in same manner or simply click Keep same rule for early out.
In Attendance Rules Section, the admin has to select the Attendance Based On ( Total Working Hours/ Actual Working Hours), set Absent Rule < (set the minimum hours’ time below which the employee will be marked absent), Half Day Rule < (set the minimum hour hours’ time below which the employee will be marked working half day), Full Day Rule < (set the minimum hour hours’ time which is required for the employee to be marked working full day), set rules if the attendance will have either by Weekly Adjustment (enter weekly hours) or Monthly Adjustment (enter monthly hours) or by Actual hours without break. The admin can add Inclusion in shortfall hours by choosing Weekly-off working hours/ Holiday working hours / Optional holiday working hours.
In Monitoring Rules, the admin sets Monitoring Rules like Daily/Weekly/Monthly and Cut-off Day for Payroll.
Finally, after clicking the submit the shift details are created.
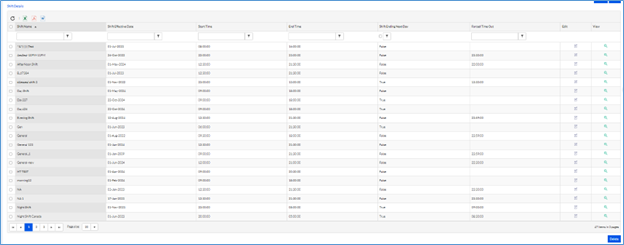
Previously created Shift details are displayed below. They can also extract the data in Excel, PDF or Word Format. To delete a particular shift details, select the details by clicking the box on its left and click delete.
The records can be edited by the admin.
The Enable Late Mark Penalty Rule:
Admin can set late mark rules for employees via admin configuration with the help of attendance management tab as shown below:
The Enable Late Mark Penalty Rule
This setting allows the organization to define attendance penalties for employees who report to work after their scheduled shift start time. This rule is applicable only for late arrivals and is not applicable for Early Out occurrences.
- Grace Period for Each Occurrence
- The Admin can define a grace period that allows employees to report late without incurring a penalty, subject to the configured number of allowed occurrences.
Example 1:When the shift start time is 07:00 am and grace period: 15 Minutes
Allowed Occurrences: 5 Times per Month.If an employee reports to work within the grace period (up to 07:15am) for a maximum of five occurrences during the month, no attendance penalty will be applied.
Once the allowed occurrences are exhausted:If the employee reports after the grace period (for example, 07:16am), the system will apply the attendance penalty as defined in the organization policy.
If the rule is configured to mark Half Day after three late occurrences beyond the grace period, the employee will be marked as Half Day Present.
If the employee reports significantly later (for example, 07:21amor beyond), the employee may be marked as Full Day Absent, depending on the configured penalty rule.
Example 2
If the shift start time is 08:00 AM and the grace period is 30 minutes and if the employee reports after 08:30 AM, the system will apply the configured penalty and mark the employee as Half Day or Full Day Absent, based on the organization's attendance policy.
No. of Allowed Occurrences
The No. of Allowed Occurrences field allows the Admin to specify the number of times an employee can utilize the defined grace period within a month without paying a penalty.
The Admin can:
- Specify a fixed number of occurrences (for example, 3, 5, or 10 occurrences).
- Select Full Month, allowing the grace period to be applied throughout the month as per the configured attendance policy.
Once the configured number of allowed occurrences is exceeded, the system automatically applies the late mark penalty according to the defined rules.
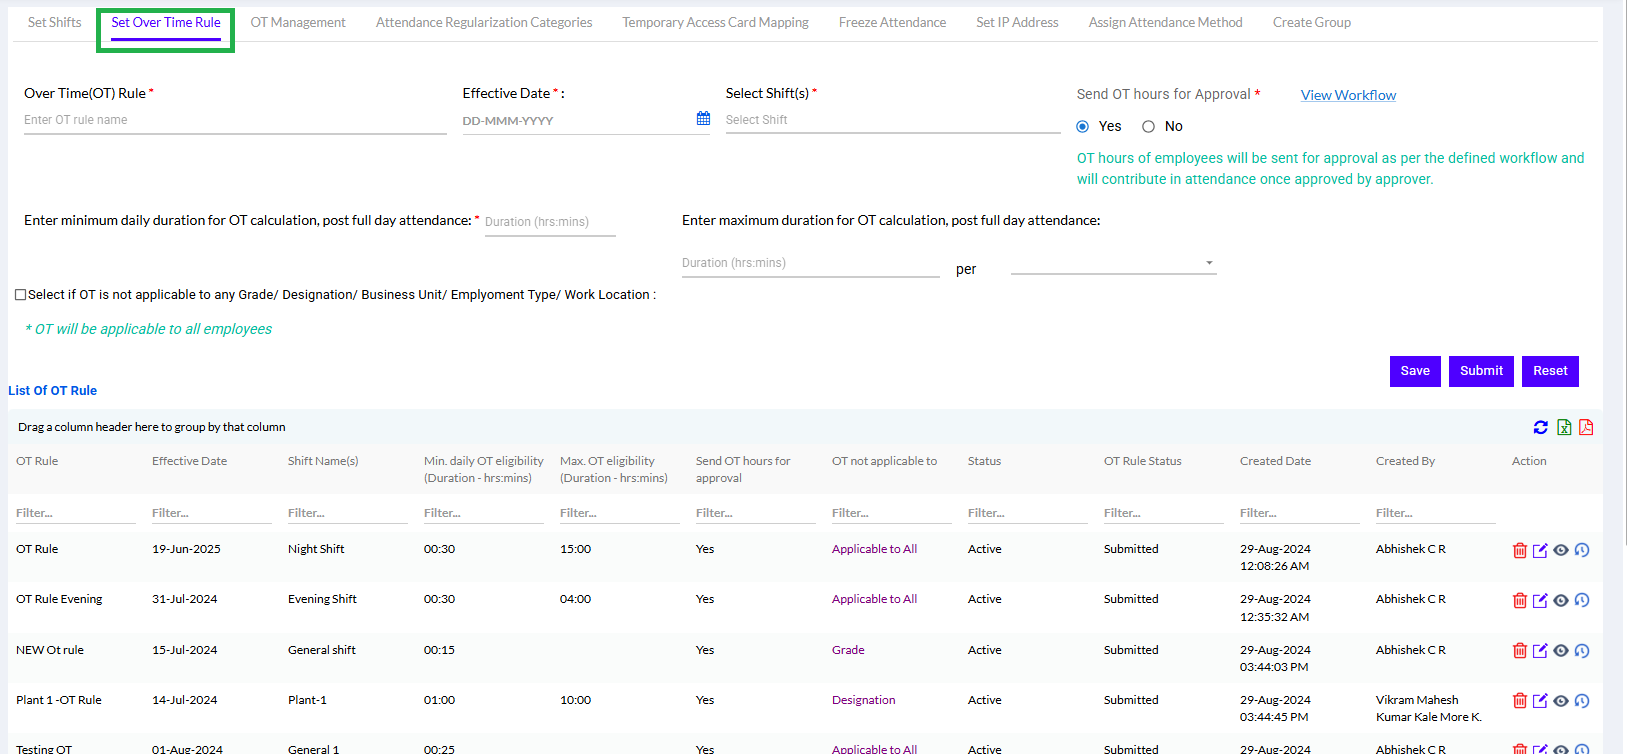
2. Set Over Time Rule
If an employee works more than their regular working hours, that is considered as over time for the employee. This tab helps the admin to set overtime rule.
The Admin creates a Over Time (OT) Rule by entering OT rule name, Effective Date (after the latest attendance freeze date), Select Shift (s) (here multiple shifts can be selected, the shifts are previously created in set shifts). If “Send OT hours for Approval” is Yes then - OT hours of employees will be sent for approval as per the defined workflow and will contribute in attendance once approved by approver; if set no then - OT hours of employees will contribute in attendance without any approval.
In the “Enter minimum daily duration for OT calculation, post full day attendance” admin can enter duration in hrs: mins. This is mandatory field. These hours simply mean minimum duration to complete in a day to mark over time. If the employee completed the minimum duration required for OT to be applicable. (Eg: Full day rule is = 8 hrs and minimum duration for OT is 55 mins. Employee X completed = 10 hrs in a day, Employee Y completed = 8:30 hrs in a day. Therefore, employee x will get the benefit of OT since he has completed the minimum requirement for OT to be applicable. Employee Y will not get any OT hours and those hrs will contribute to normal shift hrs since 55 mins are not completed.)
Similarly, in the “Enter maximum duration for OT calculation, post full day attendance” admin can enter duration in hrs: mins. These hours simply mean maximum duration for OT eligibility applicable for employee in a day/week/month/quarter/year to mark over time. (Eg: Full day rule is = 8 hrs and minimum duration for OT is 55 mins and max are 2 hrs in a day. Employee X completed = 10 hrs in a day, Employee Y completed = 11:30 hrs in a day. Therefore, employee x OT hrs will be sent 2 hrs as it is under the rule. Employee Y OT hrs will be sent 2 hrs as max is 2 hrs according to the rule even though he has completed 3 hrs 30 mins.)
Both of these can be set in Per Day/ Week/ Month/ Quarter/ Year.
The admin can click box for “Select if OT is not applicable to any Grade/ Designation/ Business Unit/ Employment Type/ Work Location”.
Select the radio button on basis of which OT will not be applicable.
Click on Submit to add the OT rule.
Previously added OT rules are displayed below
The records can be edited or deleted by the admin. They can also extract the data in Excel, or PDF Format.
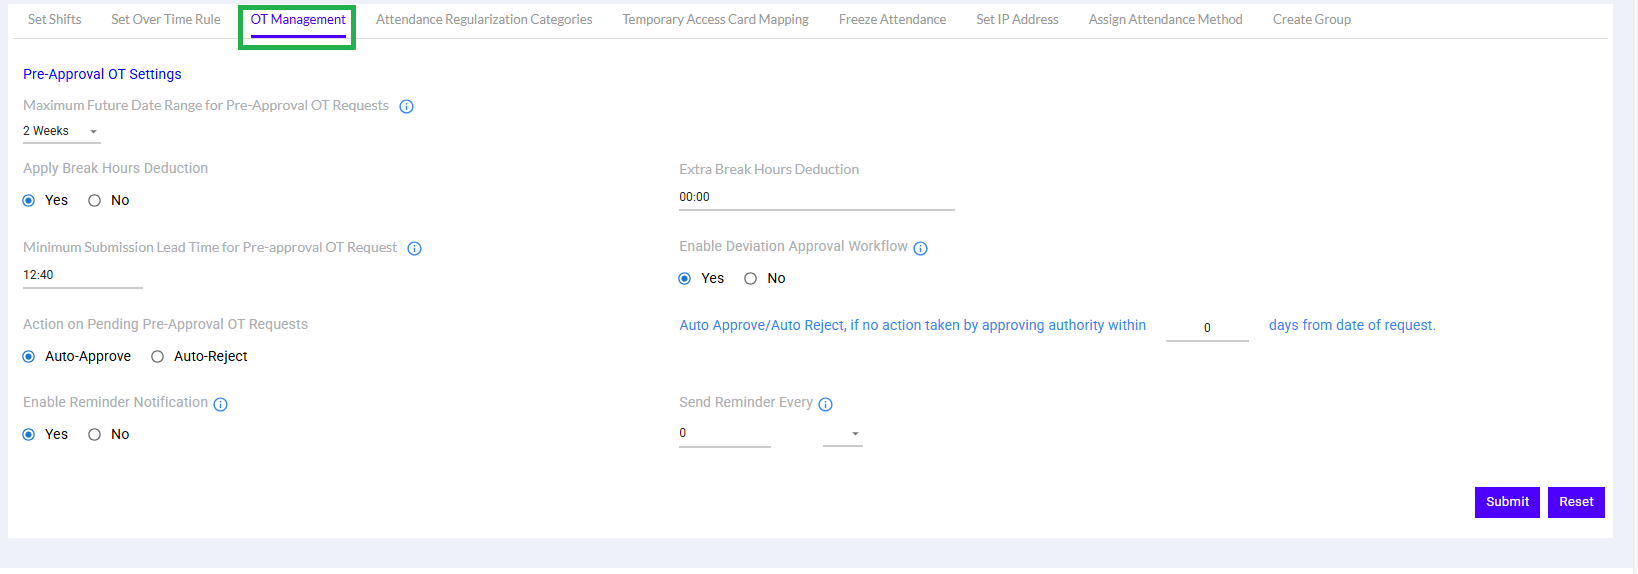
3. OT Management
Few Features are added to the OT of the employees for pre-approval by managers.
i) Pre-Approval OT Settings
Here the user can set Pre-Approval settings for OT.
Maximum Future Date Range for Pre-Approval OT Requests – it can be set from 1 week/2 Weeks/1 Month/2 Months/3 Months.
Note: This defines how far into the future dates can be selected for pre-approval OT requests.
Apply Break Hours Deduction- Yes/No
The break hours for OT can be set here. The Break Hours will be automatically deducted from the configured time if Apply Break Hours Set Yes.
If Yes- Extra Break Hours Deduction can be set in minutes or hours as per pre-decided.
Minimum Submission Lead Time for Pre-approval OT Request (Duration- Hours/Mins)
Note: If minimum number of hours before OT start time by which pre-approval request must be submitted. If not met, request will be rejected automatically.
Enable Deviation Approval Workflow-Yes/ No
Note: If enabled, managers must submit a reason for deviation, which will be routed to higher management for approval.
Action on Pending Pre-Approval OT Requests -Auto-Approve/ Auto-Reject
If the action is pending on the pre-approval of OT requests, further set of action of auto approval or auto rejection can be set here.
The HR/ Admin user can set a limit- Auto Approve/Auto Reject, if no action taken by approving authority within () days from date of request.
The system will send notification if previously set.
Enable Reminder Notification- Yes/No
Note: Enable automatic reminder notifications to higher management for unapproved pre-approval OT requests.
Send Reminder Every- () Days/ Hours
Note: Sends repeated reminders at the set interval until approval or OT start time.
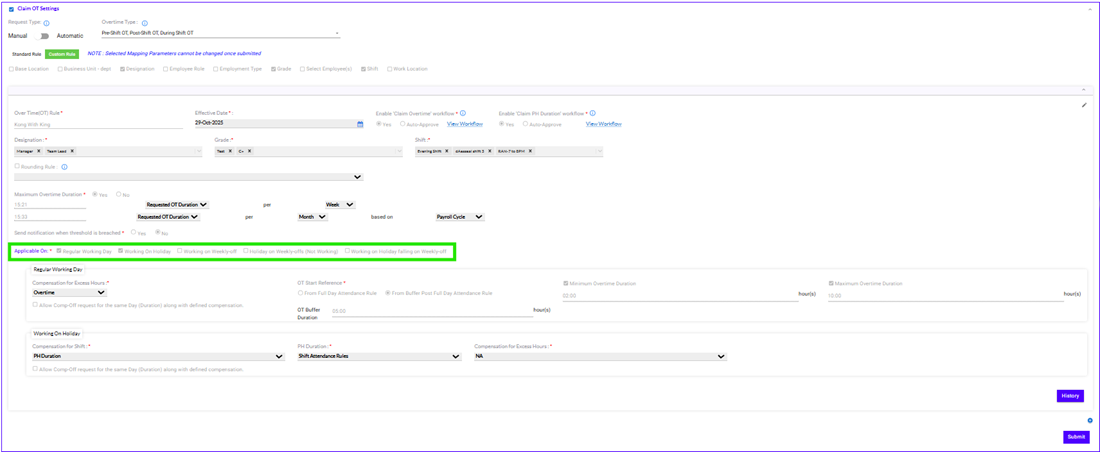
ii) Claim OT Settings
In claim OT settings an User gets an option to select over time rule like pre-shift OT, duration shift OT and post shift OT. The user can add shift or give OT depending upon the base location, business unit, designation, employee role, employee type, grade, select emplyoee’s, shift and work location. There are two rules under this, one is standard rule and custom rule. If standard rule is selected, then it will be applicable to all shift types.
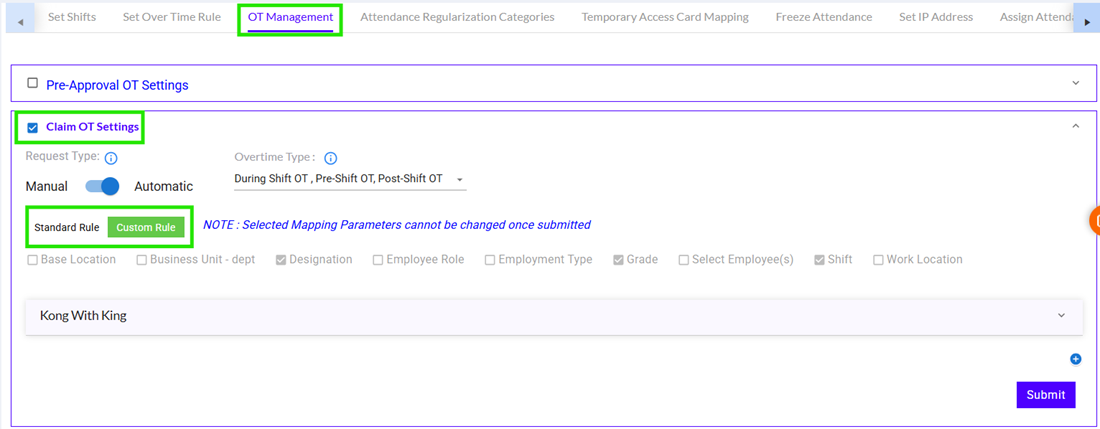
OT can be applied on regular working day, working on holiday, working on weekly off, holiday on weekly offs(Not working), working on holidays falling on weekly off as shown in the image below.
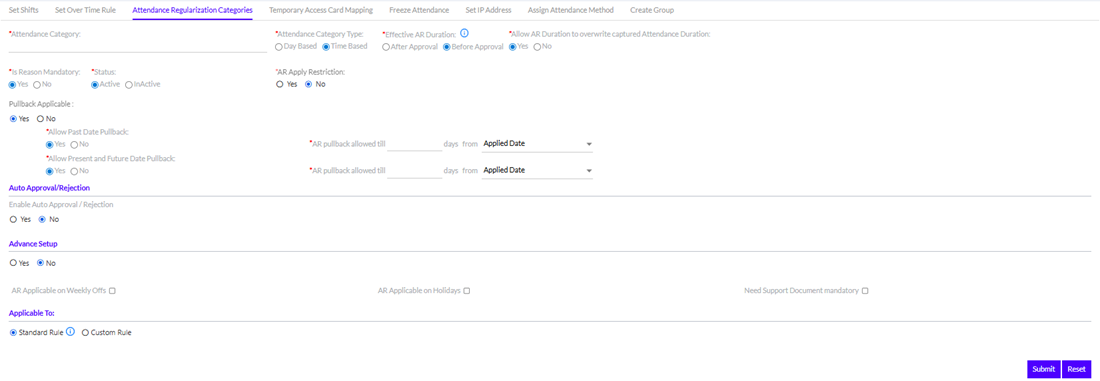
4. Attendance Regularization Categories
If by mistake an issue is faced by the employee or he/she forgets to check-in/checkout, there is an option to raise for Attendance Regularization (AR)by the employee, which if approved by the manager, regularizes the attendance for that period. Here admin should add Fill up the Attendance category. Admin has to select Pull Back Applicable Yes/No. If Yes other rules like Allow Past date pullback Yes/No, if Yes - AR pullback allowed till Allow AR pullback allowed till how many days from Applied Date/Leave Date/Approved Date can be Set (ideally 365 days). Admin can Allow Present and Future Date Pullback similarly.
Allow Present date pullback Yes/No, if Yes till date.
Also they need to select Status- Active/Inactive, Attendance Category Type- Day Based/ Time Based.
In the Auto Approval/Rejection section, Enable Auto Approval / Rejection - Yes/No to set up auto approval/rejection of AR requests after the set date (Auto Approve if no action taken by approving authority within set no. of days from date of request).
In the Advance Setup section select the required boxes of AR Applicable on Weekly Offs, AR Applicable on Holidays, and Need Support Document mandatory to set up additional AR conditions.
The Admin then clicks Submit to set the Attendance Regularization Category.
Previously added List of Attendance Regularization categories are displayed below.
They can also extract the data in Excel, PDF or Word Format. The records can be edited by the admin.
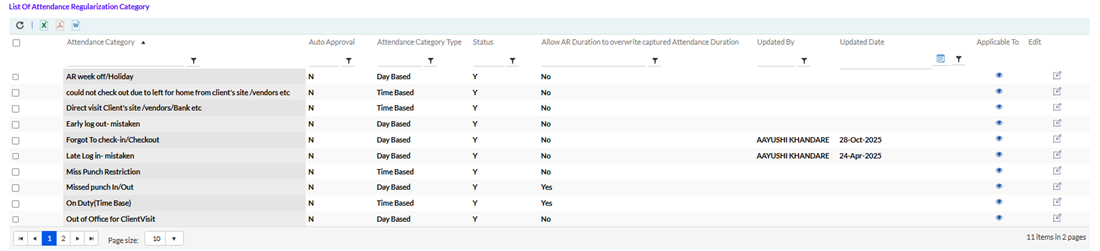
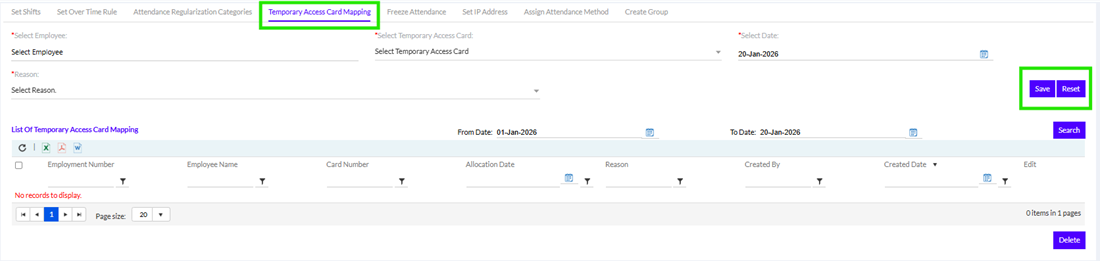
5. Temporary Access Card Mapping
When employee forgets to bring their access card, they can be temporarily assigned one access card, which needs to be mapped for attendance purpose. Here admin should Select Employee, Select Temporary Access Card, Select Date and Select Reason.
The Admin then clicks Save or can Reset. List of Temporary Access Card Mapping that are previously created are displayed below. You can search by clicking on from and to dates. Admin can also extract the data in Excel, PDF or Word Format.
6. Freeze Attendance
The Attendance of the employees can be freezed after certain dates for payroll purpose. Here admin should add Applicable to- Application/Approval-both can be selected, Select Date and give Reason.
The Admin then clicks Submit to freeze attendance till that date. Or they can Reset. List of Freeze Attendance that are previously created are displayed below. Admin can also extract the data in Excel, PDF or Word Format.
7. Set IP Address
Here admin should add Static IP, Status- Active/Inactive and optionally add Description.
The Admin then clicks Submit to Set IP Address. List of IP Addresses that are previously created are displayed below. Admin can also extract the data in Excel, PDF or Word Format. The records can be edited by the admin.
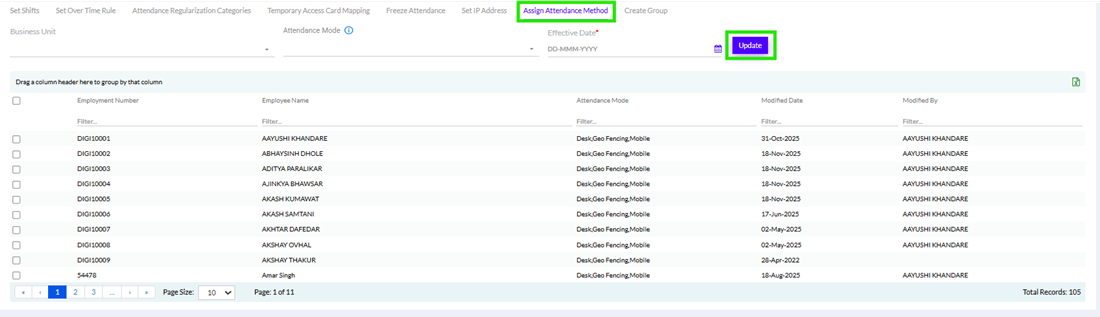
8. Assign Attendance Method
The attendance methods are assigned to all the employees through which their attendance is to be recorded.
Select the Business Unit from the drop down, select the Attendance Mode, and set the Effective Date from which the attendance Mode will be applied and click Update.
Note: To use Geofencing the admin has to complete the Setup in Employee Management and set Remote Location to Geofencing.
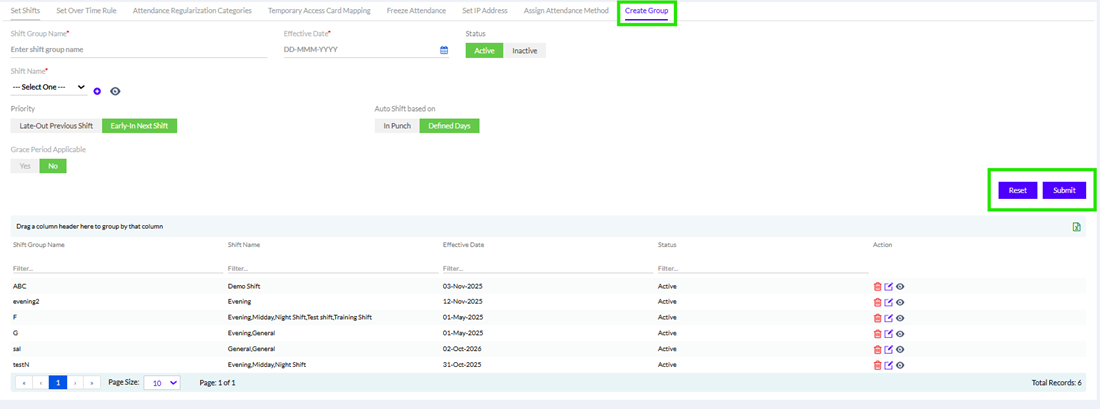
9. Create Group
There is a tab to Create Group for rosters.
When Roster for employees need to be enabled, for attendance management groups need to be created for rosters. If Roster is enabled, then 3 new tabs appear, Create Group- In Attendance management; Employee Roster- In Leave & Attendance menu and My Roster- In Leave & Attendance menu are visible for the particular employee.
Enter the Shift Group Name, Effective Date and select the Status Active/Inactive, select the Shift Name from the drop down. Select the Priority (Late Out Previous Shift/ Early In Next Shift) and Auto Shift based on (In Punch/Defined Days) and Grace Period Applicable (Yes/No) and click on Submit. Previously created groups are displayed below and can be exported in excel format.
10. Configurations
The Configuration tab within the Attendance Management module allows the Admin to establish system-wide automated rules regarding employee attendance behaviors. Specifically, this section allows the Admin to define the continuous absence rule to track, flag, and penalize consecutive missing working days.
Continuous Absence Rule (Base Setup):
The Admin can activate and set up the foundational parameters for consecutive absences using the following fields:
Continuous Absence Rule: Toggle between No and Yes to turn the tracking logic on or off. Click on "Rule Logic" next to it to review policy details.
Applicable To: Choose between Standard Rule or Custom Rule depending on whether the policy applies globally or to specific employee cohorts.
Effective Date: Input the specific implementation date via the calendar dropdown to dictate when this compliance rule becomes operational.
Continuous Absence Threshold: Specify the exact number of consecutiveWorking Daysan employee can miss before triggering an absence streak action.
Send Email Notification: Toggle Yes or No to determine if automated compliance alerts are dispatched to supervisors or employees when the threshold is crossed.
Calendar Intervention Actions:
The Admin can define how calendar intersections (such as holidays or weekends) impact an ongoing absence streak. In image_d32d75.png, three main categories can be configured:
Holidays:
Mark Intervening Holiday(s) as Absent:Treat scheduled public holidays that fallduringan absence streak as additional absent days.
Mark Preceding Holiday(s) as Absent:Backdate the absence status to include holidays occurring immediately before the streak.
Mark Succeeding Holiday(s) as Absent:Extend the absence status to include holidays occurring immediately after the streak.
Weekly Offs:Set identical conditions (Intervening,Preceding, orSucceeding) to penalize an employee's regular scheduled days off/weekends if they border an unauthorized absence window.
Optional Holidays:Configure identical proximity rules (Intervening,Preceding, orSucceeding) specifically targeting company-allocated optional or floating holidays.
Leave & Regularization (AR) Handling:This sub-section allows the Admin to determine exactly how pending or approved system adjustments affect an active absence streak count.
How should Leave applications affect the continuous absence count?
Reset the absence count irrespective of leave request status:Immediately break the streak counter if a leave request exists.
Do not reset if the application is Pending (Default):Keep the streak counter running until the leave application is formally approved by a manager.
Never reset (Continue counting the streak):Ignore leave filings entirely and maintain the streak tally.
How should Regularizations (AR) affect the continuous absence count?
Reset the absence count irrespective of AR request status:Break the streak tally upon an attendance correction filing.
Do not reset if the application is Pending (default): Keep the streak tracking active until the attendance regularization is officially approved.
Never reset (Continue counting the streak): Maintain the absence streak count regardless of any filed regularization requests.
Once all configuration criteria are defined, click Submit to commit the settings or Reset to restore default values. Completed rules appear at the bottom of the grid, where they can be tracked by their creation history (e.g.,Effective Date - 25 Feb 2026), toggled for status (Inactive/Active), edited, or deleted.
12. Attendance Re Calculation
Under this tab, the user can select the date as per the recalculation requirement and he can submit the recalculation request.
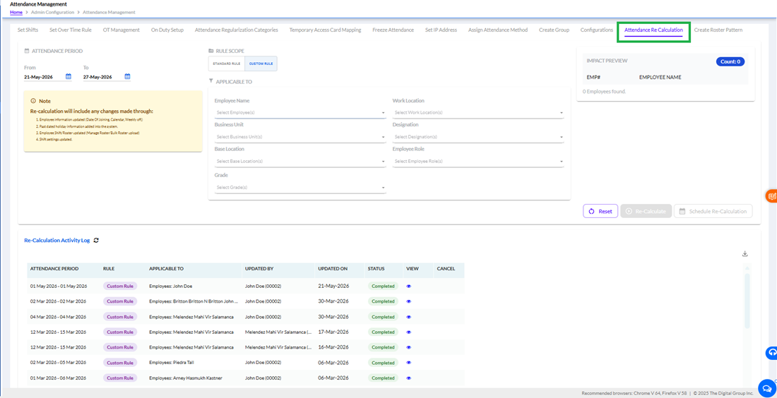
The Attendance Re-Calculation tab is used to reprocess employee attendance records whenever there are changes in attendance-related configurations or employee data. This feature helps ensure that attendance calculations are updated accurately based on modified rules, shifts, holidays, weekly offs, roster uploads, or employee information changes.
Navigation:
Home > Admin Configuration > Attendance Management > Attendance Re Calculation
Attendance Period
At the top of the page, the user can select the attendance period for which the attendance needs to be recalculated.
From Date – Select the start date of the attendance period.
To Date – Select the end date of the attendance period.
The recalculation process will be executed only for the selected date range.
Note Section:
The system displays a note section explaining which changes are included during attendance recalculation.
Re-calculation will include any changes made through:
Employee information updates (Date of Joining, Calendar, Weekly Off)
Past dated holiday information added into the system
Employee Shift Roster updates (Manage Roster Bulk Roster Upload)
Shift setting updates
This helps the administrator understand the impact before initiating the recalculation process.
Rule Scope:
Under the Rule Scope section, the user can define the type of recalculation rule.
Standard Rule:
When the Standard Rule option is selected, the system recalculates attendance based on the standard attendance policies configured in the application. The user just needs to select the date from the ‘date’ to ‘to’ date and click on Re-calculate. The recalculation process will run attendance recalculation for all the users of the account.
Custom Rule:
When the Custom Rule option is selected, the administrator can apply recalculation only for specific employees or selected criteria.
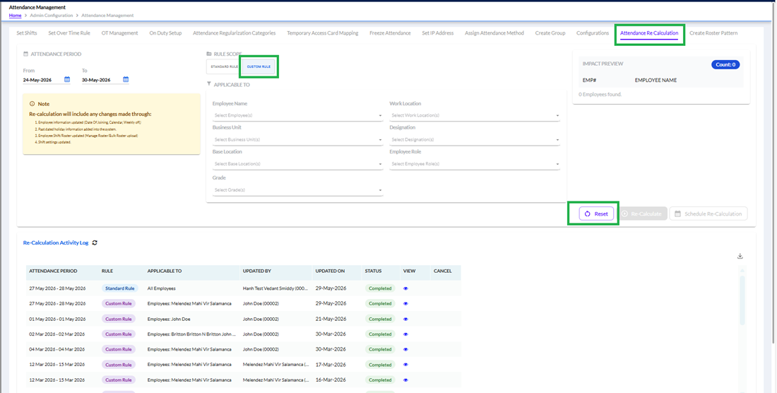
Applicable To
The Applicable To section is used to filter and identify the employees for whom attendance recalculation should be performed.
The following filters are available:
Employee Name – Select one or multiple employees.
Work Location – Filter employees based on work location.
Business Unit – Select applicable business units.
Designation – Filter employees by designation.
Base Location – Select employees based on base location.
Employee Role – Filter employees according to assigned roles.
Grade – Filter employees based on grade.
The recalculation process will apply only to employees matching the selected criteria.
Impact Preview
The Impact Preview section displays the employees who will be affected by the attendance recalculation.
The following details are displayed:
EMP
Employee Name
Total Count of Employees
This preview helps the administrator verify the impacted employee list before initiating recalculation.
Action Buttons
Reset
The Reset button clears all selected filters and restores the default screen.
Re-Calculate
The Re-Calculate button initiates the attendance recalculation process immediately for the selected employees and attendance period.
Schedule Re-Calculation
The Schedule Re-Calculation button is used to schedule the recalculation process for a later time instead of executing it instantly.
Re-Calculation Activity Log
The lower section of the page displays the Re-Calculation Activity Log, where all recalculation activities are recorded for tracking and auditing purposes.
The following details are displayed in the log:
Attendance Period – Selected date range for recalculation.
Rule – Displays whether the recalculation was performed using Standard Rule or Custom Rule.
Applicable To – Shows employees or criteria selected for recalculation.
Updated By – Displays the user who initiated the recalculation.
Updated On – Displays the recalculation date.
Status – Displays the current status such as Completed.
View – Allows viewing detailed information of the recalculation activity.
Cancel – Allows cancellation of scheduled recalculation requests, if applicable.