MSGMesh
- Overview
The Message Mesh Admin Configuration module in the HRMS application enables administrators to configure and manage service authentication details required for external communication services such as SMS, WhatsApp, or Email.
This module ensures that all messaging services are securely integrated using authentication tokens and provider configurations. It provides centralized control for creating, updating, and maintaining service credentials across the organization.
The system ensures that only valid, unique, and active configurations are used for communication workflows within the HRMS platform.
- Accessing the Module
Users can access this feature after successfully logging into the HRMS application.
To navigate to the Message Mesh configuration:
- Open the HRMS application in a web browser using the provided URL.
- Enter valid login credentials and access the dashboard.
- From the left navigation panel, expand Admin Configuration.
- Select MSG Mesh Admin Config from the submenu.
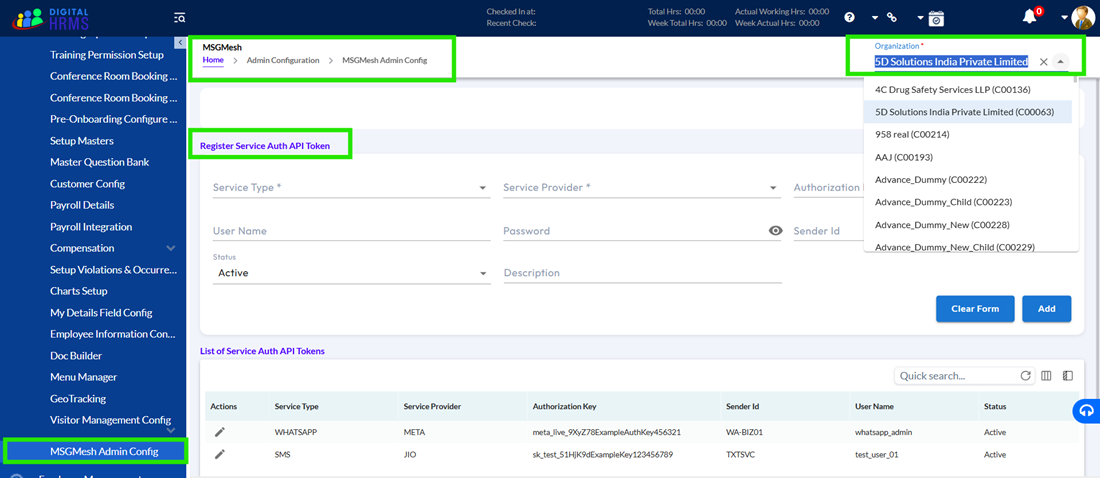
Upon accessing the page, the system prompts the user to select an organization before displaying any configuration data.
- Organization Selection & Page Initialization
Once the page is opened, the system does not immediately show data.
Instead, it displays a message:
“Please choose an organization from the dropdown menu above to view the data.”
- All configurations are organization-specific
- Each organization may have different service providers and credentials
For this user must
- Click on the Organization dropdown
- Select: <Test - Cloud Customer >
After selection:
- The system loads all configurations related to that organization
- Default tab Service Auth API Token is displayed
- Page Structure & Components
Once the organization is selected, the page is structured into clearly defined sections.
4.1 Header Section
The system displays:
- Title: Message Mesh Admin Config
- Breadcrumb:
Home > Admin Configuration > MSGMesh Admin Config
This helps users understand where they are in the system.
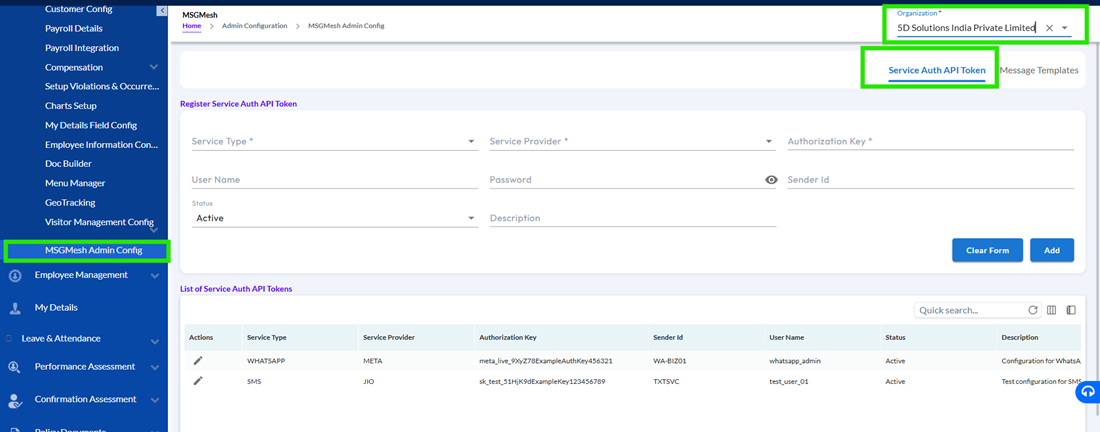
4.2 Tabs Section
There are two tabs:
- Service Auth API Token (default)
- Message Templates
Users can switch between these tabs to manage different configurations. The system ensures:
- Users land on the Service Auth tab by default
- Users can switch tabs anytime
4.3 Main Working Area
This area contains two important parts:
- Registration Form (Top Section)
Used for:
- Adding new records
- Editing existing records
- Records Table (Bottom Section)
Displays:
- All saved service configurations
The system ensures:
- Any change in the form reflects in the table immediately
- Data remains consistent across UI
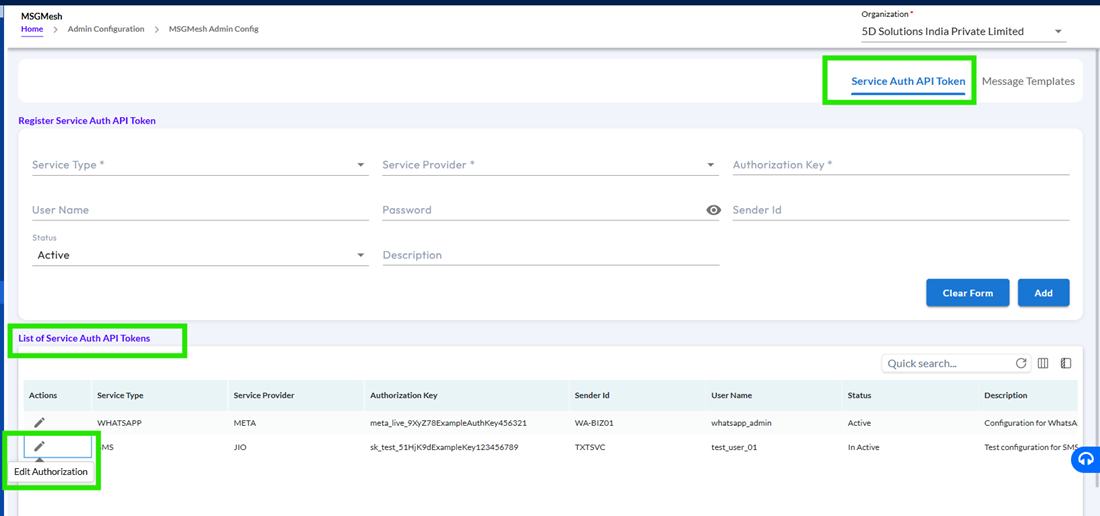
- Service Auth API Token Section
This section contains:
- Register Service Auth API Token Form (for Add/Edit)
- List of Service Auth API Tokens Table
The system ensures both sections remain synchronized:
- Any newly created or updated record is reflected immediately in the list.
5.1 Adding a New Service Auth API Token
Users can create new service authentication configurations using the form.
- Click on Add New Service Auth API Token.
- The system displays an empty form above the records table.
- Users must provide the following details:
| Field | Description | Example |
| Service Type | Type of communication | SMS |
| Service Provider | Vendor providing service | META |
| Authorization Key | Unique API key | abc123xyz |
| Username | Provider username | sms_user |
| Password | Secure password | Test@123 |
| Sender Id | Identifier for messages | HRMSAPP |
| Description | Optional explanation | New SMS Config |
| Active Status | Enable/disable service | Active |
5.2 System Behaviour
- The system allows users to input values in all fields.
- Password fields are masked for security.
- Dropdown fields restrict selection to predefined values.
5.2 Saving the Record
When users click Save:
- The system validates all required fields.
- If valid:
- The record is saved successfully.
- A confirmation message is displayed.
- The new record appears in the list instantly.
- Editing an Existing Configuration
Users can modify existing service configurations directly from the list.
- Locate a record in the Service Auth API Token table.
- Click the Edit (pencil icon).
- The system loads the selected record into the form.
Pre-filled Data Behavior
The system ensures that all fields are pre-populated with existing values, including:
- Service Type
- Service Provider
- Authorization Key
- Username
- Sender Id
- Status
- Description
This ensures consistency between stored data and editable form data.
6.2 Updating the Record
- Users can modify allowed fields.
- Click Update to save changes.
The system ensures:
- Updated values overwrite previous data.
- Changes are immediately reflected in the table.
- A confirmation message is displayed.
6.3 Reset Changes
- Users can click Reset Changes to discard unsaved edits.
- The system restores original values from the selected record.
- System Behavior & Data Handling
The system ensures:
- Real-time synchronization between form and table
- Data persistence after save/update actions
- Secure handling of sensitive fields (e.g., password masking)
- Role-based edit permissions
For example:
- Admin users can edit all fields
- Non-admin users may have restricted or disabled edit access
- Validations & Restrictions
The system enforces strict validation rules to ensure data integrity.
8.1 Mandatory Fields Validation
The system restricts saving if the following fields are empty:
- Service Type
- Service Provider
- Authorization Key
Error messages are displayed inline for user correction.
8.2 Duplicate Prevention
The system ensures that duplicate configurations are not allowed.
- Duplicate check is based on:
- Service Type
- Service Provider
If duplication is detected:
- The system displays an error message
- Record is not saved
8.3 Format Validation
The system validates input formats:
- Authorization Key must meet defined criteria
- Sender Id and Username must not contain invalid special characters
If invalid data is entered:
- The system displays appropriate error messages
- Submission is blocked
8.4 Dropdown Restrictions
The system restricts values to predefined options:
- Service Type > SMS / WhatsApp / Email (as configured)
- Service Provider > META / MSG91 / Others
- Active Status > Active / Inactive
- Status Management
Users can control whether a service is active or inactive.
9.1 Status Update Behavior
- Users can change status from Active > Inactive
- Upon update:
- Status is saved
- Updated status is reflected in the table
This ensures that inactive services are not used in communication workflows.
- Special Scenarios & Edge Cases
10.1 Unsaved Changes Handling
- If users modify fields but do not save:
- Changes remain temporary
- Reset option restores original data
10.2 Invalid Input Handling
The system ensures that:
- Invalid characters are rejected
- Error messages guide the user for correction
10.3 Duplicate Auth Key Scenario
- If the same Auth Key is used for the same Service Type:
- The system blocks the save action
- Displays duplication error
10.4 No Organization Selected
- The system restricts access to configurations
- Displays a prompt until selection is made
10.5 Permission-Based Access
- Admin users > Full access
- Non-admin users > Restricted edit capability
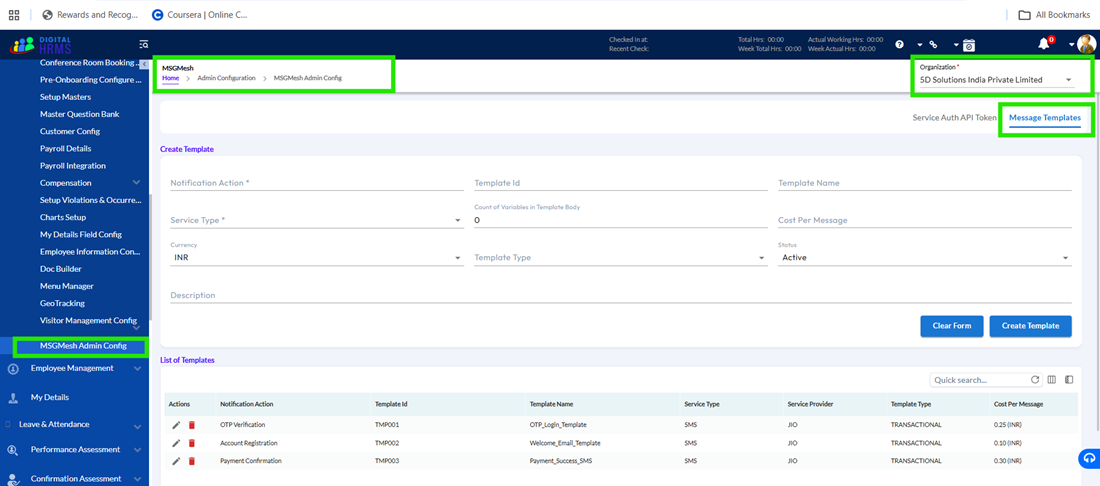
The Message Templates tab allows users to manage predefined communication templates.
When selected:
- The system loads template-related configurations
- Users can view or manage templates as per permissions
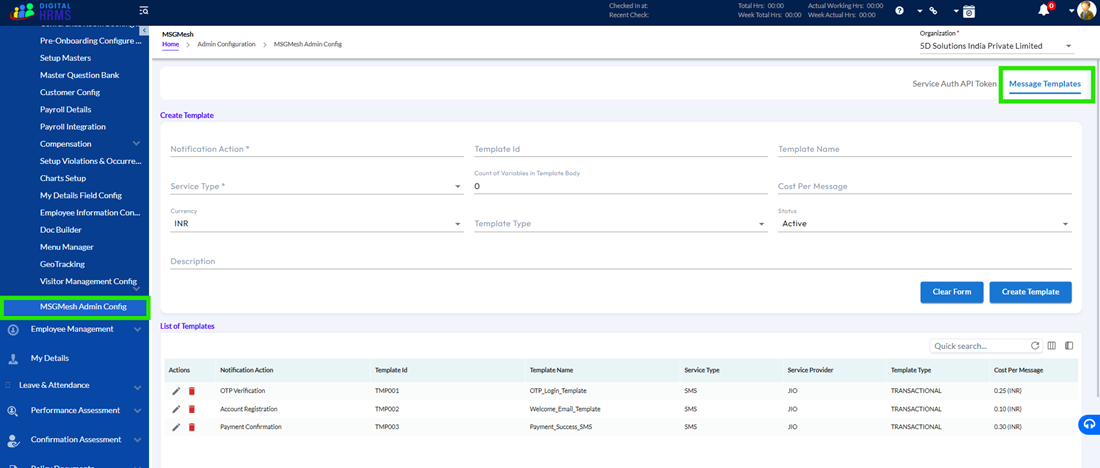
- Overview
The Message Templates module, available under the Message Mesh Admin Configuration, is designed to help administrators create, manage, and maintain standardized communication templates that are used across the HRMS system.
These templates play a crucial role in enabling automated communication for various business processes
Each template defines not only the content of the message but also includes key configuration details such as:
- The communication channel (SMS, Email, WhatsApp)
- The service provider used to send the message
- Dynamic variables within the message
- Cost and currency for message delivery
The system ensures that every template created is:
- Properly structured and validated before saving
- Configured with accurate service details
- Easily reusable across different workflows
This ensures consistency, reduces manual effort, and improves communication reliability across the organization.
- Navigation & Access
To access the Message Templates module, the user must have appropriate administrative privileges within the HRMS system.
Step-by-Step Navigation Flow
- Open the HRMS application in a web browser
- Enter valid login credentials and successfully log in
- Once on the dashboard, navigate to the left-hand panel
- Expand the Admin Configuration section
- Click on MSG Mesh Admin Config
- Select an organization (e.g., Test Cloud Customer) from the dropdown
- Click on the Message Templates tab
The system ensures that:
- Only authenticated users can access this module
- Data is not displayed until an organization is selected
- The correct configuration is loaded based on the selected organization
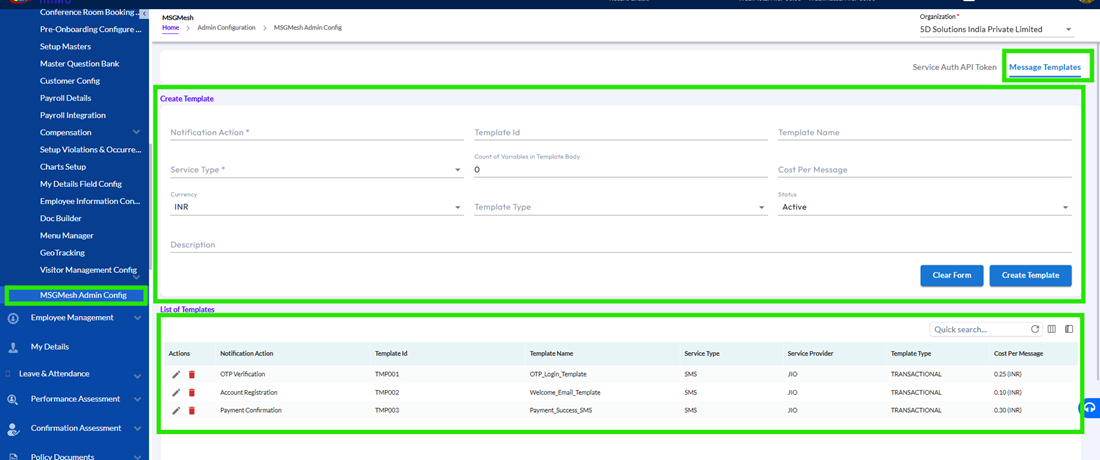
- Page Understanding
Once the user navigates to the Message Templates tab, the page is structured into two clearly defined sections to provide a seamless user experience.
3.1 Create Template Section (Top Panel)
This section acts as the primary workspace where users can:
- Create new message templates
- Edit existing templates
The form contains multiple fields that capture all necessary details required to define a template.
The system ensures that:
- Each field accepts only valid input based on its type
- Mandatory fields are clearly enforced
- Dropdowns display only relevant and configured options
3.2 List of Templates Section (Grid)
This section displays all existing templates in a structured tabular format.
Users can:
- View all template details
- Perform actions like Edit
- Search, filter, and customize the grid
The system ensures that:
- Any new template created is immediately reflected in the grid
- Updated templates are refreshed in real time
- Data displayed is always consistent with backend records
- Creating a New Message Template
4.1 User Interaction Flow
To create a new template, users need to fill out the required fields in the Create Template section.
This includes:
- Defining the action associated with the template
- Providing a unique Template ID
- Entering a descriptive Template Name
- Configuring variables and message structure
- Selecting service type and provider
The system ensures that users are guided through a structured input process to avoid errors.
4.2 System Behaviour During Creation
When users start entering data, the system performs multiple validations in the background:
- Ensures all mandatory fields are filled
- Validates that Template ID is unique
- Restricts invalid input formats
- Dynamically updates dependent dropdowns (e.g., Service Provider based on Service Type)
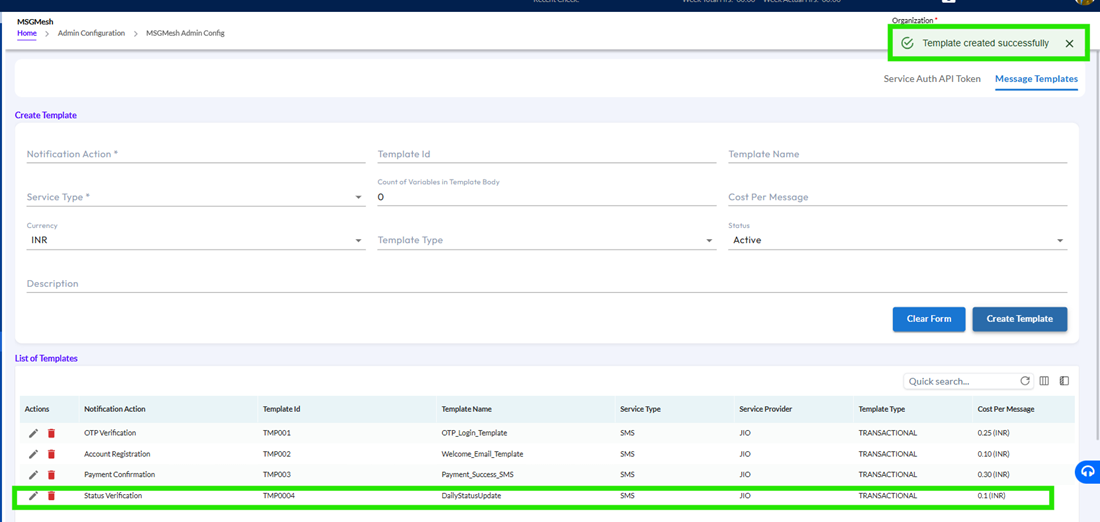
4.3 Example for Better Understanding
Consider the following example:
- Template Name: DailyStatusUpdate
- Template ID: TMP0004
- Service Type: SMS
- Service Provider: JIO
- Variables: 3
- Cost per Message: 0.1
- Currency: INR
When the user clicks Create Template:
The system ensures:
- All validations are passed
- The template is saved successfully
- A confirmation message is displayed
- The new template appears in the grid
- Total record count is incremented
- Template Body & Variable Handling
This section becomes especially important when using providers like Natraj, where dynamic message content is required.
5.1 Variable Syntax and Usage
The system requires that variables within the template follow a strict format:
{#var#}
These variables act as placeholders that are replaced dynamically when the message is sent.
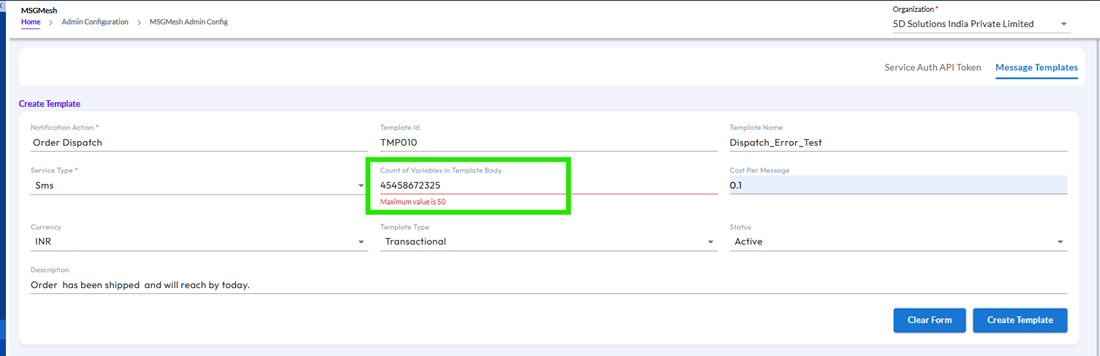
5.2 Matching Variable Count
The system ensures that:
- The number of variables defined in the template body matches the Count of Variables field
Example:
If Count = 3
Then Template Body must include exactly 3 variables
Daily update: {#var#}, {#var#}, {#var#}
5.3 Validation Behaviour
The system restricts:
- Incorrect variable formats
- Missing variables
- Extra or fewer variables than defined
If validation fails:
- The system displays a clear error message
- Template cannot be saved until corrected
- Editing an Existing Template
6.1 User Flow
Users can update existing templates directly from the grid.
Steps include:
- Clicking the Edit icon
- Loading template data into the form
- Making necessary changes
- Clicking Update Template
6.2 System Behaviour
The system ensures:
- All fields are pre-populated accurately
- Changes overwrite existing values
- Record count remains unchanged
- Updated data is reflected immediately
6.3 Example
Before Update:
- Template Name: DailyStatusUpdate
After Update:
- Template Name: WeeklyStatusUpdate
The system ensures the update is applied without affecting other records.
- Revert Changes Functionality
7.1 Purpose
This feature allows users to safely discard unsaved changes.
7.2 System Behaviour
When the user clicks Revert Changes:
- All modified fields revert to original values
- No changes are saved
- Form reflects previously stored data
This ensures users do not accidentally save incorrect data.
- Grid Features & Usability Enhancements
The grid is designed to provide flexibility and control to users.
8.1 Column Visibility
Users can:
- Show or hide columns as needed
The system ensures:
- Hidden columns are removed from view
- Preferences can be saved
8.2 Column Freezing
Users can freeze important columns to keep them visible during scrolling.
The system ensures:
- Frozen columns remain fixed
- Other columns scroll normally
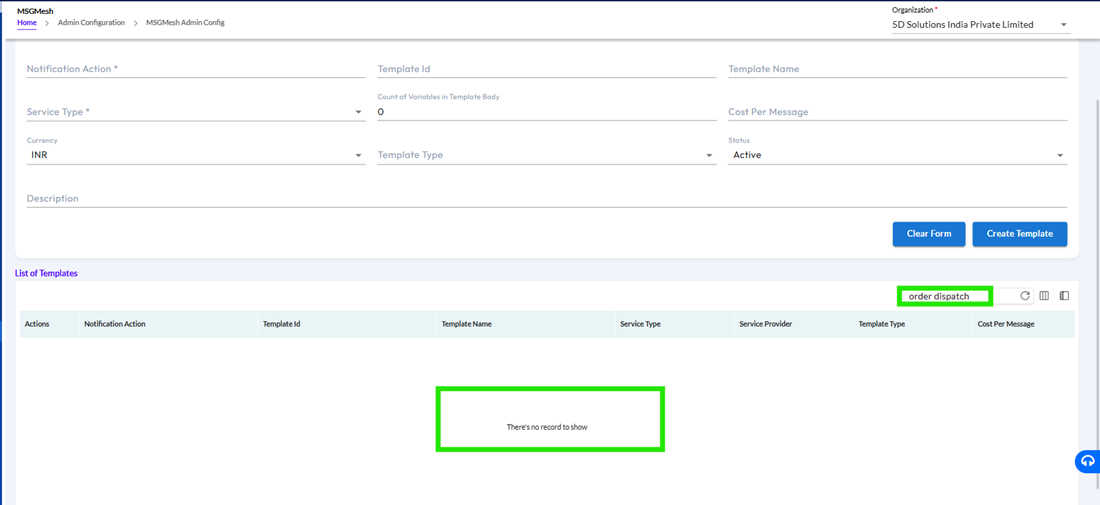
8.3 Search Functionality
Users can search for templates using keywords.
The system ensures:
- Search is case-insensitive
- Results are accurate and filtered in real time
8.4 Data Consistency
The system ensures:
- Grid data always matches backend data
- No mismatch or inconsistency occurs
8.5 Empty State Handling
If no templates exist:
- The system displays: “No records found”
- Grid Configuration Management
9.1 Save Configuration
Users can save their grid settings such as:
- Column visibility
- Column order
- Frozen columns
The system ensures:
- Settings persist after refresh
- Settings persist across sessions
9.2 Reset Configuration
Users can revert to default grid settings.
The system ensures:
- All customizations are cleared
- Default layout is restored
9.3 Auto Save Feature
When Auto Save is enabled:
- Changes are saved automatically
When disabled:
- Changes remain temporary
- Validations & Restrictions
10.1 Mandatory Fields
The system restricts saving if required fields are missing.
10.2 Duplicate Prevention
Template ID must be unique.
If duplicate:
- Save is blocked
- Error message displayed
10.3 Cost Validation
- Only numeric values allowed
- Maximum 2 decimal places
10.4 Dropdown Restrictions
Only valid options are shown and selectable.
- System Behaviour & Data Logic
The system ensures:
- Real-time updates after save/edit
- Data persistence across sessions
- Consistent UI behaviour
- Strong validation enforcement
The Message Templates module provides a powerful and structured way to manage communication templates within the HRMS system.
The system ensures:
- Accuracy in template creation
- Strong validation and data integrity
- Flexible UI customization
- Reliable and consistent communication setup
In simple terms:
This module ensures that all messages sent from the system are well-structured, validated, and ready for seamless communication across the organization.