COB - Import Management
The Client Onboarding – Import Management module is designed to streamline the process of transferring client-provided employee data into the HRMS. Since clients often maintain their records in Excel format, this module provides a structured, step-by-step workflow to ensure accurate, efficient, and error-free data migration.
The onboarding flow is divided into distinct stages, beginning with the import of the source file and followed by field mapping, data validation, master creation or approval, and finally confirmation of import. At each stage, the system enforces validations and provides guided navigation so that users cannot proceed without completing the necessary prerequisites. This ensures both data accuracy and process integrity.
By consolidating disparate Excel datasets, aligning them with HRMS standards, and validating them in real time, the module eliminates manual dependencies, reduces errors, and accelerates the client's onboarding process. The end result is a seamless integration of client data into the HRMS, ready for operational use.
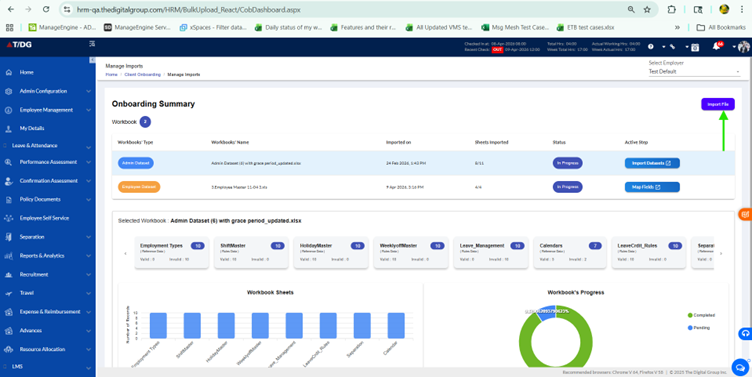
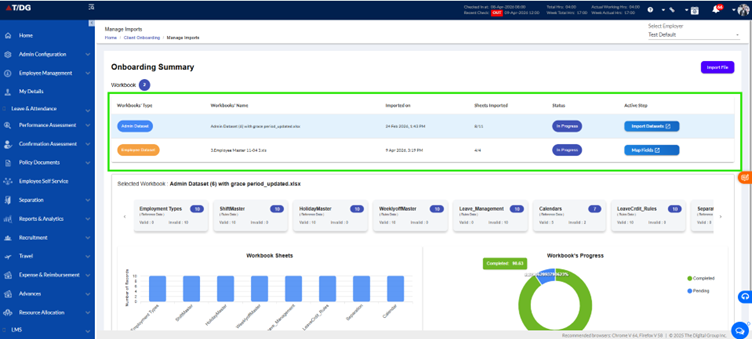
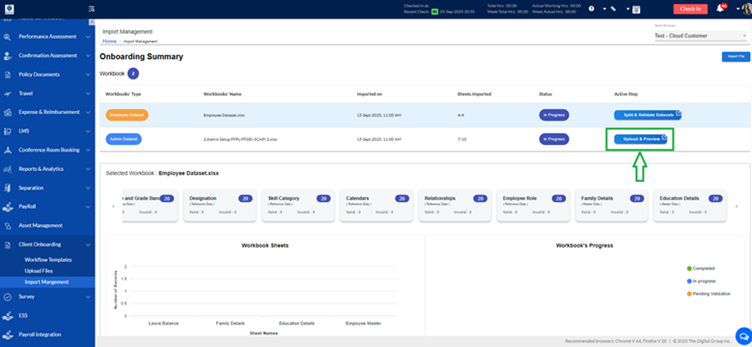
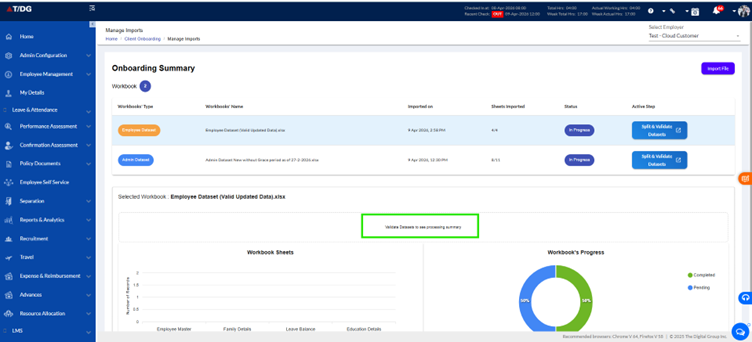
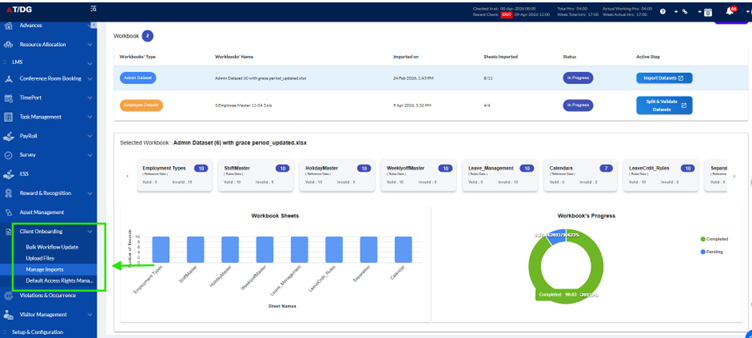
Onboarding Summary
The Onboarding Summary page shall provide a centralized view of uploaded workbooks along with their validation progress. It shall display workbook details such as type, name, timestamp, sheets imported, and current status. Users shall be able to select a workbook to review dataset cards with valid and invalid record counts, supported by Bar charts for sheet-level records and a Donut chart for progress tracking. The page shall also allow drill-down into dataset details for error review and provide navigation options to switch between Import Management and Upload Files.
- Page Header Section
Requirements:
1.1 The system shall provide an Import File button.
1.2 On clicking the Import File button, the system shall navigate to the Upload and Preview Tab page.
1.3 The system shall support importing files in formats: .xlsx, .xls, .csv with a maximum file size of 10 MB.
1.4 The system shall allow two ways of uploading files:
- Users shall be able to drag and drop a supported file onto the Select Files button.
- Users shall be able to click the Select File button, browse the system, and upload a supported file.
1.5 If an invalid file is uploaded, the system shall display an alert box with the message:
“The workbook contains extra sheets not allowed in the template: Name format of valid files.”
1.6 On successful import, the system shall display a success message:
“Workbook <File Name> saved successfully.”
1.7 After successful upload, the file shall appear in the Onboarding Summary > Workbook Section with details including:
- Workbook Type
- Workbook Name
- Imported On (Timestamp)
- Sheets Imported (Count)
- Status
- Active Step
- Workbook Section
Requirements:
2.1 The system shall display the following elements for each workbook:
- Workbook Type (Employee Dataset / Admin Dataset)
- Workbook Name (e.g., 3. Employee Master 11-04.xls)
- Imported On (Timestamp)
- Sheets Imported (Count)
- Status (In Progress)
- Active Step (e.g., Upload and Preview)
2.2 The Workbook Name shall be clickable. On clicking:
- The system shall display workbook details in the Selected Workbook Section.
- The system shall show workbook details in Workbook Sheets (Graphical Representation) and Workbook Progress (Pie Chart Representation).
2.3 The system shall provide an Upload & Preview button. On clicking, the system shall open an Upload & Preview modal/window of the uploaded workbook to allow review before validation.
Image is not Updated - Still it is incorrect
2.4 The Status Indicator shall display the current stage: In Progress, Completed, or Pending Validation.
2.5 The Status Indicator shall be auto updated after each stage completion.
- Selected Workbook Section
If the data is not processed correctly the message will appear as "Validate Datasets to see processing summary"
Once processed the data will be available to the selected workbook section
Requirements:
3.1 The system shall display Dataset Cards, including:
- Contact Details
- Personal Details
- Emergency Contact
- Grade & Grade Band
- Designation
- Skill Category
- Calendars
- Relationships
3.2 Each dataset card shall display:
- Total Records
- Valid Count
- Invalid Count
3.3 Dataset Cards shall be clickable. On clicking a card, the system shall open a detailed view of that dataset showing row-level data.
3.4 Invalid records shall be highlighted with error messages.
3.5 Valid/Invalid counters shall display real-time counts after validation.
3.6 Counters shall be non-editable and for informational purposes only.
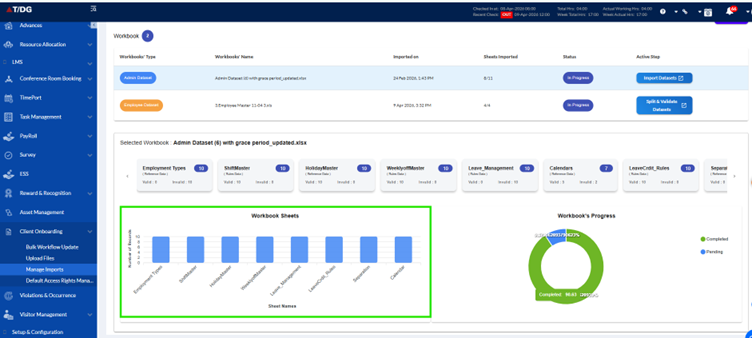
- Workbook Sheets Visualization Section (Bar Chart)
Requirements:
4.1 The system shall provide a Bar Chart displaying Sheet Names vs. Number of Records. Sheets include:
- Education Details
- Family Details
- Employee Master
- Leave Balance
4.2 The bars in the chart shall be unclickable.
4.3 On clicking or hovering over a bar, the system shall display a tooltip with record count.
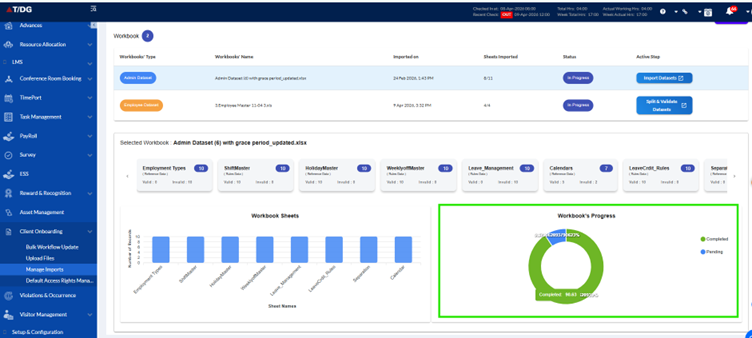
- Workbook Progress Section (Donut Chart)
Requirements:
5.1 The system shall display a Donut Chart with the following categories:
- Completed (Green)
- In Progress (Blue)
- Pending Validation (Orange)
5.2 On hovering over the chart, the system shall show percentage and record counts.
5.3 On clicking the chart, the click action shall be disabled, but percentage and record counts shall still be shown.
- Left Navigation Menu Section
Requirements:
6.1 The navigation menu shall display the following relevant items for this page:
- Upload Files (under Workflow Templates)
- Import Management (Active)
6.2 The Import Management menu item shall be highlighted to indicate the current active page.
6.3 The Upload Files menu item shall be clickable. On clicking, the system shall redirect the user to the Upload Files Page, where fresh imports can be initiated.
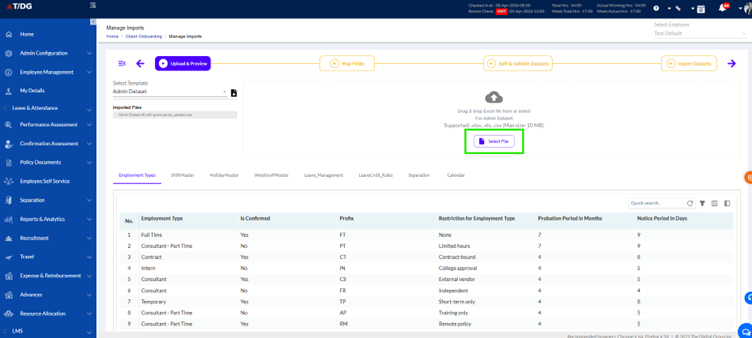
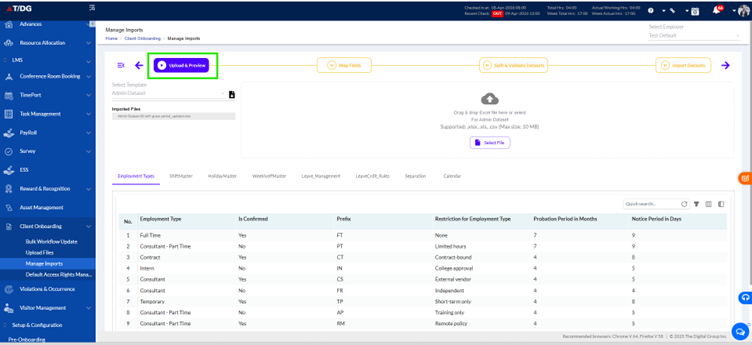
1. Upload & Preview
The Import Management – Upload & Preview Page is designed to enable users to download predefined dataset templates, upload employee or admin data files, and prepare them for migration into the HRMS system. The page ensures structured data import through validation, preview, and workflow steps. User can Navigate to Uplaod and Preview Page from Onbaording Summary Page--> Workbook Section-->Import File button.
i) Page Header Section
Requirements:
- System should provide an Upload & Preview Button.
- On clicking the back icon near Upload & Preview, system shall navigate to the Onboarding Summary Page.
- System shall display uploaded workbook details in the Workbook Summary Section.
- System shall provide a Download Excel Template (Dropdown + Export Icon)

- Users shall be able to select dataset type (Admin Dataset or Employee Dataset).
- On clicking the export icon, system shall download a pre-defined Excel template file.
- The exported template shall contain structured sheets including Employee Master, Family Details, Leave Balance, Education Details.
- Each sheet shall include columns with:
- Mandatory / non-mandatory flags
- Data type restrictions
- Length validations
ii). File Upload Section

Requirement:
- System shall support file uploads using:
- Drag and drop into upload area.
- Select File button for manual browsing.
- Supported file types: .xlsx, .xls, .csv with a maximum size of 10 MB.
- If the uploaded file is invalid:
- System shall show alert: “The workbook contains extra sheets not allowed in the template: Name format of valid files.”
- On successful upload:
- System shall show confirmation: “Workbook 'File Name' saved successfully.”
- Workflow shall move to the Map Fields step.
Requirements:
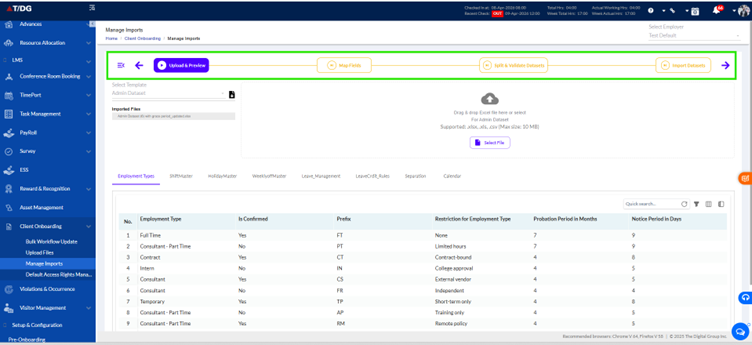
- System shall follow a stepwise workflow:
Upload & Preview > Map Fields > Split & Validate Datasets > Import Datasets.
- The Upload & Preview step shall be highlighted as the active stage.
- Subsequent stages shall remain disabled until prerequisites are completed.
Requirements:
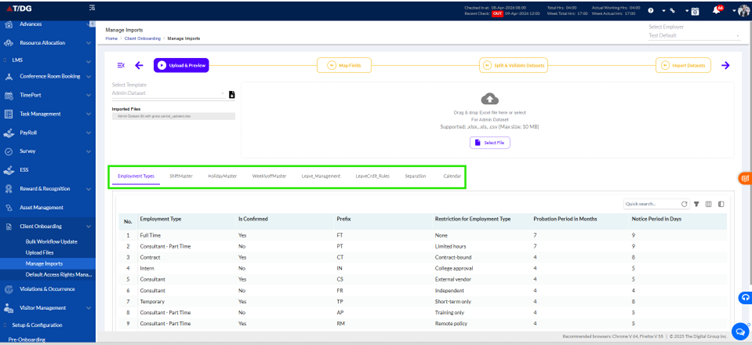
- System shall provide data set tabs: Employment Types, Shift Master, Holiday Master, Weekly Off Master, Leave Management, Leave Credit Rules, Separation.
- On clicking a tab, the system shall switch to its respective dataset view.
- Dataset tables shall display:
- Mandatory vs. Non-Mandatory fields
- Restrictions (valid values, probation periods, notice periods, etc.)
- Remarks section for additional rules (e.g., valid codes or conditions)

Requirement:
- System shall provide following grid functionalities:
- Quick Search Box: Filters rows instantly based on typed text.
- Column Visibility Option: Allows showing/hiding of specific columns.
- Frozen Column Option: Locks chosen columns to the left for easier scrolling.
- Filter Option: Per-column filters with conditions (equals, contains, starts with).
- Reset Column Configuration: Restores grid to default state (original column order, visibility, frozen state, filters).
Requirements:
- System shall display dataset information in tabular format with:
- Column headers showing tooltips with full name and data restrictions on hover.
- Rows listing acceptable field values, restrictions, and validation rules.
- Example: Employment Type field shall support values such as Permanent – Confirmed, Permanent – Probation, On-Contract, etc.
Dataset Organization:
Calendar Master Sheet: A new “Calendar” sheet is introduced in the Admin Workbook.
- You can now create and manage calendar records directly in this sheet
- Earlier, calendars were created from the Employee Workbook > Calendar Column
Updated Flow:
- Step 1: Create calendar data in Admin Workbook > Calendar Sheet
- Step 2: Map employees to the correct calendar using the Employee workbook
Requirement:
- Exported template shall contain multiple pre-defined sheets:
- Employee Master > Organization Name, Employment Number, Effective Date, Title, First Name, Middle Name, Last Name, Designation, Employee Role, Skill Category, Previous Experience.
- Family Details > Family member details, relation, date of birth, dependent flag.
- Leave Balance > Leave type, balance days, validity period.
- Education Details > Qualification, institute, passing year, grade.
- Each sheet shall define:
- Mandatory vs. non-mandatory fields
- Data types: Character, Number, Date (DD-MMM-YYYY)
- Maximum length restrictions (e.g., Character 100, Number fields with limits)
The Map Fields tab is the second step in the client onboarding process. It ensures that each column in the uploaded Excel dataset is correctly aligned with its corresponding system-defined field. This mapping is critical to maintain data integrity when importing employee data into the HRMS.
Mapping must be reviewed and confirmed before proceeding to the next stage, Split & Validate Datasets.
i). Key Functionalities – Map Fields TabThe Map Fields tab is designed to help users correctly associate (or "map") the data columns from a client's uploaded Excel file with the standard data structure used in the HRMS. This ensures accurate data transformation and integrity during the import process.
1.1. Tabbed Interface for Worksheets
- When an Excel file is uploaded, each worksheet in that file appears as a separate tab on the mapping interface.
- Example worksheet tabs include:
- Employee Master
- Family Details
- Leave Balance
- Education Details
- Only tabs corresponding to worksheets that exist in the uploaded file are displayed.
- Each tab contains a visual indicator to reflect mapping status:
- All required fields on this tab are correctly mapped.
- One or more required fields are either unmapped or incorrectly mapped.
- This structure allows users to work independently on different data segments (employee, family, leave, etc.), making the mapping process modular and manageable.
1.2. Field Mapping Grid
- The main content of each tab is a two-column grid:
- Client Fields – Columns/headers from the uploaded Excel file.
- System Fields – Standardized HRMS fields that client data must align with.
- The system attempts auto-mapping: it matches client fields to system fields based on name similarity.
- Unmapped or mismatched fields are clearly highlighted (e.g., in red or with warning symbols), alerting users to manual action.
- Fields that are mandatory for system operations are marked with a red asterisk (*), e.g.:
- First Name*
- Designation*
- Employee Role*
- The grid is scrollable and includes search functionality for quick navigation in large datasets.
1.3. Field Mapping Options
Users have multiple ways to adjust or correct the mapping if the auto-matching is inaccurate:
- Edit Icon:
- Clicking the edit icon beside a system field allows the user to remap it.
- Drag & Drop Mapping:
- Users can drag a field from the Client Field list and drop it onto the corresponding System Field to establish the mapping.
- Dropdown Selection:
- Clicking a system field opens a dropdown menu with a list of available client fields. Users can select the appropriate one to complete the mapping.
1.4. Search Functionality
- A search bar is placed at the top of the mapping interface.
- Users can type keywords or partial names to:
- Quickly locate specific system fields.
- Navigate large field lists efficiently.
- This is especially useful for files with dozens of columns or when working across multiple tabs.
To ensure accuracy and compliance with HRMS data requirements, the system enforces the following validation rules during the mapping process:
Mandatory Fields:
- Fields marked with a red asterisk must be mapped before continuing.
- Leaving a required field unmapped will trigger a warning and block progress.
Duplicate Mappings:
- A client field can only be mapped to one system field.
- If a client field is accidentally mapped to multiple system fields, an error is shown.
Progress Restriction:
Users cannot proceed to the next step (Split & Validate Datasets) unless:
- All required system fields are correctly mapped.
- There are no unresolved errors or conflicts in the current worksheet/tab.
iii). UI Components on Map Fields Page – Actions & Expected Results
This section defines the interactive UI elements available on the Map Fields page, along with user actions and the corresponding system behavior (expected results). Each component is designed to guide the user in accurately mapping client data fields to HRMS system fields.
| UI Component | Action to Perform | Expected Result |
| Worksheet Tab Bar | Click on a worksheet tab (e.g., Employee Master, Family Details, Leave Balance) | The selected worksheet's data appears in a structured mapping grid for review and field mapping. |
| Mapping Grid | Review the side-by-side layout of Client Fields and System Fields | Shows how client-uploaded fields have been mapped; unmapped or invalid fields are visually flagged. |
| Edit Icon | Click the Edit icon next to a mapped field | The selected field becomes editable, allowing you to remap it using dropdown or drag-and-drop. |
| Drag & Drop Mapping | Drag a Client Field and drop it onto the correct System Field | Immediately remaps the client field to the selected system field and updates the grid. |
| Dropdown Mapping | Click on a System Field and choose the correct value from the dropdown list | The client field is reassigned to the selected system field, mapping updates automatically. |
| Search Bar | Type part of a system field name in the search bar | Filters the list to show only matching system fields, making it easier to locate and map fields. |
| Mandatory Field Indicator | Identify fields marked with a red asterisk | Indicates that these fields must be mapped; system prevents progression if any are left unmapped. |
| Tooltips / Warning Icons | Hover over or click on warning icons beside fields | Displays detailed messages explaining why a field is invalid, duplicated, or unmapped. |
| Navigation Button – "Split & Validate Datasets" | Click the button to proceed after completing mapping | Transitions to the next step only if all required fields are correctly mapped with no errors. |
| Mandatory Fields Organization | Click the button it will enable the button. | Show mandatory fields at the top Easily identify required fields |
The Reset Mappings button is used to clear all field mappings on the currently active worksheet tab. It only becomes active after the user has made at least one change using the Edit icon. When clicked, the system removes all mappings and restores the worksheet to its initial state (including removing any auto-mapped fields). If no changes have been made, the button remains disabled. A confirmation prompt should appear before performing the reset to avoid accidental loss of changes.
Save Mappings Button
The Save Mappings button allows users to save the current state of field mappings on the active worksheet tab. Like the Reset button, it becomes active only after the user edits a mapping using the Edit icon. Once clicked, the current mappings are saved and persist even if the user navigates away from the screen or logs out. If no changes are made, the button remains disabled, and clicking it has no effect.
Mandatory Fields Organization
A new option is available to reorder fields in the Mapped Fields Page.
- Show mandatory fields at the top
- Easily identify required fields
- All required system fields are mapped correctly.
- No duplicate mappings or errors exist.
- Users can successfully proceed to the next tab.
- Mapping is saved in the system for validation in the next stage.
Each component on the Map Fields page has been designed to enforce accurate data mapping and eliminate errors during the onboarding process. Users must actively review, adjust, and confirm mappings to ensure that all mandatory fields are covered before proceeding.
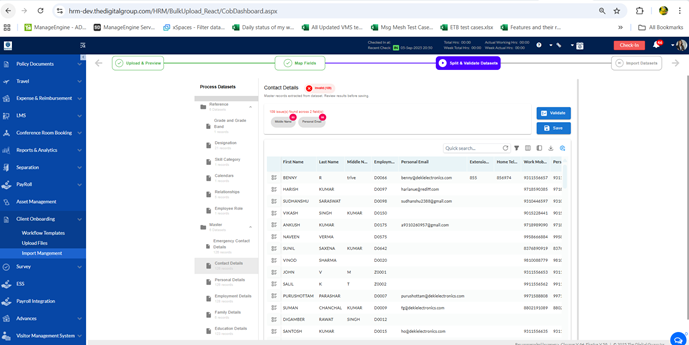
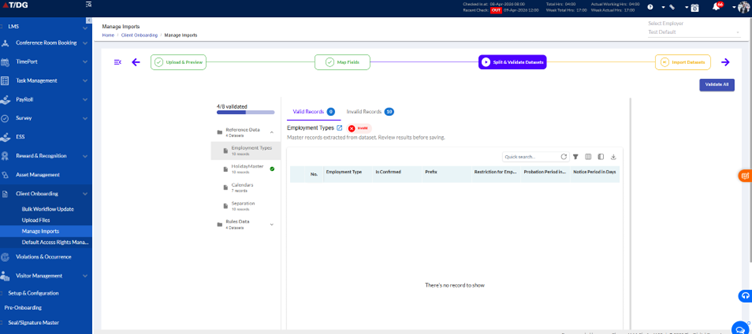
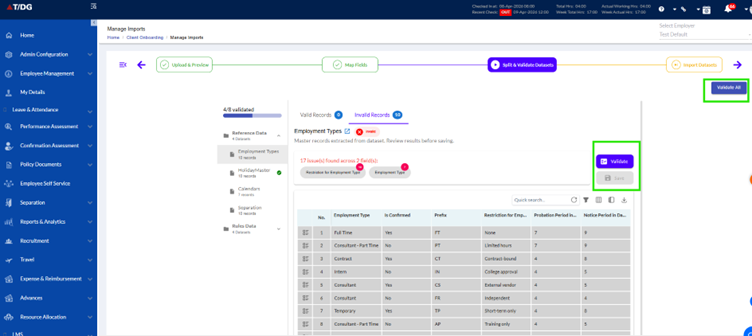
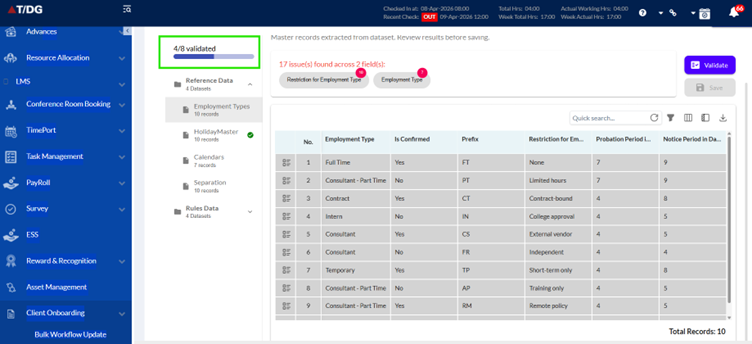
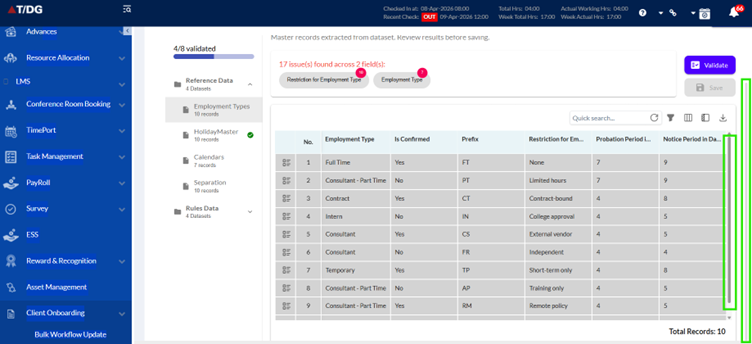
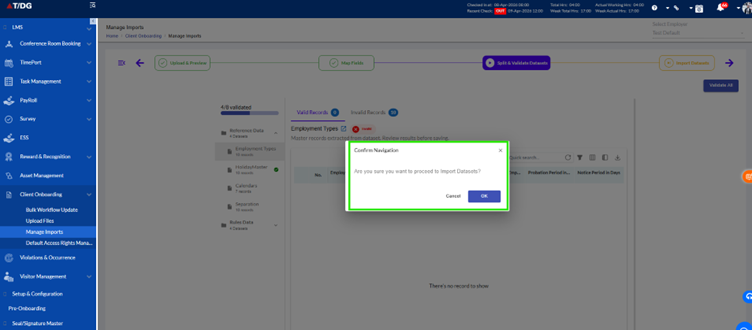
iii). Split & Validate Datasets1. Introduction
This document outlines the functional and technical requirements for the Dataset Validation and Bifurcation Process. It categorizes datasets into Reference, Master, and Transactional categories, allowing users to validate and correct data before importing.
2. Functional Requirements
2.1 Data Bifurcation
- Categories: Datasets are divided into Reference, Master, and Transactional.
- Display: Lists of datasets with Total records count and category labels.
2.2 Data Validation
- Requirement: The system must validate the imported datasets and categorize them based on the validation status (valid or invalid).
- Process Flow:
- Validation Indicators:
- Valid Datasets: A green validation status with a "Valid" indicator will be shown for datasets that pass all validation rules.
- Invalid Datasets: A red validation status will be shown with error indicators on fields where validation fails (e.g., incorrect or missing values in a field like "Personal Email").
- View Valid & Invalid Data Separately
In the Split & Validate stage: You can switch between:
- Valid Data
- Invalid Data
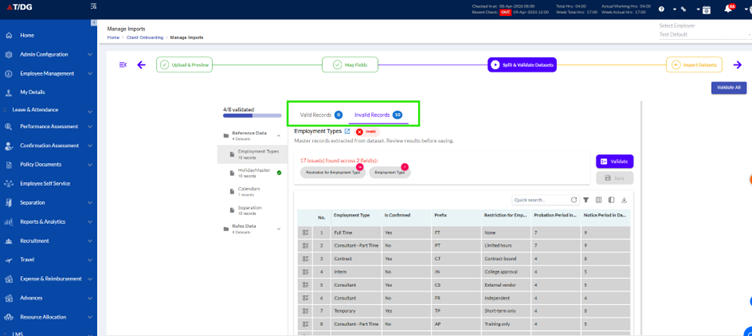
- Field-Specific Validation: Each dataset will undergo validation based on the predefined data integrity rules for each field. For instance:
- Home Telephone: Must match the correct format (e.g., numeric, no special characters).
- Email Fields: Must match standard email format.
- Phone Numbers: Should be checked against valid country-specific formats.
- Error Messages: If a dataset is invalid, specific error messages will be shown next to the field that caused the error, making it easier for the user to identify and correct the issues. {N issue(s) found across Y field(s), Where N is Total no. of issues and Y is total no.of fields}
Validation Feedback:
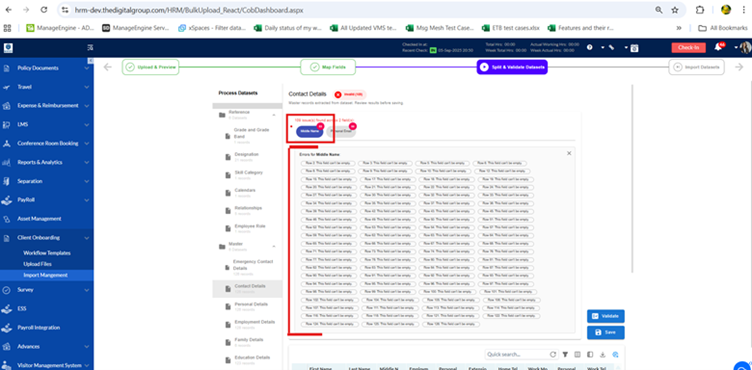
- A summary of invalid fields will be shown at the top, with clickable indicators to quickly navigate to the specific fields needing attention.
- Clicking an error message (e.g., "Invalid email format in 'Personal Email'") will take the user directly to the 'Personal Email' field within the dataset for easy correction.
- Home Button: A Home button will be available in the error summary to allow users to return to the Home tab at any time.
2.3 Actionable Validation
- Edit & Save: Users can correct errors directly in the grid, revalidate, and save datasets once valid.
- Revalidation: After editing, users can revalidate and save corrected data.
- “Validate All” Option: You can now validate all sheets in one go.
2.5 Dataset Status Summary
- Summary View: Each category will show a quick overview of validation status (Valid/Invalid).
Usability: User-friendly interface with tooltips and grid interaction for sorting/filtering data.
4. User Interface Design4.1 Dataset Categories Display
- Sections: The UI should have three primary sections under Process Datasets:
- Reference
- Master
- Transactional
- Dataset List: For each section, datasets should be listed with the following details:
- Dataset Name
- Total Record Count
- Validation Status (Valid/Invalid)
- Validation Indicators: Clear indicators showing whether each dataset is Valid (green) or Invalid (red).
4.2 Validation Results
- Status Indicators: Each dataset should have a status bar or icon indicating whether it is valid or has errors.
- Error Messages: The grid should display error messages or icons next to fields with invalid data with count.
- Error Summary:
- A summary section at the top lists all errors across datasets, with each error presented as a clickable link.
- Clicking on any error message will automatically navigate the user to the specific field within the dataset where the error is located, allowing for a quick correction.
4.3 Actions
- Validate: Button to initiate the validation of datasets.
- Save: Button to save the validated datasets.
- Validate All” Option: You can now validate all sheets in one go.
How it works:
- Click “Validate All” in the Split & Validate stage
- System validates all datasets automatically
Saves time and effort
5. Grid Functionality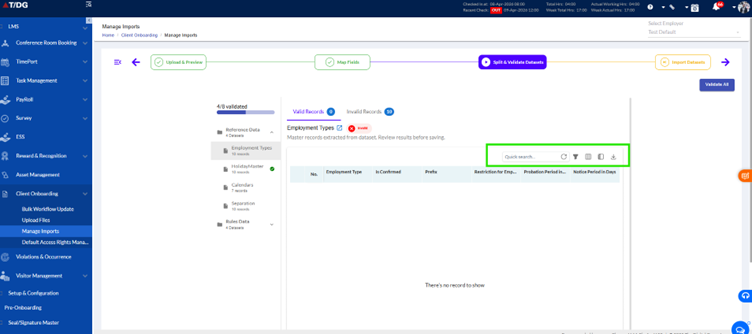
- Quick Search
- What it does: A search bar allows users to type keywords to filter data across all columns in real-time.
- Action: The grid updates to show matching records instantly as you type.
- Column Filter
- What it does: Each column has a filter icon on hovering on column and to apply filters using filter option for each column (e.g., text, number range, date).
- Action: Clicking the filter icon opens a dropdown to set filter criteria, and the grid updates accordingly.
- Column Visibility
- What it does: Users can choose which columns to show or hide.
- Action: Toggle the visibility option to customize the display.
- Frozen Columns
- What it does: Users can freeze certain columns so they stay visible while scrolling horizontally.
- Action: Select columns to freeze, and they will remain in place when scrolling.
- Export Data
- What it does: Export grid data to CSV, PDF, or Excel.
- Action: Click the export button to download data in the desired format.
- Save
- What it does: Save grid settings like filters, column visibility, and sorting.
- Action: Use the "Save Configuration" button to save your personalized grid layout.
- Auto Saving
- What it does: Automatically saves any changes made to filters, columns, or data.
- Action: Changes are saved instantly without manual input, ensuring preferences persist.
- Validation Progress Tracker: You can now see validation progress in the sidebar.
Example:
- 3 out of 5 sheets validated
Helps track progress easily
- Always Visible Horizontal Scrollbar:
- Grid scrollbar is now always visible
- No need to scroll down to find it
Improves navigation in large datasets
- Smart Navigation for Missing Data: If required data is missing, the system provides quick navigation options:
You can directly go to:
- Setup Masters (HRMS Configuration Page)
- COB Upload File Stage
This helps:
- Quickly fix missing configurations
- Avoid delays in processing

- Dashboard Navigation Icon:
- Every page now has a Dashboard icon
- Click it to quickly return to Dashboard
Easy navigation across the system

- Confirmation Before Moving to Next Stage:
The Dataset Validation and Bifurcation Process ensures that the datasets are correctly categorized into Reference, Master, and Transactional categories and are validated for accuracy. The system will provide real-time validation feedback, actionable results for correcting invalid data, and an intuitive user interface to streamline the import process. This feature helps ensure data integrity and enhances the user experience by allowing them to quickly identify and resolve data issues.
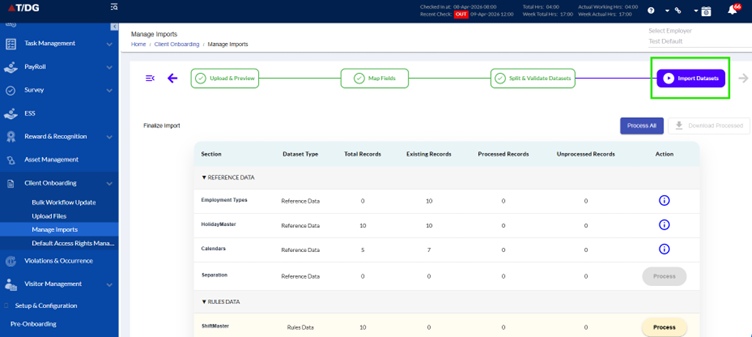
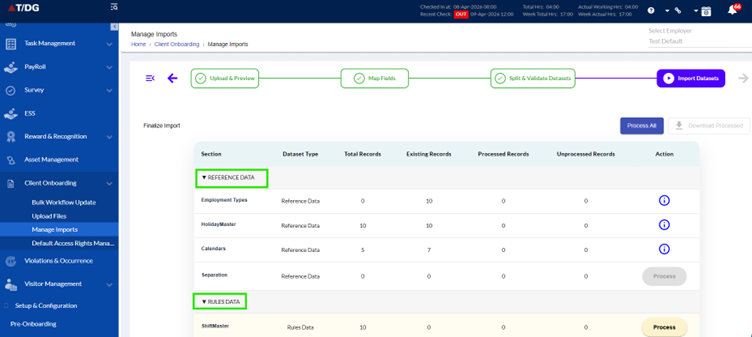
iv) Import Datasets
The Import Datasets page serves as the final review stage in the Client Onboarding workflow. It presents users with a consolidated list of all datasets that have been processed during the Upload & Preview, Field Mapping, and Validation steps. Users can review the dataset names, data types, record counts, and validation statuses before clicking Import Datasets to commit the data to HRMS.
Functional Requirements
2.1 Dataset Listing
The page shall display all datasets grouped into two main categories:
- Reference Data: Lookup/Support data such as Grade & Grade Band, Designation, Skill Category, Calendars, Relationships, Employee Roles, etc.
- Master Data: Core employee-related records such as Employee Master, Education, Family, and Leave details.
Each dataset row shall display the following columns:
| Column | Description |
| Dataset Name Section | Name of the dataset as per HRMS standards. |
| Dataset Type | Indicates whether the dataset belongs to Reference Data, Master Data, or Transactional Data. |
| Total Records | Total Number of records in the dataset. |
| Existing Records | Total Number of records in the dataset exists in the system after Processing. |
| Processed Records | Total Number of records are processed in the dataset after Processing. |
| Unprocessed Records | Total Number of records are unprocessed in the dataset after Processing. |
| Action | Displays the current state (Completed, Pending, Error). The status updates dynamically as users process the datasets. |
Each dataset must have a status badge:
- Completed (Green): All records are valid and ready for import.
- Error (Red): One or more records have validation issues that must be fixed before importing.
- Pending (Grey): Validation is still in progress or has not been triggered.
- (i) Icon(Blue) : When records are existing in the system then it displayed
2.3 Action Item Updates
Initially, each dataset will have the action item in a greyed-out state (labeled "Process"), indicating that the user cannot interact with it at this stage. When the user is allowed to process the dataset:
- The action item will turn into a yellow clickable button labeled "Process".
- Clicking the "Process" button will trigger the validation and processing of the dataset. The system will then:
- Update the dataset status to Completed (Green).
- Change the action item to a green tick icon to indicate that the dataset has been processed successfully.
After processing, users will be able to proceed with final import actions only when all datasets are marked as Completed (Green).
2.4 Navigation & Actions
- Primary Action Button:
The Import Datasets button will be enabled only when all datasets are marked as Completed. This button will commit the data to HRMS when clicked.
- Secondary Navigation:
A Back button must allow users to return to the Split & Validate Datasets or Map Fields page for corrections. The system shall retain previously uploaded files and mappings upon navigating back, ensuring no data loss.
2.5 Read-Only Nature
- The page is view-only for data — users cannot edit, delete, or add records here. The page's purpose is strictly for confirmation before import.
2.6 “Process All” Option
- You can process all sections at once
- Processing happens in the background
Allows multitasking and saves time
2.7 Download Processed Data
After processing:
- You can download final data as a new Excel (XLS) file With Only the processed Data
Why this is useful:
- Keeps a record of final uploaded data
- Includes manual corrections done in COB pages
UI/UX Requirements
| UI Element | Requirement |
| Page Header | The page name shall be displayed as “Import Datasets”, with breadcrumb navigation: Home > Client Onboarding > Import Management > Import Datasets. |
| Progress Tracker | All previous steps (Upload & Preview, Map Fields, Split & Validate) will be shown, with Import Datasets highlighted as the current step. |
| Dataset Table Layout | Datasets are grouped into collapsible sections: Reference Data and Master Data. The table/grid should clearly display: Dataset Name, Type, Count, Status. |
| Status Badge | The status badge uses color-coded icons: Green = Completed, Red = Error, Grey = Pending. Hover tooltips will display additional information, such as "Validation completed successfully" or "Contains validation errors". |
| Action Button (Process) | Initially greyed out and non-interactive. After triggering, it turns yellow and clickable. Once processed, it turns into a green tick. |
| Responsiveness | The page must be responsive and display properly on desktop and adapt to smaller screens (minimum width 1280px supported). |
Non-Functional Requirements
Error Handling
If the data import fails, the system must display a clear error message and allow the user to retry the process without losing validated data.
Summary
This page serves as the final checkpoint before committing data into HRMS. It ensures all datasets are validated, and the statuses are clearly visible, allowing the user to process datasets and proceed only when everything is confirmed as Completed. This process minimizes the risk of erroneous data being imported into the system and streamlines the client onboarding experience.