Leave Management
The admin can create leave type, leave policy, leave balance adjustments, leave credit rules, yearly leave truncation and create comp-off rules here.
To access, select the Admin config and select the leave management, then the admin can view the already created leave types, leave policy, leave balance adjustments, leave credit rules, yearly leave truncation and create comp-off rules here. New Types can be created here.
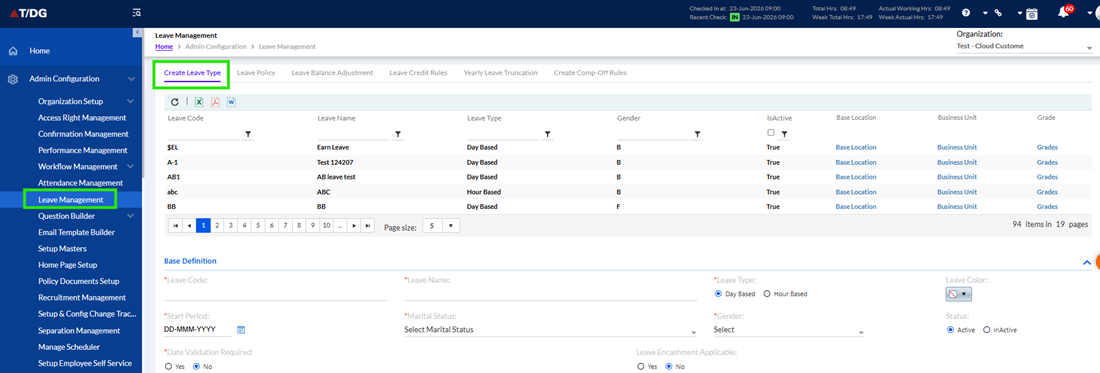
1. Create Leave Type
Here admin should add Leave Code, Leave Name, add the Leave Type (whether Day Based/ Hour Based), designate a Leave Color, add the Start Period, add Marital Status (Single/Married/Separated/Widow), add Gender (Male, Female, Other, All), add Status Active/InActive in the Base Definition section.
Admin can set Auto-calculate Leave End Date once user enter start date based on Available Balance (Yes/ No) so that the system will calculate and while the user is selecting dates for leaves in calendar and has added the start date, it will automatically show the end date.
The admin can set Date Validation Required Yes or No for the particular leave that they are creating. If yes, the following screen opens up and user can select the Date Validation Based on Date of Birth, Wedding Date or can Allow request on different days.

A lot of leaves like paternity and maternity leaves are based on the employees’ gender and marital status. The leaves are also based on grades of employees.
Base Defination
This section is used to set up and manage different leave types in the system. The admin can view all existing leave rules in the list and edit any rule using the edit icon. In the base definition form, the admin can set important details such as leave code, leave name, leave type, leave color, status, and other options like half-day leave, leave encashment, request pullback, auto approval, salary slip display, notice period use, negative balance, and date validation. These settings define how each leave type works in the system.
Negative Balance Limit Enhancement
The Admin can configure a higher Negative Balance limit while creating or modifying leave types.
Updated Limits
- Day-Based Leave: Negative balance limit increased from 30 days to 365 days.
- Hour-Based Leave: Negative balance limit increased from 30 hours to 100 hours.
Validation
- For Day-Based Leave, values greater than 365 days are not allowed.
- For Hour-Based Leave, values greater than 100 hours are not allowed.
Note: This enhancement only increases the allowable negative balance limit and does not change existing leave processing functionality.
Compensatory Off Credit Rules:
Select the Leave Type Compensatory Off -Yes/No while creating leaves.

The comp-off leaves can be applied only if the employee has worked on weekly off or holidays. If clicked yes there are few other options which open up as above. If the Credit Comp-Off based on Attendance box is checked, then the employee’s comp off will be calculated as per his/her attendance by the system.
But if the box is unchecked the HR can set rules by setting how the comp off leaves will be credited to the employees, it can be done by selecting either “Automatic by system”, which will let the system automatically credit comp off leaves to the employees if they have worked on weekly off or holidays; if the “Request Comp-off” is selected, the employee needs to request for the comp-off after they have worked on weekly off or holidays and if the “Leave Balance Adjustment” is selected the employee has to send emails to the HR after they have worked on weekly off or holidays, the HR then have to manually assign comp-off via Leave Balance Adjustment.
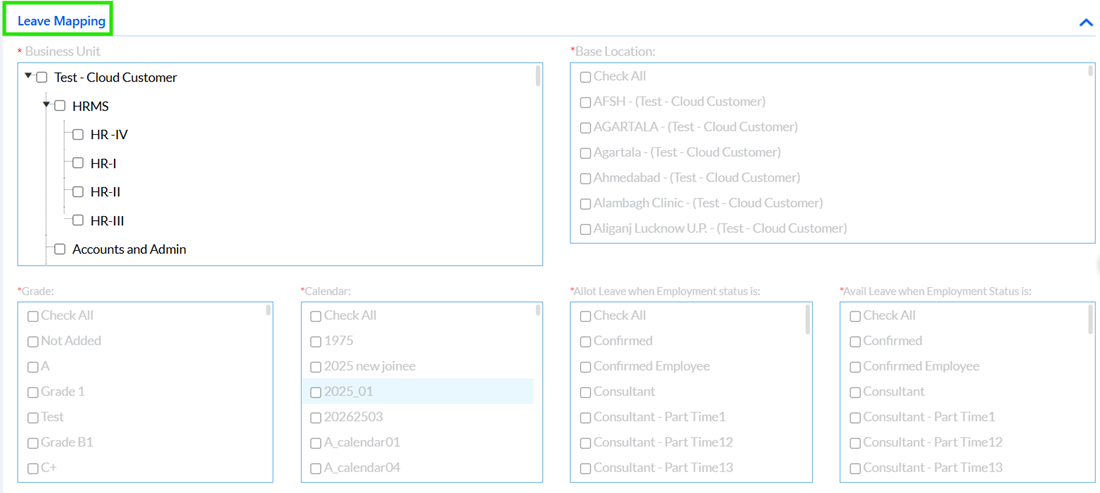
Leave mapping:
Complete the mapping of leaves in Leave Mapping by selecting the Business Unit, Base Location, Grade, and Calendar.
There is an option to “Allot Leave when Employment status” and “Avail Leave when Employment status”, where the admin allots the leave on certain conditions fulfilled after creating it and employee can avail leave only if conditions are fulfilled. The admin can select one, multiple or all by checking all.
The Admin can allot leave with different employment status by setting the condition in Allot Leave when Employment Status is from Confirmed, Consultant, Contractual etc. or can Check all together.
Similarly, they can make them avail leave with different employment status by setting the condition in Avail Leave when Employment Status is from Confirmed, Consultant, Contractual etc. or can Check all together.
The data can be viewed by only those who are mapped to leaves.
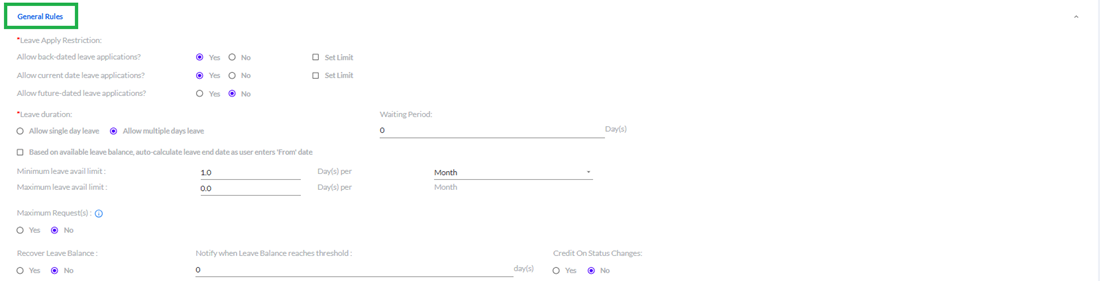
General Rules:
The admin can restrict user based on the selection. If the admin doesn’t want the user to apply the back dated leave, then he can select as ‘No’ for allow back-dated leave application, which means he can apply for future dates only. Then for allow current date leave application, if the admin doesn’t want the user to apply for current date leave application, then he can select ‘No’, similarly if the admin doesn't want the user to apply for future date, he can select as ‘No’
There are two different sets of rules.
One based on Day based and another Hour based.
If the day-based is selected:
A section for Leave Apply Restriction is there.
It allows HR or Admin and HR to put the restrictions.
In the “Leave Apply Restriction”, the user can set – “Allow back-dated leave applications?” Yes/ No or add value in Set Limit “Max Days Back” (Calendar Days/Working Days);
In the “Allow current date leave applications?” click Yes/ No or add value in Set Limit (From Shift Start);
Allow future-dated leave applications? Yes/ No or add value in Set Limit “Max Days Ahead” (Calendar Days/Working Days).
In “Leave duration” the user can set- “Allow single day leave” -if selected only one day selected, no From and To Dates and if “Allow multiple days leave”- if selected From and To Dates are shown.
There is a check box- “Based on available leave balance, auto-calculate leave end date as user enters 'From' date” if the Admin/HR selects this then the employee.
If Hour Based is selected:
The “Leave Events” section is visible.
In the “Leave Events” click Yes/ No;
If the “Leave Event” is No
In the “Leave Apply Restriction” there is “Allow back-dated leave applications?” click Yes/ No, Set Limit “Max Days Back” (Calendar Days/Working Days);
In the “Allow current date leave applications?”, click Yes/No, Set Limit “Must apply ‘x’ mins in advance” (From Shift Start/ From Leave Start);
In the “Allow future-dated leave applications?” click Yes/No, Set Limit “Max Days Ahead” (Calendar Days/Working Days).
If the “Leave Event” is Yes
Select “Leave Avail Restriction”- Allow Late In/ Allow Early Out.
To create separate rules-click “Create New Event”
For “Allow Late In” the user can create separate “Leave Application Restriction” and for the user “Allow Early Out” can create separate “Leave Application Restriction” respectively.
For both the cases configuration can be set by the user. Like the “Allow Late In” and “Allow Early Out” can be disabled for the current day and only future dates can be allowed.

For the employee while applying for leave the “i” icon shows all the configuration done.
Admin can set Pullback options whether Pullback applicable. If selected Yes, whether you want to allow Past Pullback, allow Present and Future Pullback.
Allow Leave pullback allowed till how many days from Applied Date/Leave Date/Approved Date (all levels like L1 or L2) can be Set (ideally 365 days).
Admin can Allow Passed Dated Application, Allow Half Day and Current Year Negative Balance (after balance zero) by clicking Yes/No. Here, the Minimum value is 1 and Maximum value is 30 for any current year negative balance.
Admin can set Minimum leave avail limit and Maximum leave avail limit – days per Week/ Month /Quarter/ Half year/ Year/ Tenure.
Admin can also “Set Maximum Application per Employment tenure”.
Set the Waiting Period of a particular leave to be activated. Waiting period is the period of time in an organization after which the leave will be activated.
Auto Approval Rejection:
The admin can Enable Auto Approval / Rejection for certain cases where the approval or rejection will take place automatically by the system after a certain period, if no action has been taken by the manager.

The Admin can automate the workflow for pending requests by setting time-bound conditions for automatic approval or rejection when an authority remains inactive.
As seen in above image, the configurations include:
- Enable For: The Admin can select either Approval or Rejection to decide the automated action taken on an inactive request.
- Auto approve if no action taken by approving authority with in: The Admin can define the system rule by specifying the maximum number of days allowed for manual intervention. For example, setting the value to "4" means the system will auto-approve or auto-reject the request if no action is taken by the approving authority within 4 days from the date of the request.
Notice Period Rules:
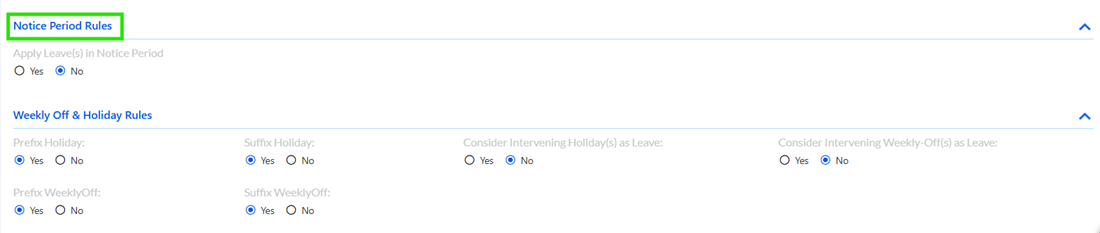
The Admin can manage the maximum limit of leaves an employee can apply for during their notice period by configuring the conditions under Notice Period Rules.
As shown in above image, the settings include:
- Max Limit Options: The Admin can restrict notice period leave applications using one of two parameters:
- Available Leave Balance: Restricts the employee's request strictly to whatever balance they currently possess.
- Set Limit: Allows the Admin to define a specific maximum number of day(s) an employee can request during this period regardless of a higher balance.
- Important Note: The defined Max Limit count will be applicable only if the employee(s) have a sufficient leave balance to cover the request.
Weekly Off Holiday Rules:
Admin can set Weekly Off and Holiday Rules (prefix, suffix or intervening holidays allowed or not) as well. This mainly used in Sandwich Holidays.
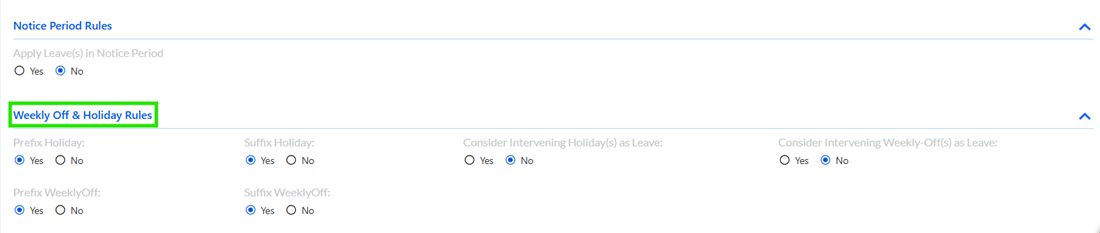
- Leave Before Holiday(s): If this option is set to Yes by the admin, the user can apply for leave before a holiday. If it is set to No, the user will not be allowed to apply leave before a holiday.
- Leave After Holiday(s): If this option is set to Yes by the admin, the user can apply for leave after a holiday. If it is set to No, the user will not be allowed to apply leave after a holiday.
- Leave on Holiday(s): If this option is set to Yes, the user can apply leave on a holiday. If it is set to No, the user will not be allowed to apply leave on a holiday.
- Leave Before Weekly Off(s): If this option is set to Yes by the admin, the user can apply for leave before a weekly off. If it is set to No, the user will not be allowed to apply leave before a weekly off.
- Leave After Weekly Off(s): If this option is set to Yes by the admin, the user can apply for leave after a weekly off. If it is set to No, the user will not be allowed to apply leave after a weekly off.
- Leave on Weekly Off(s): If this option is set to Yes, the user can apply leave on a weekly off. If it is set to No, the user will not be allowed to apply leave on a weekly off.
- Consider Intervening Holiday(s) as Leave: If this option is set to Yes, any holiday falling between the employee’s leave dates will also be treated as leave. If it is set to No, intervening holidays will not be counted as leave.
- Consider Intervening Weekly-Off(s) as Leave: If this option is set to Yes, any weekly off falling between the employee’s leave dates will also be treated as leave. If it is set to No, intervening weekly offs will not be counted as leave.
- Intervening Holiday/Weekly-Off Conditions: The user can choose whether the intervening holiday or weekly off should be considered as leave when the leave is applied: before the leave start date, on the leave start date, after the leave start date.
- Selected Rule Behavior: When the relevant option is enabled, the system will apply the configured rule to the leave request according to the selected condition.
Clubbing Rules:
This section has the rules for clubbing of leaves and carry forward rules. Here, admin can set Loss of Pay applicable (Yes/No), Recover Leave Balance (Yes/No), if Leave Encashment allowed (Yes/No), Encashment Limit in days, Minimum Balance for Encashment, Encashment Frequency, Leave Truncation (Yes/No) and the Carry Forward Limit in days.
In the “Leave Type Not to Club With”, the admin can add all the leaves which cannot be clubbed with. Add the details in Display Leave Information on Salary Slip

Display Leave Information On Salary Slip:
Select Yes/ No for Display Leave Information on Salary Slip. If user wants to carry forward the leave based on the given calendar, then he can select yes and get options like Show Leave Earned, Show Leave Used, Show Leave Balance
Lapse and Carry Forward Rules:
The Admin can configure how unused leaves expire or roll over by setting the parameters in Lapse & Carry Forward Rules.
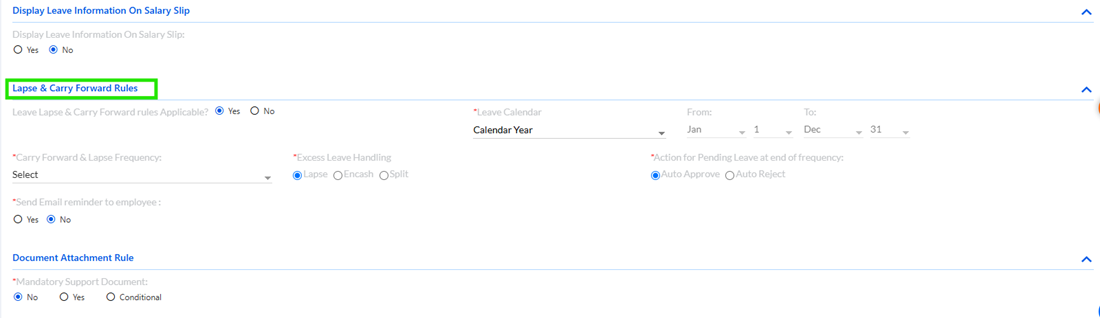
As shown in image, the configurations include:
- Leave Lapse & Carry Forward rules Applicable?: Select Yes to activate lapse and rollover policies for the leave type, or No to disable them.
- Rule Type Selection: When set to Yes, the Admin can choose between two rule formats:
Standard Rule: Select this tab to apply the system's default lapse and carry-forward configurations.
Custom Rule: Select this tab to define personalized, specialized boundary conditions for leave accumulation.
After filling up all the details click “Submit” to create the leave.
Document Attachment Rule:
While applying leave the user need to attach a document. When the user selects Yes for Mandatory Support Document. Also, there is a condition when the mandatory support document is required for example if the leave duration is more than 2 days or more.
Note: When user is applying any leave for the particular leave type, if the leave reason is already added then he can directly select the leave reason in the L&A Task’s ‘Reason’ field.
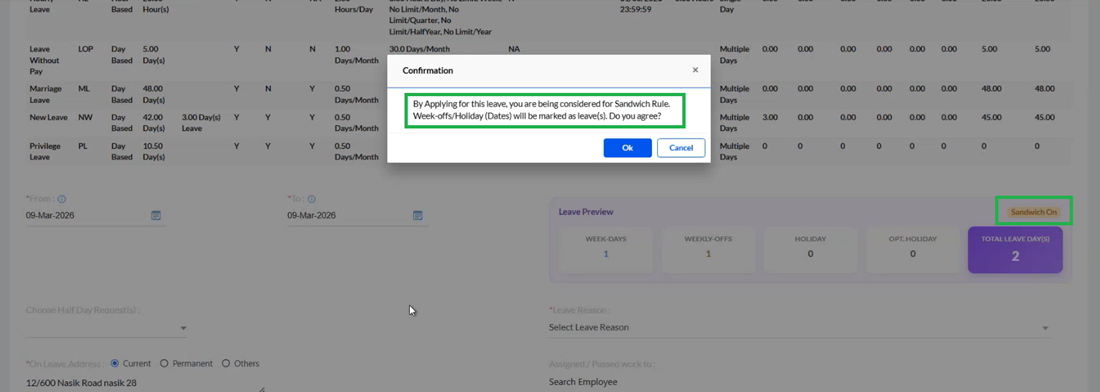
Sandwich Holiday Rules
The employee can apply halfday while applying the sandwich rule. If the the user applies holiday before the week off which can be full day or half day or second half before the weekoff and same he applies immediately after the week off, then the week off date falling between the two-leave application will be treated as the sandwich leave.
For example: If the user chooses to apply a GL (Garden Leave) on a day before weekoff and same leave i.e GLleave just after the weekoff by selecting the same leave type on which halfday internal flag is enabled for both full day leave and half day leave. After applying the leave a pop will appear on the screen as shown in the image below, also it will show what is the leave type for such type of leave application such as Sandwhich leave shown in leave preview:
2. Leave Policy
The Leave Policy tab is used to define and manage leave policies within the organization. It allows the administrator to configure various leave-related settings such as leave type, loss of pay applicability, half-day leave eligibility, encashment rules, negative balance permissions, and other leave processing rules.
The Admin can create and maintain different leave policies based on organizational requirements and employee leave entitlements.
Leave Policy List
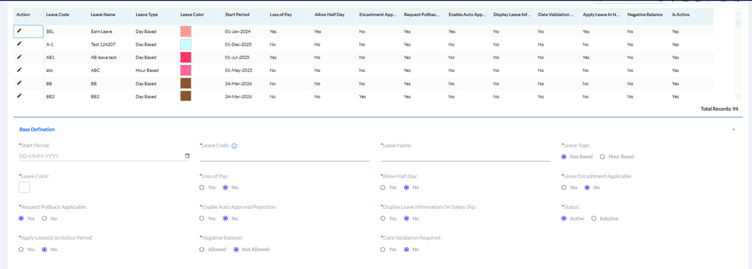
The upper section displays the list of all configured leave policies. The grid contains details such as:
- Leave Code – Unique code assigned to the leave type.
- Leave Name – Name of the leave.
- Leave Type – Indicates whether the leave is Day Based or Hour Based.
- Leave Color – Color assigned for leave display in calendars and reports.
- Start Period – Effective date from which the leave policy is applicable.
- Loss of Pay – Indicates whether the leave is considered as Loss of Pay.
- Allow Half Day – Specifies whether half-day leave can be applied.
- Encashment Applicable – Indicates whether leave encashment is allowed.
- Request Pullback Applicable – Allows employees to withdraw submitted leave requests.
- Enable Auto Approval/Rejection – Automatically approves or rejects leave requests based on configured conditions.
- Display Leave Information on Salary Slip – Displays leave details in employee salary slips.
- Date Validation Required – Enables date validation while applying leave.
- Apply Leave in Notice Period – Allows or restricts leave application during the notice period.
- Negative Balance – Specifies whether leave can be applied when leave balance is insufficient.
- Is Active – Indicates whether the leave policy is active.
The administrator can use the Edit option available in the Action column to modify an existing leave policy.
Leave Policy Tabs
The Leave Policy configuration contains the following sections:
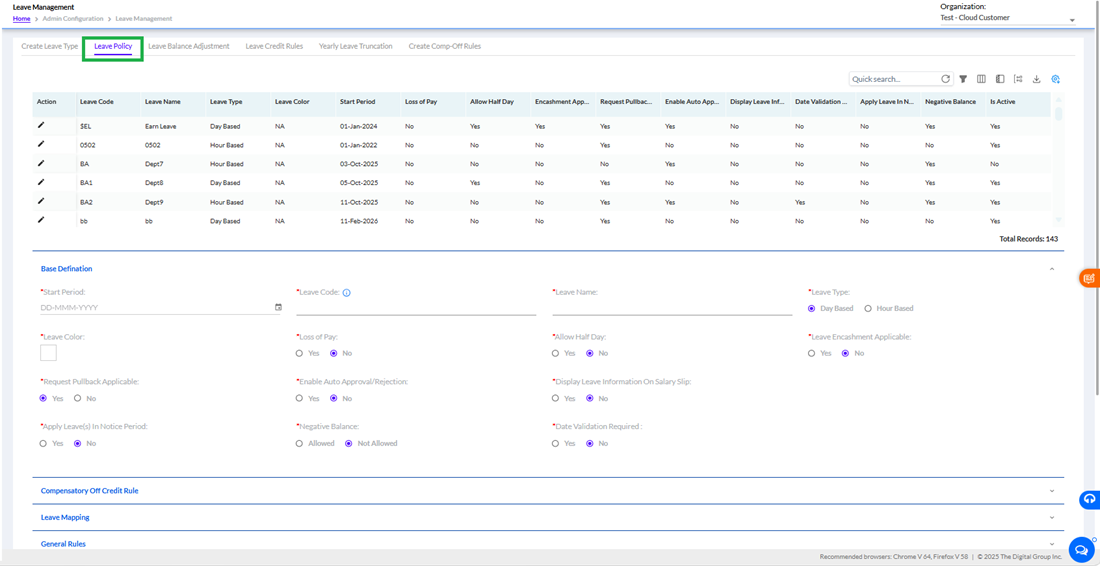
Base Definition:
This section of the covers the core configuration and management of various leave types within the system, as illustrated in the given image.
The top section features a comprehensive data grid displaying a list of all existing leave rules, their parameters, and a total record count. Administrators can click the Edit (pencil) icon under the Action column to modify any existing leave rule.
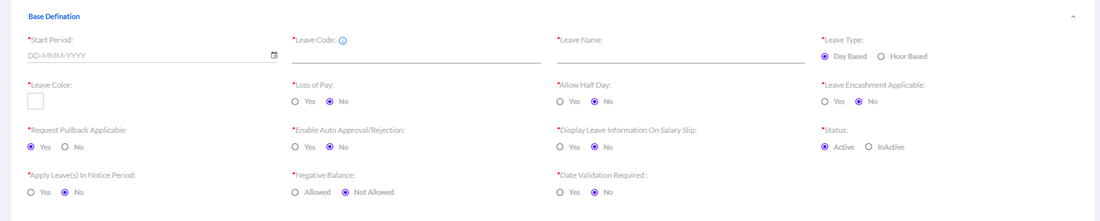
Base Definition Field Configurations
The Base Definition form at the bottom of image is used to define the fundamental rules and boundaries for a selected or new leave type. Fields marked with a red asterisk (*) are mandatory.
Here, the admin can configure the following parameters:
Start Period: Select the effective start date for the leave configuration from the calendar dropdown (formatted as DD-MMM-YYYY).
Leave Code & Leave Name: Enter a unique code identifier and a clear descriptive name for the leave type (e.g., Earned Leave, Sick Leave).
Leave Type: Determine the tracking metric by selecting either Day Based or Hour Based radio buttons.
Leave Color: Choose a designated color block to represent this specific leave type visually across system calendars and dashboards.
Loss of Pay: Specify whether the leave type triggers a salary deduction by choosing Yes or No.
Allow Half Day: Define whether employees are permitted to apply for half-day durations (Yes/No).
Leave Encashment Applicable: Set whether unused balances for this leave type can be converted into monetary value (Yes/No).
Request Pullback Applicable: Set whether an employee can recall or cancel a submitted leave request before or after approval (Yes/No). If it is yes selected, then it will reflect as yes in request pullback rules.
Enable Auto Approval/Rejection: Choose Yes or No to determine if the system should bypass manual workflows and automatically process applications based on backend logic.
Display Leave Information On Salary Slip: Toggle Yes or No to control whether the balance or utilization of this leave type appears on the employee’s payslip.If it is selected yes then it will be displayed display leave information on salary slip.
Status: Control the availability of the leave type by toggling it between Active or InActive.
Apply Leave(s) In Notice Period: Rule whether employees currently serving their notice period are allowed to utilize this leave type (Yes/No).
Negative Balance: Choose whether the system allows an employee’s leave balance to drop below zero (Allowed or Not Allowed).
Date Validation Required: Set whether the system should run advanced checks on the selected application dates (Yes/No).
This section is used to define the basic properties of the leave policy.
These settings determine the fundamental behavior of the leave type.
Compensatory Off Credit Rule:
This section is used to configure the rules for granting Compensatory Off (Comp-Off) credits to employees.
Administrators can define the eligibility and crediting conditions under which employees receive Comp-Off leave for working on holidays, weekly offs, or other eligible days as per company policy.

Comp-Off Utilization Rules
The Comp-Off Utilization Rules section is available under the General Rules configuration of the Comp-Off leave type. These settings enable administrators to control how employees can utilize earned Comp-Off units and ensure compliance with organizational Comp-Off policies.
The Admin can configure Comp-Off utilization behavior by defining whether half-day Comp-Off credits can be combined into a full-day leave and whether full-day Comp-Off credits can be utilized as multiple half-day leaves.
Note: These rules are applicable only when Allow Half Day is enabled for the Comp-Off leave type. If Allow Half Day is disabled, the Comp-Off utilization rules will not be displayed.
Allow Aggregation of Half-Day Earned Units into Full-Day Application
This setting determines whether multiple half-day Comp-Off earned units can be combined and utilized as a full-day Comp-Off leave.
Options:
- Yes – Employees can combine two eligible half-day Comp-Off earned units to apply for one full-day Comp-Off leave.
- No – Employees cannot combine half-day Comp-Off earned units. Each half-day earned unit must be utilized separately.
Example
An employee has earned two half-day Comp-Off credits on different eligible working days.
- If Yes is selected, the employee can combine both half-day credits and apply for one full-day Comp-Off leave.
- If No is selected, the employee must utilize each half-day Comp-Off separately and cannot submit a full-day Comp-Off request using the two half-day earned units.
Allow Splitting of Full-Day Earned Units into Half-Day Applications
This setting determines whether a full-day Comp-Off earned unit can be utilized as multiple half-day leave applications.
Options:
- Yes – Employees can split one full-day Comp-Off credit into two separate half-day leave applications.
- No – Employees must utilize the full-day Comp-Off credit as a single full-day leave request.
Example
An employee has one full-day Comp-Off credit.
- If Yes is selected, the employee can take:
- First Half leave on one day, and
- Second Half leave on another day.
- If No is selected, the employee must utilize the entire Comp-Off credit as one full-day leave and cannot split it into multiple half-day requests.
Block Multiple Separate Half-Day Requests for the Same Calendar Date
This option becomes available when Allow Splitting of Full-Day Earned Units into Half-Day Applications is set to No.
This setting prevents employees from bypassing the Comp-Off utilization policy by submitting separate first-half and second-half leave requests for the same calendar date.
Options:
- Selected – The system blocks multiple half-day Comp-Off requests that together constitute a full-day leave on the same date.
- Not Selected – The system allows separate half-day leave requests as per configured leave rules.
Purpose
This validation ensures that employees cannot indirectly create a full-day Comp-Off leave by submitting separate first-half and second-half requests when the organization has restricted full-day Comp-Off credits from being split into half-day applications.
Comp-Off Utilization Validation
The system performs validations based on the configured Comp-Off utilization rules.
Validation for Full-Day Credit Split Restriction
When Allow Splitting of Full-Day Earned Units into Half-Day Applications is set to No, employees attempting to utilize a full-day Comp-Off credit as a half-day leave will receive a validation message and the request will not be submitted.
Validation for Half-Day Credit Aggregation Restriction
When Allow Aggregation of Half-Day Earned Units into Full-Day Application is set to No, employees attempting to combine multiple half-day Comp-Off earned units into a full-day leave request will receive a validation message and the request will be blocked.
Business Rule
As per the Comp-Off policy, an employee cannot utilize multiple Comp-Off earned records from different earned dates against a single Comp-Off utilization day when aggregation is restricted. The system validates the leave request based on the configured Comp-Off utilization settings and allows or restricts leave application accordingly.
These rules help organizations maintain accurate Comp-Off tracking and ensure that earned Comp-Off credits are utilized in accordance with company policy.
Leave Mapping:
The Leave Mapping section is used to establish relationships between different leave types.
Through leave mapping, administrators can define how leave balances should be considered when an employee exhausts a particular leave type or when leave conversion rules are applicable.
This configuration helps in ensuring seamless leave utilization and proper leave balance management.

General Rules:
The General Rules section is used to define additional leave processing rules and organizational policies applicable to the leave type.
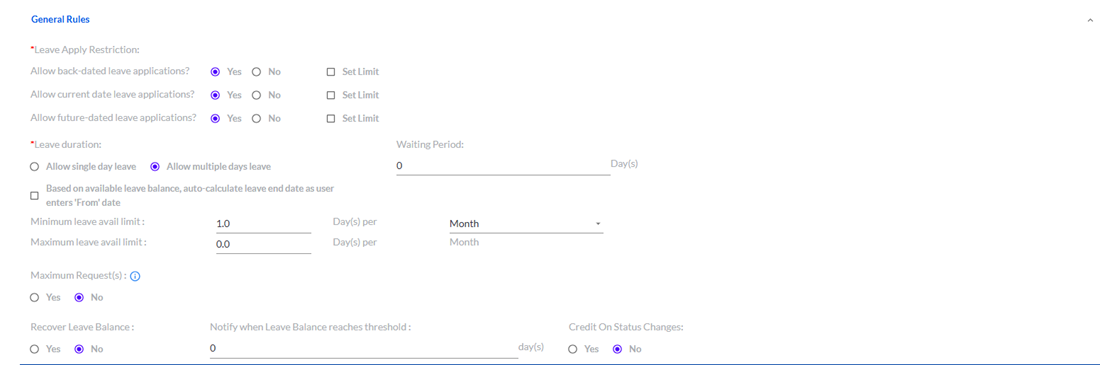
Leave Apply Restriction
The Admin can restrict or allow submission timelines for employee leave requests by configuring the following settings:
- Allow back-dated leave applications?: Select Yes or No to control if employees can apply for past dates. Check Set Limit to specify how many days back they can apply.
- Allow current date leave applications?: Select Yes or No to toggle same-day leave submissions, with an option to Set Limit.
- Allow future-dated leave applications?: Select Yes or No to manage whether advance planning requests are permitted.
Leave Duration & Availability
The Admin can define the duration limits and request restrictions for the policy:
- Leave Duration Model: Choose between Allow single day leave or Allow multiple days leave.
- Waiting Period: Input the mandatory number of waiting days required before an employee becomes eligible to utilize this leave type.
- Auto-Calculate End Date: Toggle the checkbox to auto-calculate the leave end date based on the user’s available leave balance as soon as they enter a ‘From’ date.
- Minimum/Maximum leave avail limit: Set the explicit minimum and maximum number of days an employee is permitted to avail per month or other designated periods.
System Alerts & Threshold Rules
The Admin can customize system responses, tracking, and recovery rules at the bottom of above given image :
- Maximum Request(s): Toggle Yes or No to impose a ceiling cap on the total number of individual requests allowed.
- Recover Leave Balance: Select Yes or No to determine if negative or unearned balances should be reclaimed by the system.
- Notify when Leave Balance reaches threshold: Specify a milestone day count value to trigger an automated alert when an employee’s leave balance drops to that level.
- Credit On Status Changes: Select Yes or No to configure whether a change in an employee’s organizational or employment status will trigger an immediate recalculation/credit of leaves.
Request Pullback Rules:

The Admin can configure the policies for pulling back submitted leave requests based on past, present, or future dates.
Allow Past Date Pullback
The Admin can enable or disable the ability for employees to pull back leave requests for dates that have already passed.
- Yes / No: Select Yes to allow pulling back past leave requests, or No to restrict it.
- Leave pullback allowed till: If enabled, define the maximum number of days allowed to pull back the request, calculating from either the Applied Date or the actual leave date using the dropdown menu.
The Admin can manage the pullback rules for current and upcoming leave requests.
- Yes / No: Select Yes to allow employees to pull back present and future leave requests, or No to restrict it.
- Leave pullback allowed till: Define the specific timeframe (number of days) within which a present or future leave request can be pulled back from the Applied Date or leave date.
Weekly Off & Holiday Rules:
- Leave Before Holiday(s): If this option is set to Yes by the admin, the user can apply for leave before a holiday. If it is set to No, the user will not be allowed to apply leave before a holiday.
- Leave After Holiday(s): If this option is set to Yes by the admin, the user can apply for leave after a holiday. If it is set to No, the user will not be allowed to apply leave after a holiday.
- Leave on Holiday(s): If this option is set to Yes, the user can apply leave on a holiday. If it is set to No, the user will not be allowed to apply leave on a holiday.
- Leave Before Weekly Off(s): If this option is set to Yes by the admin, the user can apply for leave before a weekly off. If it is set to No, the user will not be allowed to apply leave before a weekly off.
- Leave After Weekly Off(s): If this option is set to Yes by the admin, the user can apply for leave after a weekly off. If it is set to No, the user will not be allowed to apply leave after a weekly off.
- Leave on Weekly Off(s): If this option is set to Yes, the user can apply leave on a weekly off. If it is set to No, the user will not be allowed to apply leave on a weekly off.
- Consider Intervening Holiday(s) as Leave: If this option is set to Yes, any holiday falling between the employee’s leave dates will also be treated as leave. If it is set to No, intervening holidays will not be counted as leave.
- Consider Intervening Weekly-Off(s) as Leave: If this option is set to Yes, any weekly off falling between the employee’s leave dates will also be treated as leave. If it is set to No, intervening weekly offs will not be counted as leave.
- Intervening Holiday/Weekly-Off Conditions: The user can choose whether the intervening holiday or weekly off should be considered as leave when the leave is applied: before the leave start date, on the leave start date, after the leave start date.
- Selected Rule Behavior: When the relevant option is enabled, the system will apply the configured rule to the leave request according to the selected condition.

Clubbing Rules:
This section has the rules for clubbing of leaves and carry forward rules. Here, admin can set Loss of Pay applicable (Yes/No), Recover Leave Balance (Yes/No), if Leave Encashment allowed (Yes/No), Encashment Limit in days, Minimum Balance for Encashment, Encashment Frequency, Leave Truncation (Yes/No) and the Carry Forward Limit in days.
In the “Leave Type Not to Club With”, the admin can add all the leaves which cannot be clubbed with. Add the details in Display Leave Information on Salary Slip.

Leave Reason Configuration:
The Admin can configure how employees provide justification for their leave requests by determining the input format under Leave Reason Configuration.

As seen in above image, the settings include:
Leave Reason Type: The Admin can choose how the reason field is displayed to the user:
Free Text: Select this option to allow employees to type out their specific reason in an open text box.
Dropdown list: Select this option to restrict entries to a predefined list of reasons.
Dropdown Options: When the Dropdown list type is active, the Admin can input custom categories into the text field and click the Add button to build the selection list.
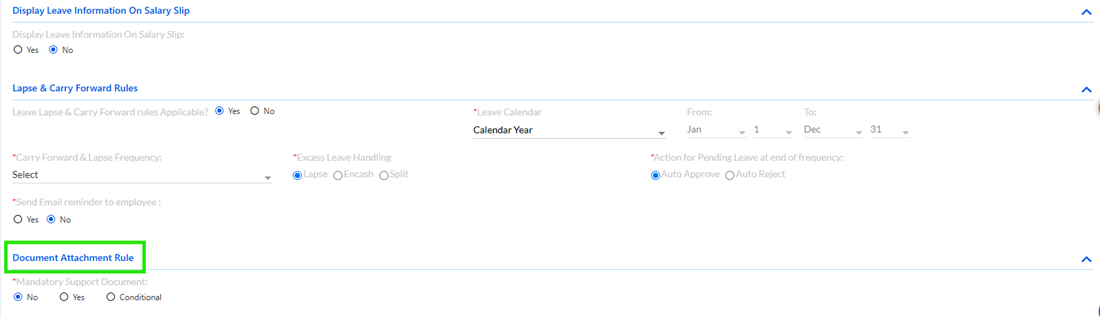
Lapse & Carry Forward Rules:
The Admin can configure how unused leaves expire or roll over by setting the parameters in Lapse & Carry Forward Rules.

As shown in image, the configurations include:
- Leave Lapse & Carry Forward rules Applicable?: Select Yes to activate lapse and rollover policies for the leave type, or No to disable them.
- Rule Type Selection: When set to Yes, the Admin can choose between two rule formats:
Standard Rule: Select this tab to apply the system’s default lapse and carry-forward configurations.
Custom Rule: Select this tab to define personalized, specialized boundary conditions for leave accumulation. After filling up all the details click “Submit” to create the leave.
Document Attachment Rule:
While applying leave the user need to attach a document. When the user selects Yes for Mandatory Support Document. Also, there is a condition when the mandatory support document is required for example if the leave duration is more than 2 days or more.
3. Leave Balance Adjustment
The Admin can Select Leave Type in Leave Name, then search the Employee(s) from the dropdown and add to the list on the right column. Add the No. of Days, Reason and then click Submit. When certain leaves need to be added to employees manually this process is followed.
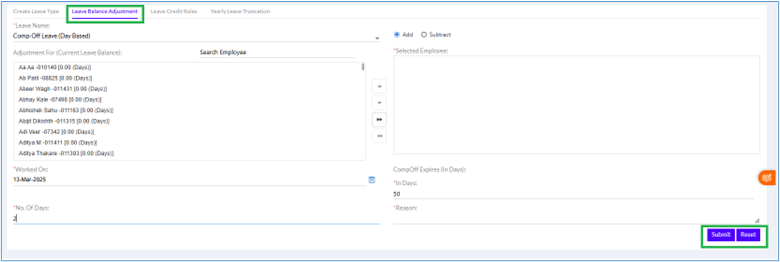
Admin can add leave type for selected employees by selecting particular or multiple employees together or subtract few employees from the list by setting up no. of days and the reason etc. This is done during time of confirmation of employees or other designation change.
The Admin can adjust employee leave balances in bulk through the Leave Balance Adjustment tab. This feature is designed to support frequent leave balance corrections arising from policy changes, yearly carry-forward updates, opening balance modifications, and other organizational requirements. The system allows leave balance adjustments through both the user interface and Excel template upload.
Navigation
Admin Configuration > Leave Management > Leave Balance Adjustment
Leave Selection and Employee Preview
- Select the requiredLeave Name.
- Apply filters such as Business Unit, Base Location, Work Location, Designation, Employee Role, Employment Type, or Employee Name.
- ClickPreviewto display all employees mapped to the selected leave type.
- The system displays the employee list along with their current leave balances and yearly opening balances.
Download and Upload Template
The Admin can click Download Template to export employee leave balance details into an Excel file. After entering the required adjustment values, the updated file can be uploaded using Upload Template to process leave balance changes in bulk.

Leave Balance Adjustment Options
The system provides the following adjustment types:
| Adjustment Type | Description |
| Credit | Adds the specified leave units to the employee's current leave balance. |
| Debit | Deducts the specified leave units from the employee's current leave balance. |
| Set Balance | Directly sets the employee's leave balance to the specified value without calculating credit or debit differences manually. |
4. Leave Credit Rules

Accrual Based Leave Credit
TheLeave Credit Rulestab is used to define how leave credits are allocated to employees. The system provides flexible options to configure leave accrual based on employee attendance, service conditions, and organizational policies.
New Enhancement – On Accrual Present Days
A new option,On Accrual Present Days, has been introduced under thePro Rata Basissection. This option enables organizations to credit leave based on the actual number of days an employee is present during the accrual period.
Configuration Steps:
- Navigate to Leave Management > Leave Credit Rules.
- Select the required Leave Type.
- Choose the desired Frequency(Monthly, Quarterly, Half-Yearly, or Yearly).
- Select the Credit Month.
- The system now allows users to select any month as the credit month, regardless of the selected frequency.
- For example, organizations following an April to March leave cycle can configure leave credits accordingly.
- Under Pro Rata Basis, select On Accrual Present Days.
- Pro rata basis has credit full leaves and credit no leaves and pro rata basis.
- Under Credit Leave Based On, select Conditional.
- From the conditional criteria dropdown, select On Accrual Formula.
- Configure the leave credit formula and save the rule.
For Pro Rata basis option: If the employee has joined in between month of the organization like joined on the 16th, 17th, or 20th of the month, then also he will be eligible to get full leaves through credit full leaves. And if the person joins after 25th of the month, then he won’t be eligible to get the full leaves as it will be credited to him next month onwards based on the pro rata calculation, so the option is to go with credit no leaves.
How the Accrual Formula Works
When On Accrual Present Days is selected, leave credits are calculated based on the employee's actual attendance during the accrual period. The system evaluates the number of present days and credits leave proportionately based on pro-rata calculations.
Benefits
Credits leave based on actual employee attendance.
Supports pro-rata leave calculations.
Provides flexibility for different leave cycles and credit months.
Ensures accurate leave allocation according to organizational policies and employee presence records.
5. Yearly Leave Truncation
The Admin can click Invoke to Truncate and Click Balance to check the balance.
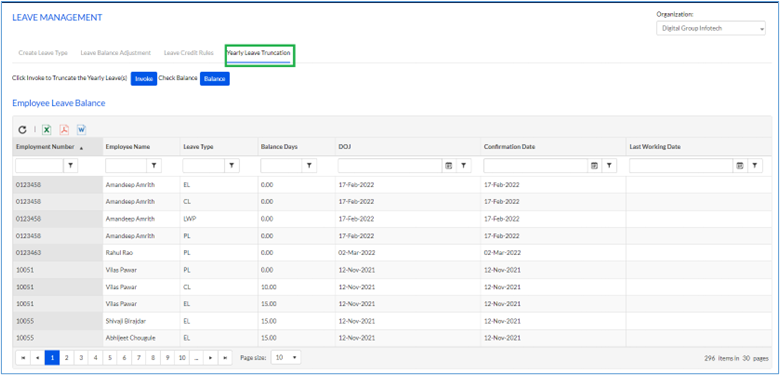
The Admin can click Invoke to truncate the Yearly Leave(s) of employees and Check Balance of Employee Leaves. They can also extract the data in Excel, PDF or Word Format.
Employee Leave Balance is displayed below.
6: Create Comp-off Rules
With the help of create comp-off rules the comp-off can be applied on regular working day as well. Also the comp-off can be given on base location, business unit, designation, emplyoee role, emplyoment type, grade, select emplyoees, shift and work location. There are two options under this tab, one is Comp-off leave (Co Day Based) and Hour2nd comp (HC-Hour Based) as shown below.

In Comp-off leave (Co Day Based), both standard and custom rules can be applied as shown below.

In Hour2nd comp (HC-Hour Based), both standard and custom rules can be applied as shown below:
