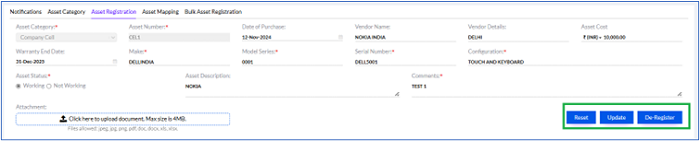
Asset Registration
The Asset Registration page allows administrators to register and manage assets within the system. This section provides an overview of all registered assets and their current allocation details.
Users can navigate to:
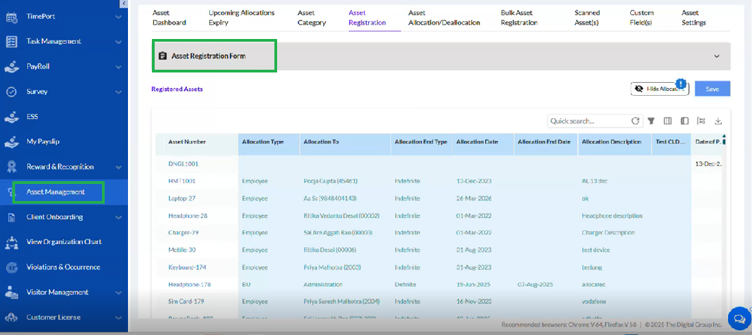
Asset Management > Asset Registration
The system displays all registered assets along with allocation details such as: Asset Number, Allocation Type, Allocation To, Allocation End Type, Allocation Date, Allocation End Date, Allocation Description, Custom Fields
Asset Allocation from Asset Registration Form
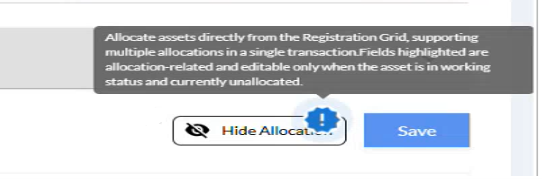
The system allows users to directly allocate assets from the Asset Registration Form.
By clicking on the Asset Registration Form tab, users can allocate one or multiple assets at a time.
The allocation can be made to:
- Employee
- Business Unit
- Location
This simplifies the allocation process and eliminates the need for navigating to separate allocation pages.
Conditions for Asset Allocation
Before allocating an asset, the following conditions must be met:
- The asset status must be Working
- The asset must not be in:
- Repair State
- Store State
- De-registered State
- Already Allocated State
If the asset is in any restricted state, allocation will not be allowed.
Example:
If an asset is marked as Repair, the user must first edit the asset status and update it to Working before allocation.
Allocation End Type
While allocating an asset, the user must select an Allocation End Type:
- Definite – Allocation for a specific duration.
In this case, the user must enter:- Allocation Date
- Allocation End Date
- Indefinite – Allocation without any end date.
In this case, only the Allocation Date is required.
Suggested Enhancement Under Review:
The current labels Definite and Indefinite may be updated to Temporary Allocation and Permanent Allocation in future releases for better usability.
Multiple Asset Allocation
The system now supports multiple allocations in a single session.
Users can:
- Allocate multiple assets at one time
- Assign different allocation types in one process
- Enter custom field values during allocation
This improves efficiency in bulk asset allocation scenarios.
Asset Lifecycle Tracking
Once assets are allocated successfully:
New Enhancement
The system automatically updates the Asset Lifecycle Tracker with:
- Allocated User
- Allocation Date
- Modified Date
- Allocation Status
This helps track the full history of each asset.
New Feature Indicator
A new Feature Indicator Icon has been introduced across the module.
Whenever a new feature or functionality is deployed:
- The system displays a special icon along with the feature description.
- The indicator remains visible for 7 days after deployment.
- After 7 days, it is automatically removed.
This helps users identify newly released features easily.
Asset Registration Enhancements
In the Asset Registration tab, the asset registration form is now available in a collapsible dropdown format. This enhancement provides better visibility of the registered asset grid by reducing screen clutter and allowing users to expand or collapse the form as required.
A new Updated By field has been introduced to manually capture the name or ID of the person registering the asset. This field is optional (non-mandatory) and helps organizations track who created or updated a particular asset record. This feature is mainly introduced for compliance and audit purposes.
Functionality:
- Improves UI by collapsing the registration form.
- Helps track the person responsible for asset registration.
The same Updated By field is also reflected in Bulk Asset Registration.