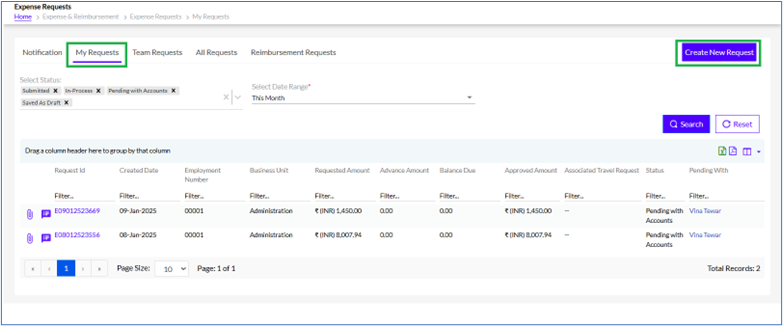
Expense- My Requests
The new requests can be created, and their status can be viewed here for self.

Creating a New Request
In order to create a new Expense request, the user has to click on the Click New Request button on the bottom right corner of the Expense Requests page, as highlighted in the screenshot below.
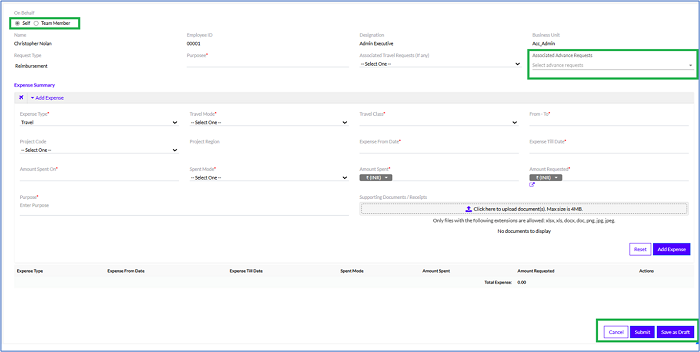
On clicking the button following screen opens.
If there is any advance request associated with the expense request (Which is created in Advance Module) it is visible in the Associated Advance Requests section as highlighted in the above section
The process of creating of a new Expense Request requires the user to enter information in the following 2 steps, as highlighted in the screenshot below:
A. On Behalf
B. Expense Summary
A. On Behalf -
The Reporting Manager can also create an Expense Request on behalf of a team member, by selecting the Team Member radio button under On Behalf, as highlighted in the screenshot below.

There are 3 options in this section, Self, Team Member or Split. The user can fill the details for themselves, on behalf of their team members or they can also Split with Team Member and fill part mentioning the splitting percentage.
In this section, the Name, Employee Id, Designation, and Department, of the employee are fetched automatically, highlighted in the screenshot below.
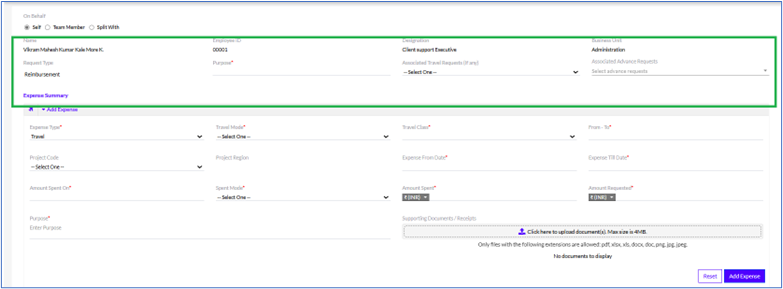
The details that need to be filled in are as follows and are shown in the screenshot below:
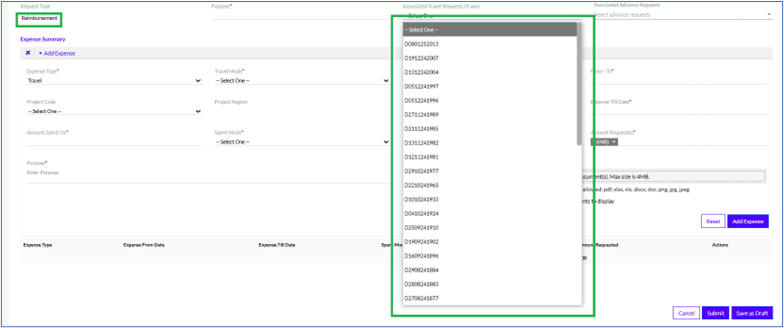
- Request Type: Can be Advance or Reimbursement
- Purpose: The purpose of the expense
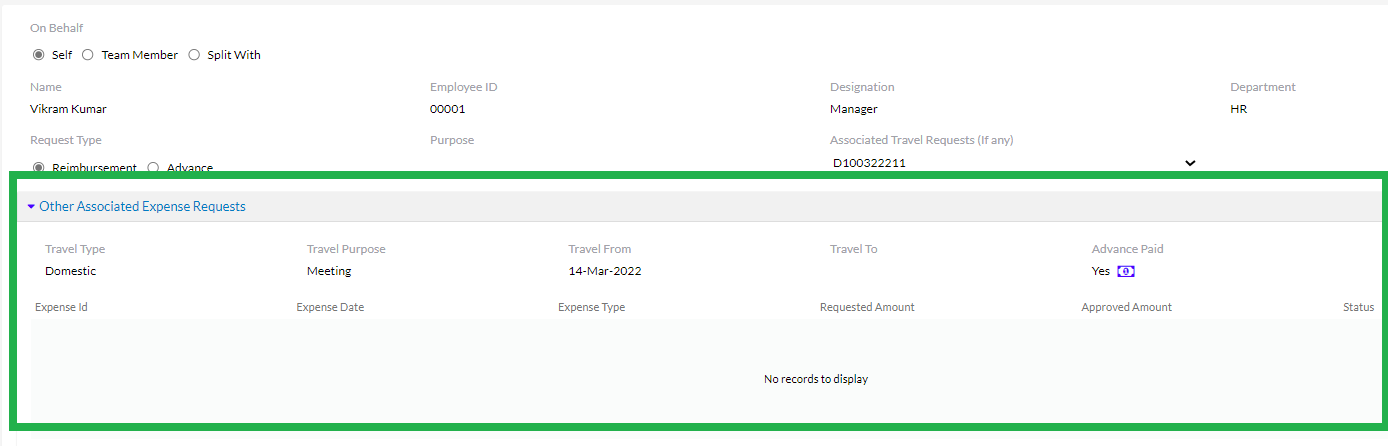
- Associated Travel Requests (if any): The user needs to select the Travel request with which the Expense request is associated.
Note: Only completed Travel Requests will be visible in the Associated Travel Requests menu.
The user needs to select the Associated Travel Request from a drop-down list as highlighted in the screenshot below.
Once the user selects a Travel Request from a drop-down list, the user can click on the Other Associated Expense Request tab to view a list of other Expense Requests that are associated with that particular Travel Request. This is highlighted in the screenshot below.
B. Expense Summary
The Expense Summary section showcases all the expenses made by the employee, as highlighted in the screenshot below.
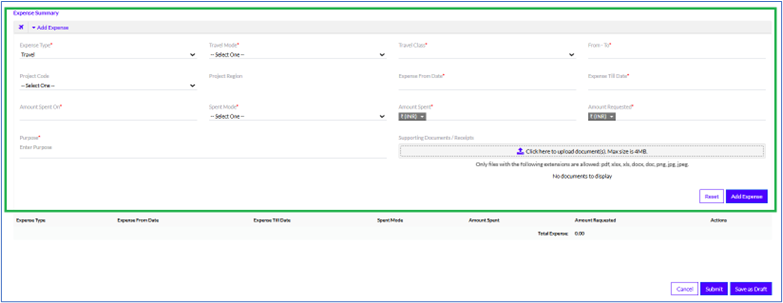
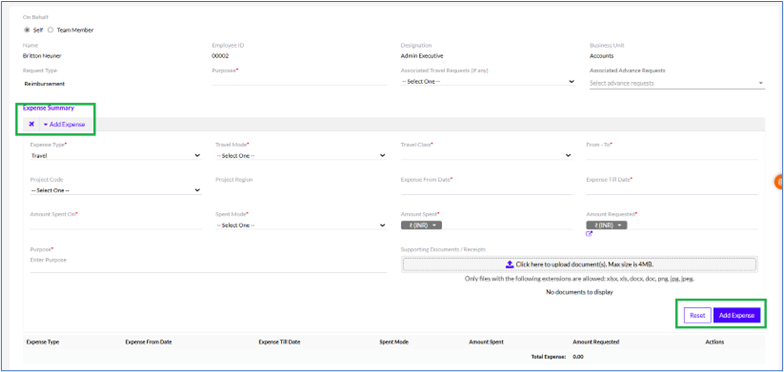
In the Expense Summary section, the user can add one or multiple expense requests, by clicking on the Add Expense tab, as highlighted in the screenshot below.
To create an Expense Request, the user needs to fill in the following details
- Expense Type: The user can select one from the drop-down list. Can be Travel, Stay, Conveyance, Food and Beverages, Medical and Health, Others, Auto Expense, Telephone and Internet, Per Diem Allowance, and Office Supplies.
- Project Code: The Project of the organization to which the cost will be charged for accounting purposes.
- Expense From Date: The date from which the employee is applying for the expense request.
- Expense Till Date: The date till which the expense request is applicable.
- Amount Spent On: The exact date on which the amount for that particular expense request was spent.
- Spent Mode: The user can select from the drop-down list. Can be Cash, Card, Account, or Cheque.
- Amount Spent: The amount spent by the employee for the purpose mentioned.
- Amount Requested: The amount requested by the employee for reimbursement.
- Notes: Any other relevant details that the employee needs to be mentioned.
Note: All the above fields are customizable and can be customized by the Admin through the Admin Configuration tab.
Note: The user can also upload supporting documents/receipts and the maximum file size supported is 4 MB. Only files with the following extensions are allowed: pdf, xlsx, xls, docx, doc, png, jpg, jpeg.
The expense type can be selected from the dropdown as given in the screenshot below.
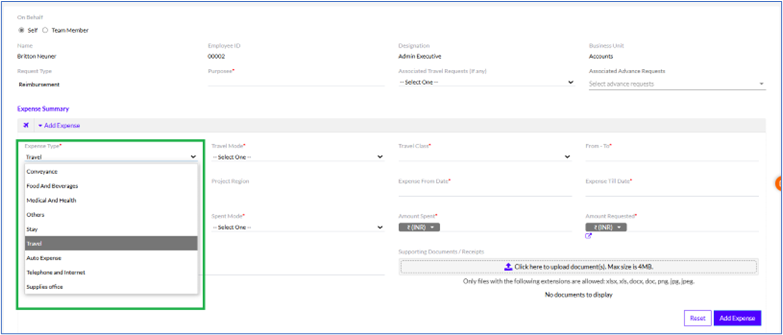
Also, depending on the expense type chosen by the employee, the user has to fill in a few other details mentioned below.
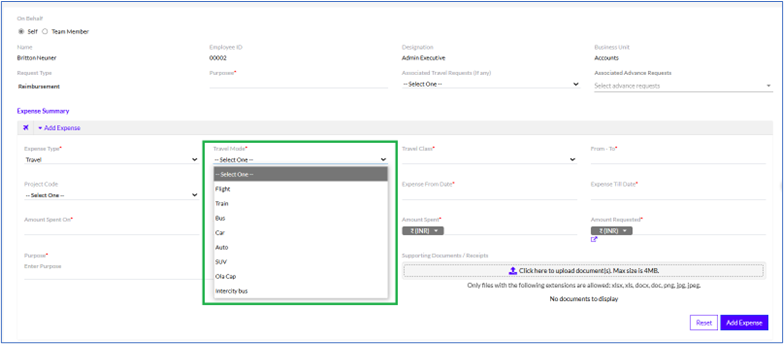
I. Travel
By clicking on the Expense tab, the user can select Travel. It refers to the expenses spent on the to and from the journey.
Once you select it, the following fields need to be filled in, as highlighted in the screenshot below
- Travel Mode: User needs to select from drop-down. Can be Flight, Train, Bus or Car.
- Travel Class: User needs to select from drop-down. Depends on the Travel Mode chosen.
- Flight: Can be Air-Economy or Air-Business
- Train: Can be 1st AC, 2nd AC, 3rd AC, AC Chair Car, Sleeper, Second Sitting
- Bus: Can be AC-Seater, AC-Sleeper, Non-AC-Seater or Non-AC-Sleeper
- Car: Can be Car-Non-AC or Car-AC
- From-To: The Departure and Arrival destinations.
- Project Code: The Project of the organization to which the cost will be charged for accounting purposes.
- Project Region: is automatically displayed as per the “Project Code”
- Expense From Date and Expense Till Date: should be selected from the calendar.
- Spent Mode: Can be Cash, Card, Account, Cheque, Corporate Credit Card, Charged to Company, or Personal Credit Card.
- Amount Spent and Amount Requested: It should be filled in according to INR or USD selection.
- Notes and Supporting Document: These are optional. Supporting documents could be up to the size 4 MB. Only files with the following extensions are allowed: pdf, xlsx, xls, docx, doc, png, jpg, jpeg.
Note: All the below fields are customizable and can be customized by the Admin through the Admin Configuration tab.
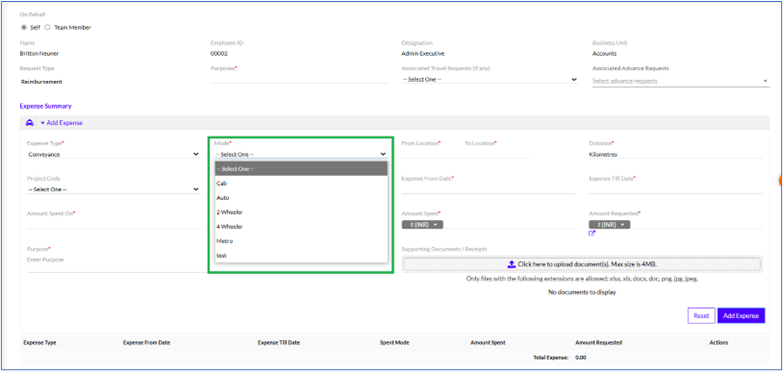
II. Conveyance
By clicking on the Expense tab, the user can select Conveyance. It refers to the expense of conveyances during the office tour.
Once you select it, the following fields need to be filled in, as highlighted in the screenshot below
- Mode: The user needs to select from drop-down. Can be Two-Wheeler or Four-Wheeler.
- Distance: The total distance of travel (in Kms).
- Rest should be filled as the “Travel”
Note: All the below fields are customizable and can be customized by the Admin through the Admin Configuration tab.
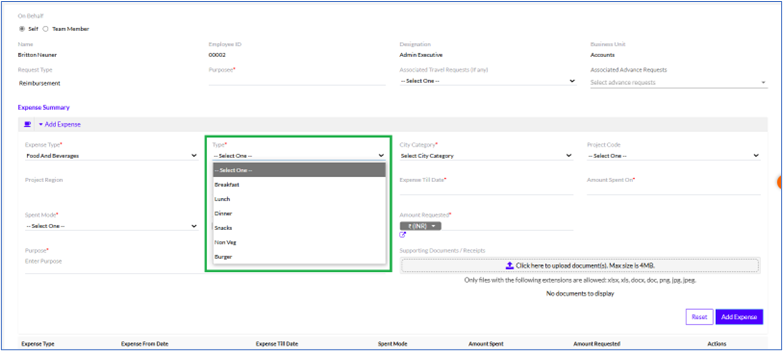
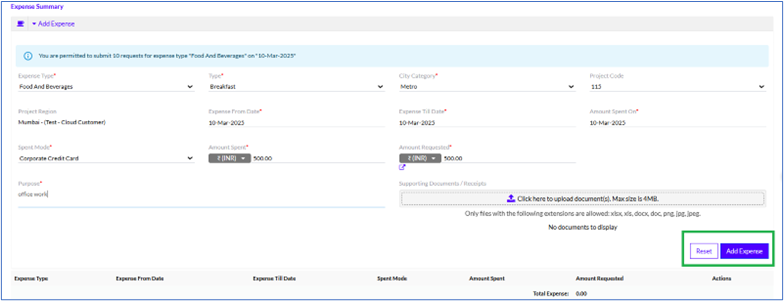
III. Food & Beverages
By clicking on the Expense tab, the user can select Food & Beverages. It refers to the amount spent on food and beverages during the office tour.
Note: All the below fields are customizable and can be customized by the Admin through the Admin Configuration tab.
Once you select it, the following fields need to be filled in, as highlighted in the screenshot below
- Type: User needs to select from drop-down. Can be Breakfast, Lunch or Dinner.
- Rest should be filled as the “Travel”
Note: All the below fields are customizable and can be customized by the Admin through the Admin Configuration tab.
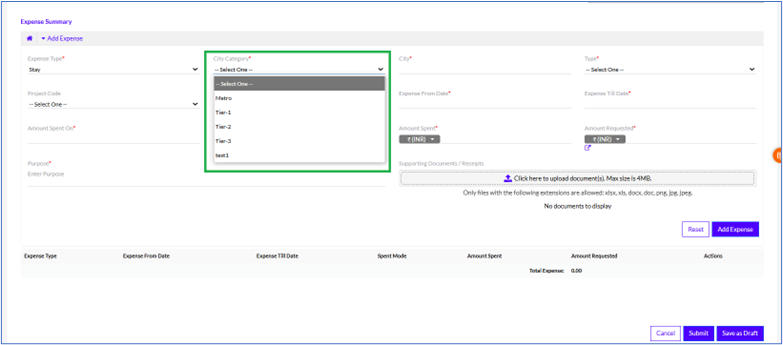
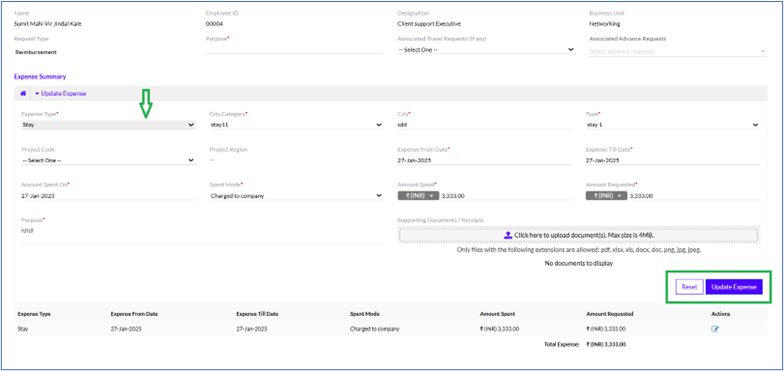
IV. Stay
By clicking on the Expense tab, the user can select Stay. It refers to the expenses spent on accommodation.
Once you select it, the following fields need to be filled in, as highlighted in the screenshot below
- City Category: User needs to select from drop-down. Can be Metro, Tier I, Tier II or Tier III.
- City: Name of the city where user stayed.
- Type: User needs to select the type of accommodation from drop-down. Can be Hotel-Standard, Hotel-3 Star, Hotel-5 Star, Hotel-5 Star Deluxe, or Guest House
Note: All the below fields are customizable and can be customized by the Admin through the Admin Configuration tab. Admin can Add Reference Data for particular expense type under manage reference data, and that data will display in expense type drop down.
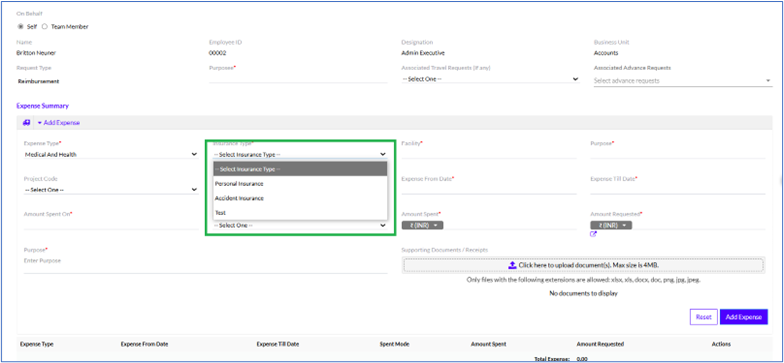
V. Medical & Health
By clicking on the Expense tab, the user can select Medical & Health. It refers to the expenses spent on medical reasons.
Once you select it, the following fields need to be filled in, as highlighted in the screenshot below
- Insurance Type: Select either personal insurance or accident insurance
- Facility: The hospital or the healthcare center the user visited for healthcare consultation
- Purpose: The purpose of the healthcare expense.
Note: All the below fields are customizable and can be customized by the Admin through the Admin Configuration tab.
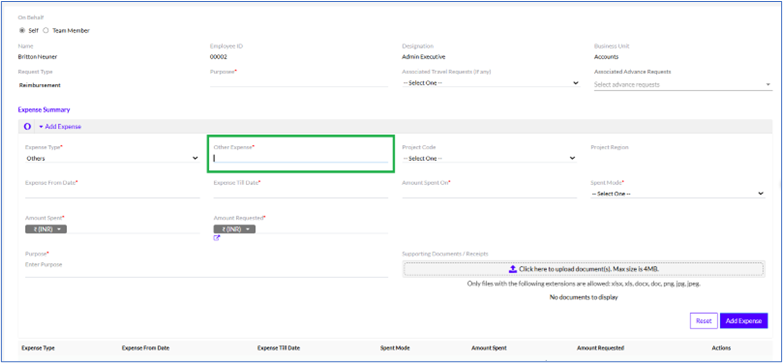
VI. Others
By clicking on the Expense tab, the user can select Others. It refers to the expenses spent on miscellaneous reasons, not mentioned in the list of types in the drop-down.
Once you select it, the following fields need to be filled in, as highlighted in the screenshot below
- Other Expense: User Needs to mention the nature of expense
Note: All the below fields are customizable and can be customized by the Admin through the Admin Configuration tab.
VII. Auto Expense
By clicking on the Expense tab, the user can select Auto Expense. It refers to the expenses spent on Auto Expenses.
VIII. Telephone and Internet
By clicking on the Expense tab, the user can select Telephone and Interment. It refers to the expenses spent on Telephone and Interment Bills.
IX. Per Diem Allowance
By clicking on the Expense tab, the user can select Per Diem Allowance. It refers to the expenses allowed per day which can vary.
X. Supplies Office
By clicking on the Expense tab, the user can select Supplies Office. It refers to the expenses spent on office supplies.
When the user adds an expense request using the Add Expense button highlighted in the screenshot below, the user can view a summary of all the expense requests added, in the form of a detailed list on the bottom of the page, as shown below.
The user can reset the expense or add a new expense by clicking the ‘Reset’ and ‘Add Expense’ buttons respectively .
Once all the required fields are filled in, the user can click on the ‘Submit’ button to submit the request. The user can also choose to cancel the request by clicking on the ‘Cancel’ button. The user may also save the request as a draft for future access by clicking on the ‘Save as Draft’ button. The buttons are as highlighted in the screenshot below.
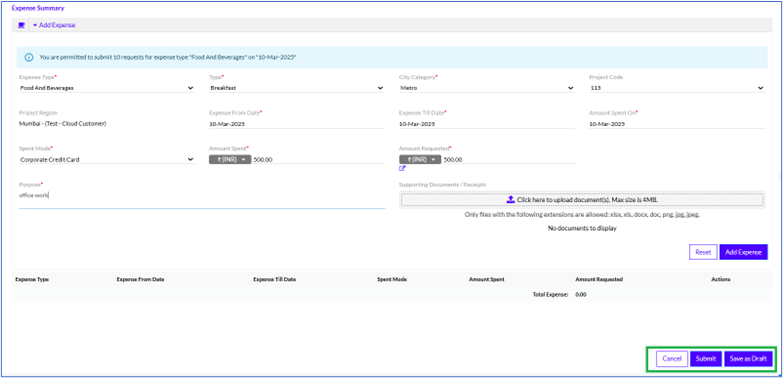
Note: When the user submits the Expense request, an email is triggered to all the stakeholders.
View Requests
The user can view their own past requests here.
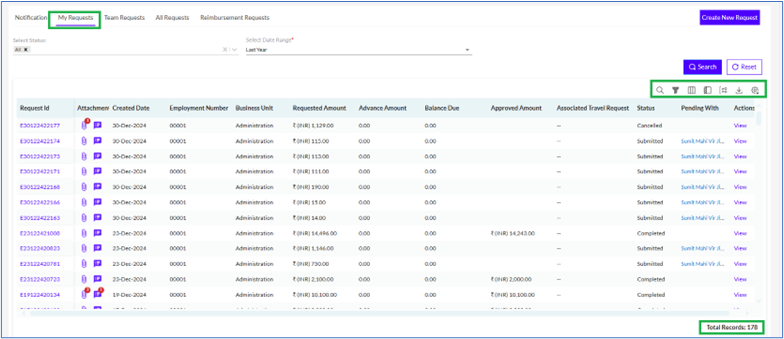
The Total Records or the total number of requests is also displayed at the bottom right corner of the page, as highlighted in the above screenshot.

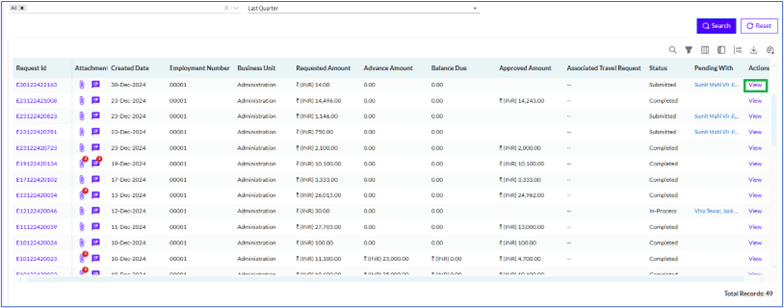
There in the Filter option, there are multiple options to Add New Filter and Remove All Filters as shown above.
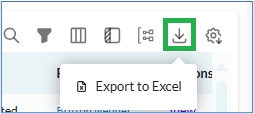
Also, the user has the option to export the list of requests to by clicking on the icon at the top right corner of the page, as highlighted in the above screenshot. On clicking it there is an option to Export to Excel.
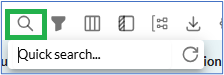
There is an option for quick search, on clicking the icon the option is displayed as shown above.
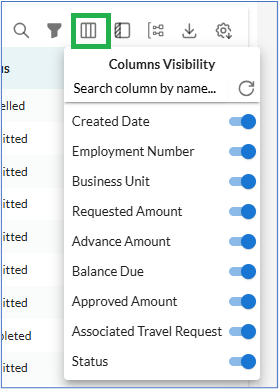
The user can also select/unselect any column header to the box above the list of records, in order to automatically sort the data based on that parameter. This is highlighted in the screenshot above.
There is also a Status column that shows the status of each request, which can be any one of the following, as highlighted in the screenshot below .
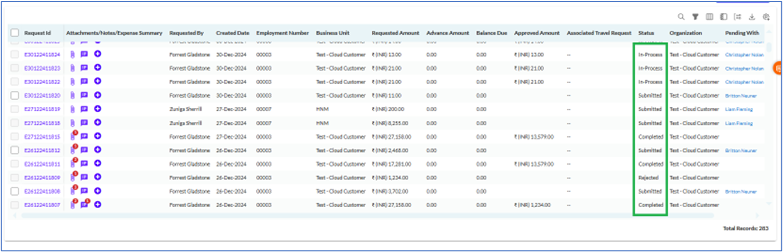
The status column in the requests has several different types as described below
- Submitted: Indicates the employee has filled in all the details and submitted the request.
- In-Process: Indicates that the request is being currently worked upon, and is not yet approved.
- Completed: Indicates the request has been approved and all the necessary actions have been completed.
- Rejected: Indicates the request has been rejected by the approvers.
- Saved as Draft: Indicates the request has not been submitted yet and has been saved as draft by the employee.
The user can click on the View button next to each request to get detailed information about that particular request, as highlighted in the screenshot below.
Clicking on the View button takes the user to the Expense Details page where the user can view all the details of the request, including the Request Type, Purpose, and Associated Travel Requests (If any). This is shown in the screenshot below
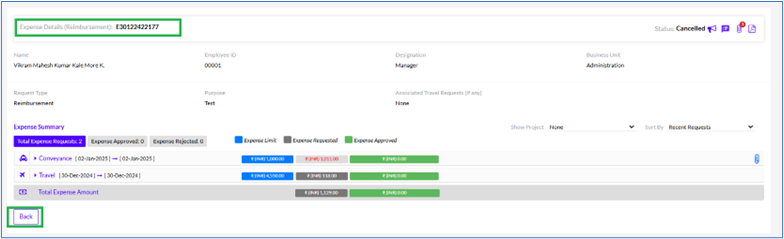
The user needs to click on the Back button to go back to the Expense Requests page, as highlighted in the screenshot above.
Edit Request
The employee or the manger who has created the request on behalf of his team member can edit the request.
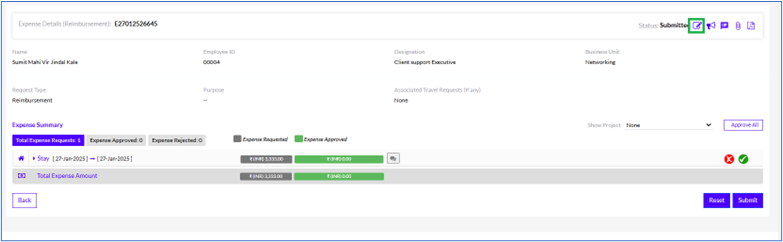
On clicking the “ ” icon the user can edit.
The Expense Type cannot be edited or the request cannot be deleted.